|
This page describes my beekeeping adventures. |

|
This page describes my beekeeping adventures. |
|
Apiary: a place where bees are kept; a collection of beehives.
Can one have an apiary in Howard County, Maryland? Yes, but only under certain conditions. These rules were set in place to help ensure protect the rights of both beekeepers and their neighbors. The following apiary zoning regulation is taken from Howard County Zoning Regulations, October 6, 2013. Doing a Google search on this text should get you a link to the official Howard County document. Mine is a copy. The section that pertains to bees is on page 360, section 128.0.N. Apiaries 1. Apiaries are permitted as an accessory use on lots containing community gardens, sites where apiaries will form part of an educational program, and on single-family residential lots; and 2. An apiary that is a permitted accessory use under this Subsection shall meet the following requirements: a. The minimum side and rear setbacks are 25 feet from the lot line, except that the minimum setbacks are 10 feet if the apiary is located as to direct the entrances away from neighboring properties and located: (1) At least 6 feet above the ground; or (2) Behind a solid fence, hedge, or other barrier that is at least 6 feet in height and runs parallel to the property line, and extends 10 feet beyond the apiary in each direction. b. Bee flyways shall be at least 6 feet above any deck or other open outdoor structure that is located on an adjoining property within 25 feet of the apiary; c. The minimum front setback is 50 feet from the front lot line; d. A water supply shall be provided to minimize honeybees from seeking water off-site; and e. Apiaries shall comply with Maryland Department of Agriculture Regulations as they pertain to beekeeping, and be operated and maintained in accordance with Best Management Practices; and 3. An apiary use may not unreasonably interfere with the proper enjoyment of the property of others, with the comfort of the public, or with the use of any public right-of-way.  |
|
I wrote the following in 2011:
From March 1, 2011 to March 29, 2011, Norma and I took a class called 2011 Beginning Beekeeping Course taught by the Howard County Beekeepers Association. Our text book was The Beekeeper's Handbook by Diana Sammataro and Alphonse Avitabile. We were motivated to enroll after learning that we could legally own an apiary on our property as a result of recent county legislation. The classes were full, with maybe 80 people per class. Some attendees were beginners while others were veterans. Many, like Norma and I, were not yet ready to commit to buying an apiary. We wanted to see what we were getting into first. Based on things I had read, it didn't sound like owning an apiary involved much work. But the class taught me otherwise. There is a great deal to consider before investing in supplies such as where and what type of bees to buy and where to put the apiary. After getting things set up, feeding, inspecting, and treating for disease and pests may take up a considerable amount of time. In the first year, one may not even get any honey and if one does get any, it will probably be little. Would it all be worth it? Hard to say. Norma and I both enjoy nature and are fascinated by things like bees. We enjoyed taking the class. Even if we never own a apiary, the knowledge we obtained will add to our appreciation of God's little creatures. Ideally, I would like to own egg-laying chickens and a fish pond but we'll need a lot more property to make the latter happen. But bees are most certainly a do-able hobby. Maybe once we get our house in order, we will consider an apiary more seriously. Shortly after our class ended, we saw several members from the club at the Howard County Greenfest on April 2, 2011. They were out recruiting new members and educating folks as to why beekeeping is good for the environment. I hope they were successful. Whether or not Norma and I will take up beekeeping remains to be seen. But even if we don't, our time was not wasted. We now have a much deeper appreciation for bees and their keepers. Fast forward four years. I re-took this course with my good friend Sara in early 2018. I intended to have two hives early in 2019. Here it is 2020 and I still don't have hives. Shame on me. In 2021, everything changed and I finally got bees. It was a big decision and basically, I ran out of excuses why I should put things off. |
|
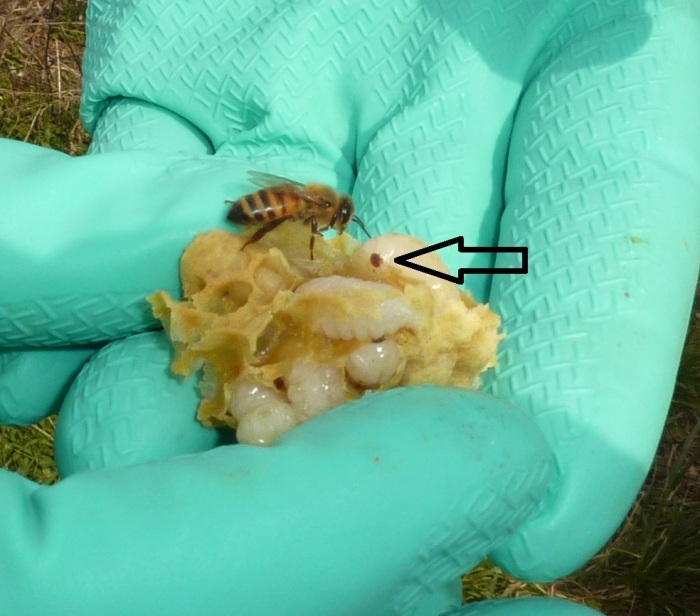
After our 2011 class ended, several of the experienced beekeepers invited us to see their hives. Closest to our home in Savage was Charlie B. who owns an apiary at Gorman Farms. He also owns the presidential apiary at the White House (at least he did in 2011). These are special bees with high level security clearances.
On April 3, 2011, Norma and I paid a visit to Gorman Farms and got a close-up view of Charlie's bees. 1 / 6

The apiaries of Gorman Farm.
2 / 6
Brood cells to grow new bees.
3 / 6
Capped cells store honey.
4 / 6
Charlie blows smoke to calm bees.
5 / 6
The queen is larger than the workers.
6 / 6
Workers circle the queen.
Once the queen is found, it is good to mark her with paint to make identification easier. This is done by placing her between mesh wire and a sponge. A paint brush with paint is then inserted between the wires in the mesh to put a dot on her. 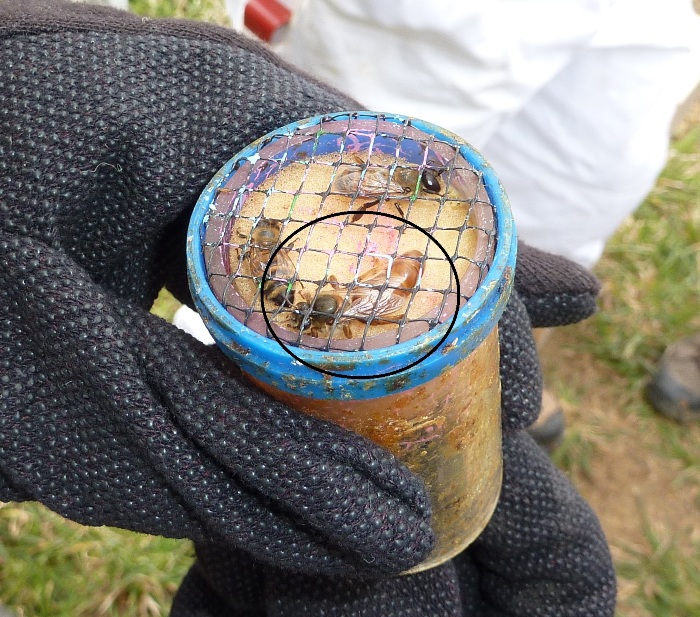
After the workers build comb, the queen lays eggs in the cells...one per cell. 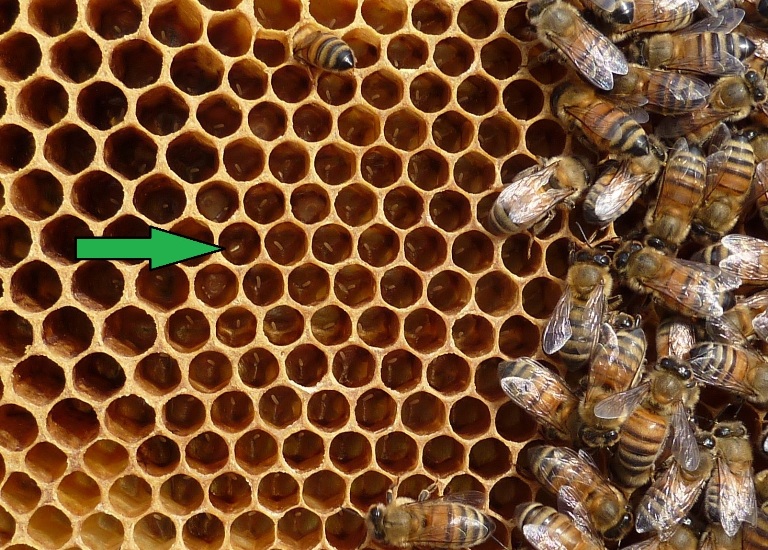
Eggs hatch into larvae. The larvae grow and eventually, their cells are sealed up. 
After the larva mature, they turn into pupa, then eventually become adults. For these freshly hatched drones, their first adult memories will be of getting their photo taken. 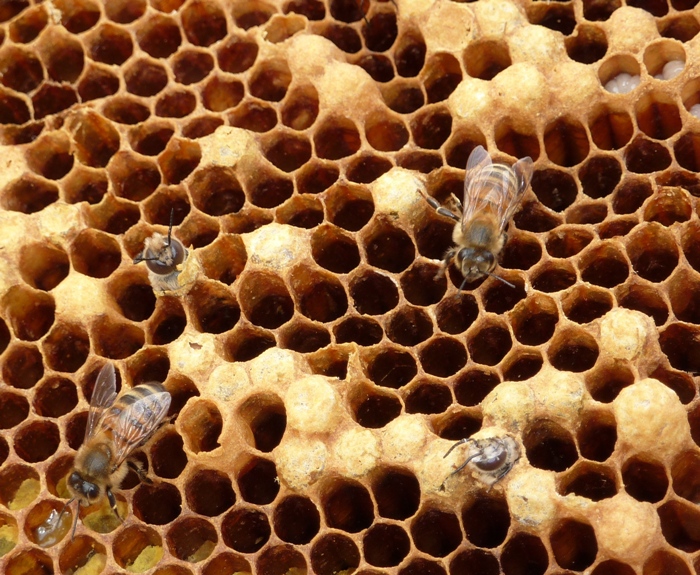
According to Lifespan of a Bee, the queen can live from 2-5 years. The drone lives 40-50 days. Workers live from 1-4 months. In this photo, dead bodies litter the floor of the hive. 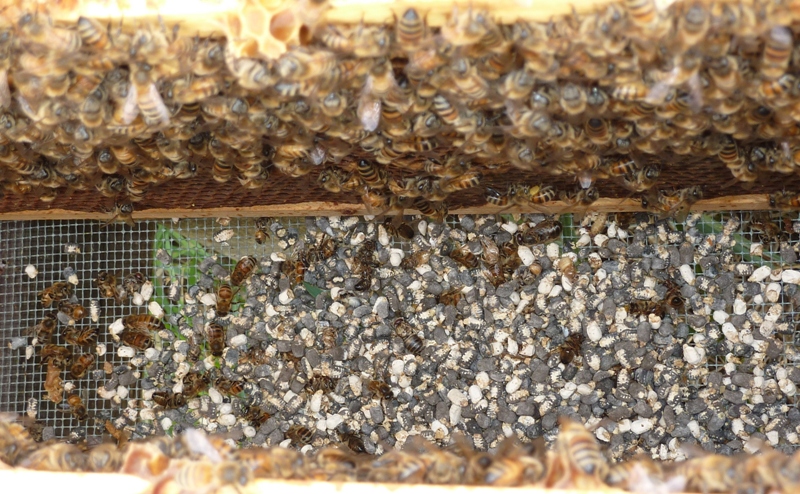
1 / 4
Drones are larger than the workers.
2 / 4
The dot on this drone larva is a mite.
3 / 4
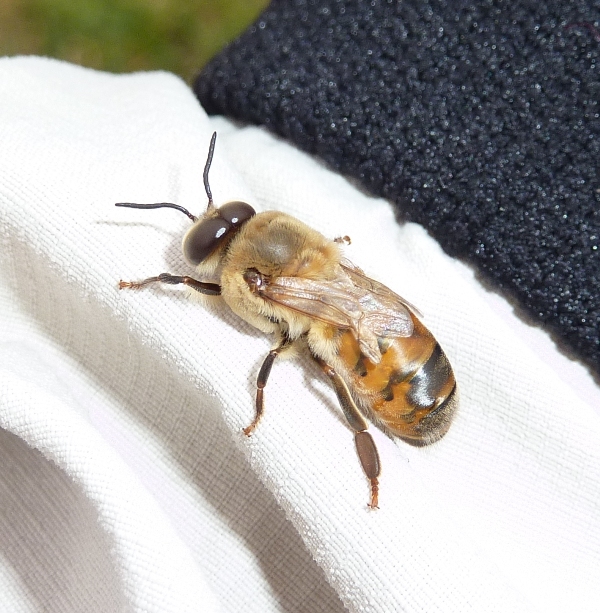
Drone with small wings; not good.
4 / 4
Feeding bees with sugar water.
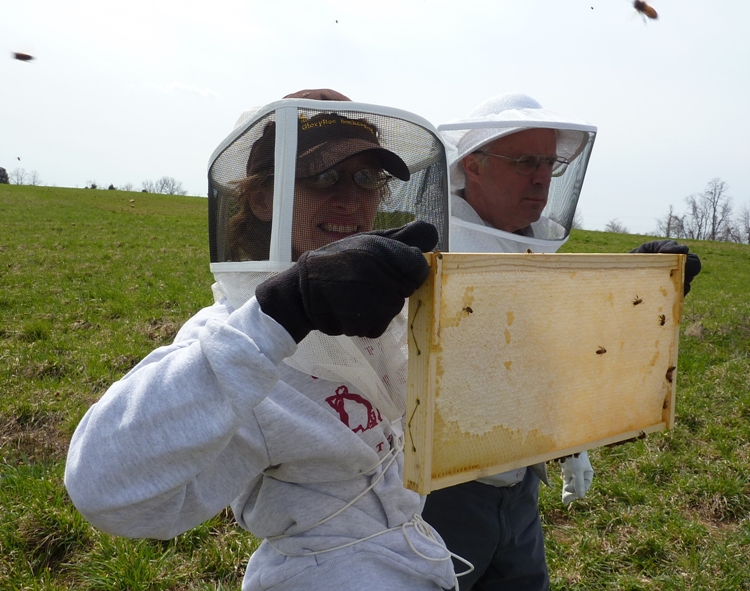
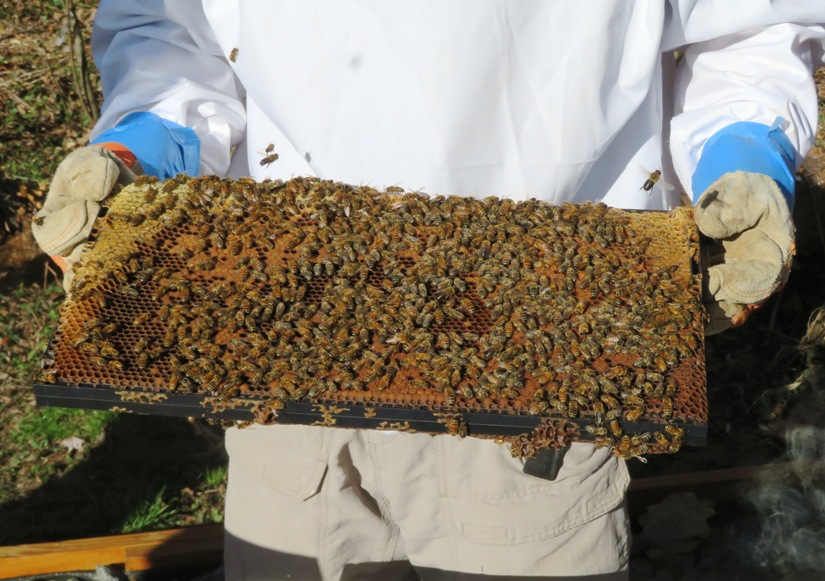
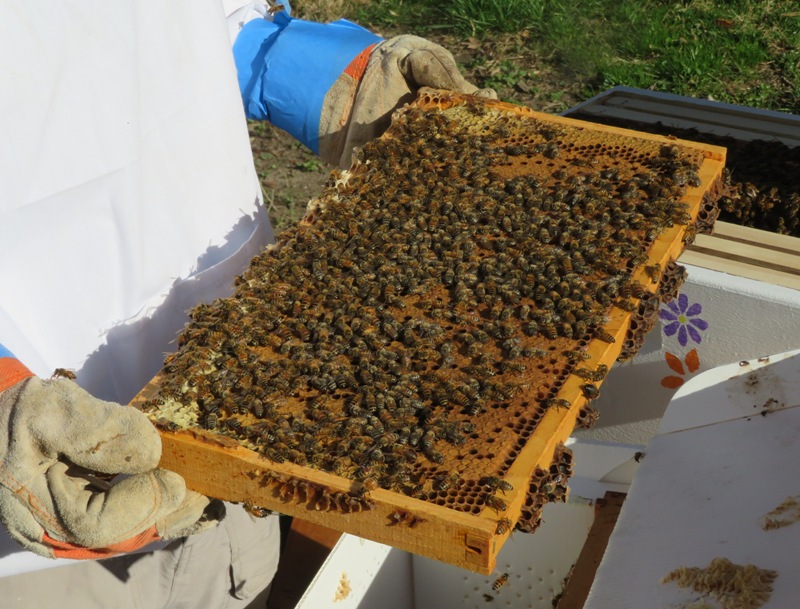
In addition to helping the environment, Charlie wants his bees to make a surplus of honey so he can take some. So he feeds them a mixture of sugar and water. This also helps get them through the times when nectar production is low. If things go right, then his bees will produce frames full of honey, like the one that Norma is holding in this blog's cover photo. |
|
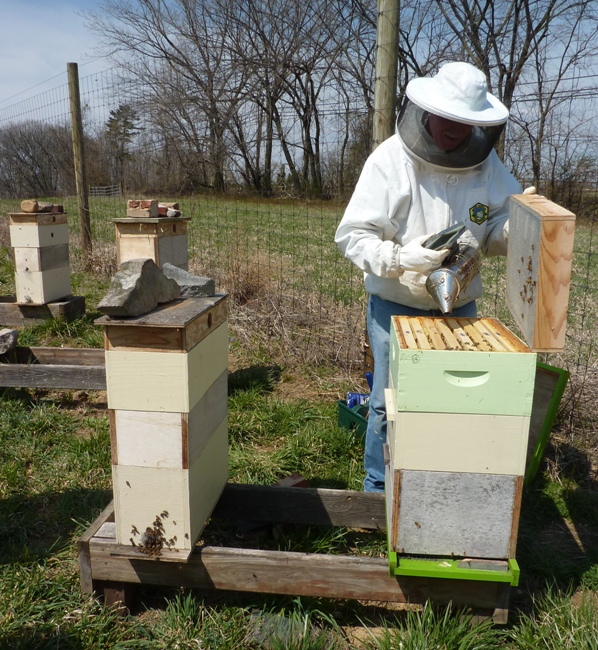
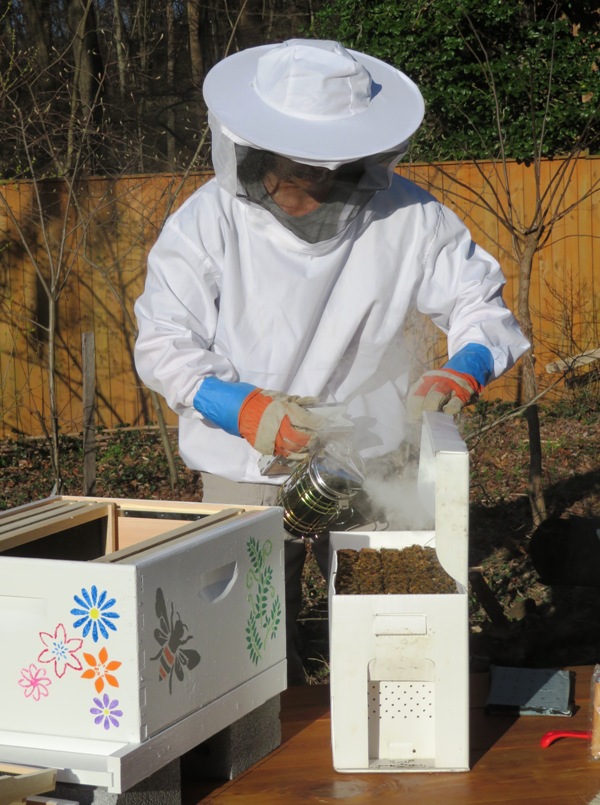
After having completed the classroom sessions of the Howard County Beekeepers 2018 Beginning Beekeeping Course, Sara and I did our field day visit to a hive in Dayton, Howard County. This was at the house of Robert S. Robert has had bees for several years. Last winter was tough and he lost quite a few bees to small hive beetles.
To prepare for this April 28, 2018 event, I purchased two Bee Keeping Suit, Jacket, Pull Over, Smock with a Veil by VIVO (BEE-V105) at $25 each. Sara and I wore gloves that we taped (using painters tape) to our shirt cuffs to close off any bare skin openings. I also wore military boot bands to keep bees from flying up my pant legs. There were five students in our group. Only one of us (a woman in Fulton) already had bees. Before we all approached Robert's two active hives, he smoked them using dry pine needles. This makes the bees hungry and passive. But since it was somewhat early and not too hot, they were calmer than normal. 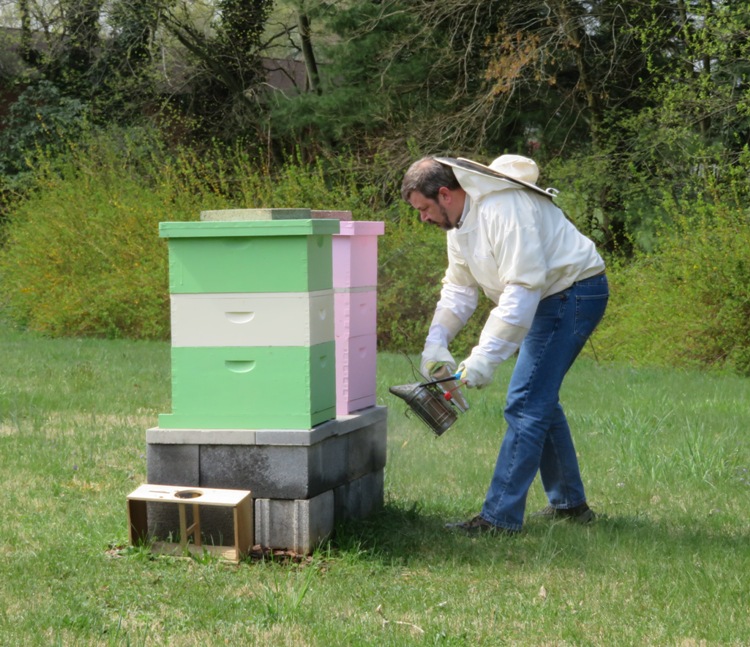
I stood in a location to get good photos but this was not a good place to stand from the bees' point of view because I was in their flight path. Below, bees enter and exit the hive through an entrance reducer. This helps keep predators out. Another thing that helps (according to Robert) is putting diatomaceous earth on the ground around the hives. Then cover it with some mulch to keep it from blowing away. It will kill bugs that crawl. 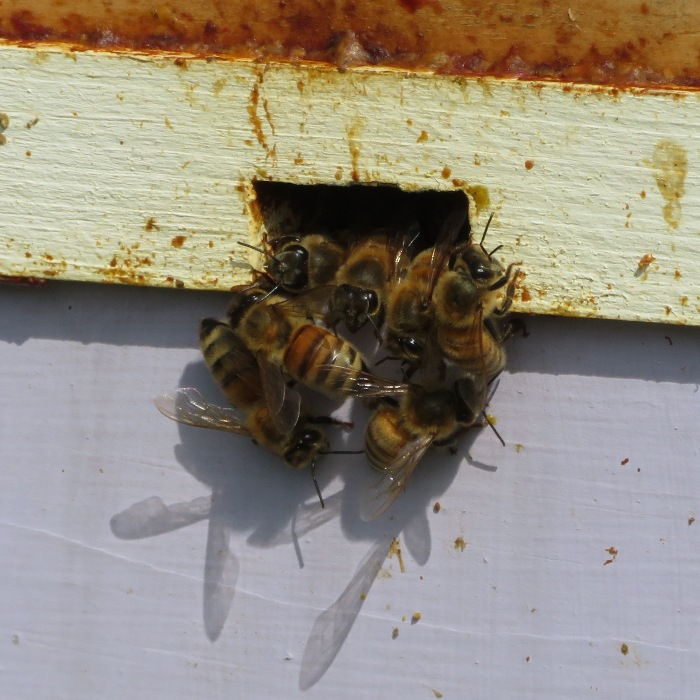
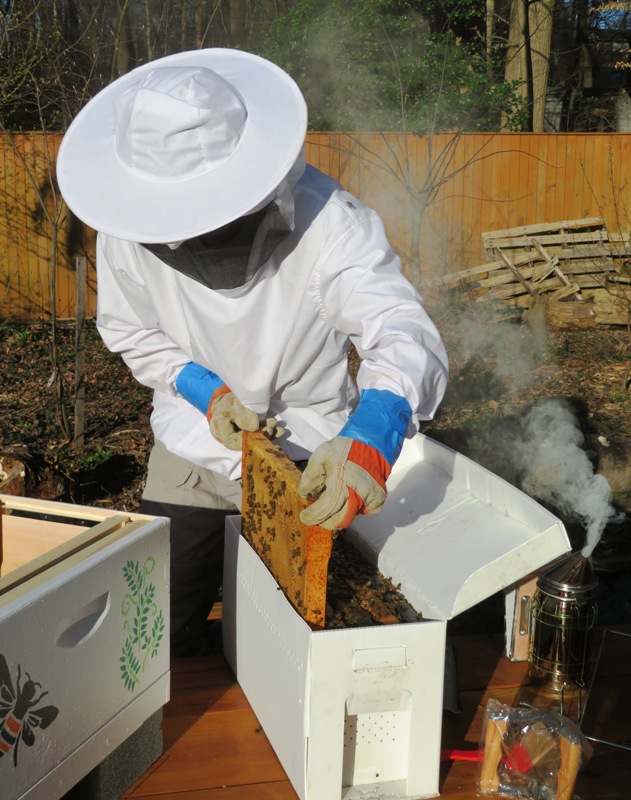
Robert was providing a pollen patty and sugar water to his bees via a feeding bucket. Both were under the top cover which was weighted with a brick. He noted that after filling the feed bucket, it should be inverted away from the hive to keep sugar water from getting on the bees or frames. In another hive, we saw fondant that he fed to them. Robert used his hive tool to pull out some frames to show us. 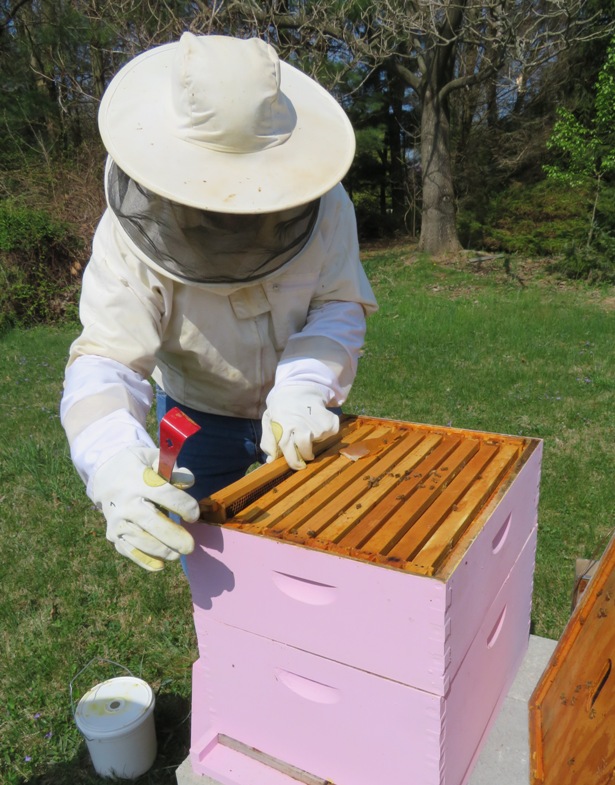
He started from the outside and worked his way in. The outer frames had less comb and activity. In the frame shown below, the bees are building comb away from the foundation. If I have bees doing this, it might be a problem if I have a flow hive. But if I buy this (~$600), then I won't need to buy a honey extractor (~$150). It seems really cool but I need to do more investigation before I make a decision. 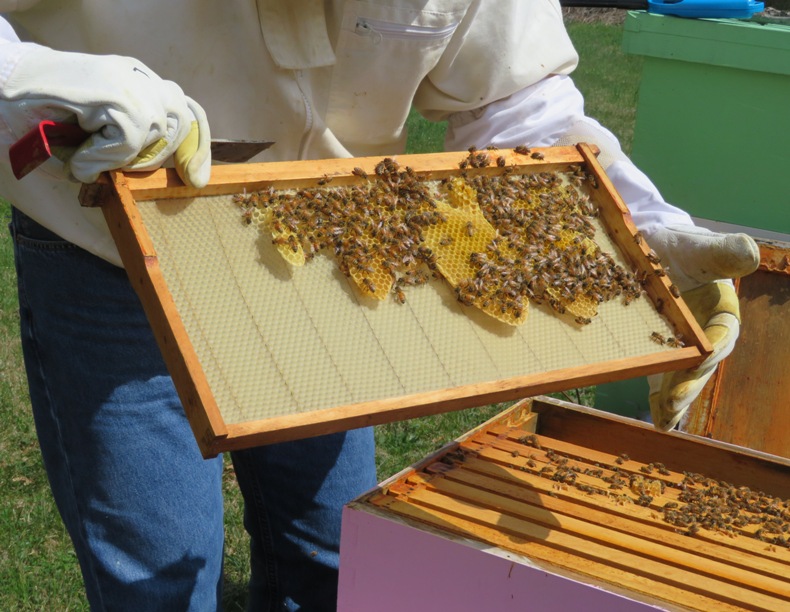
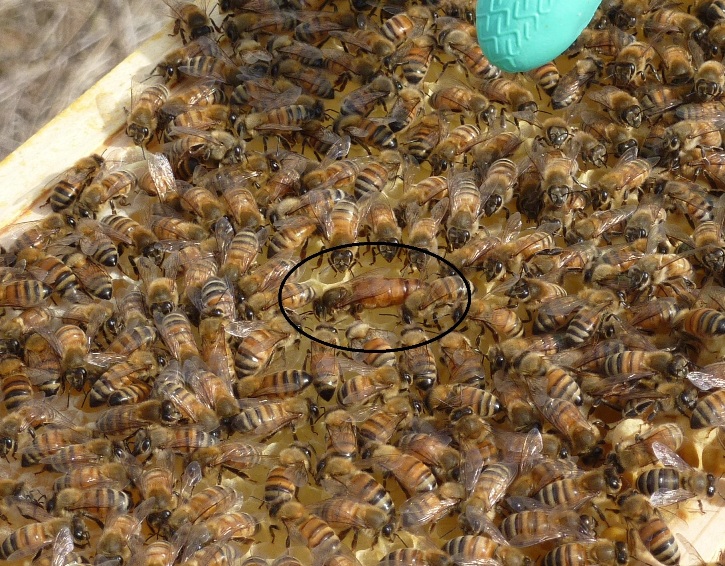
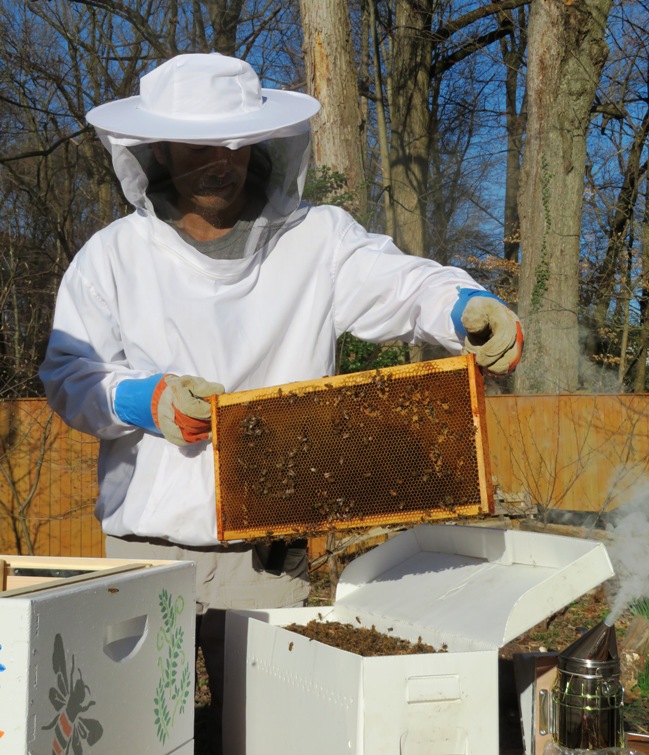
In one of the more inner frames, we saw lots of activity and located the queen, which I believe I have circled below. 
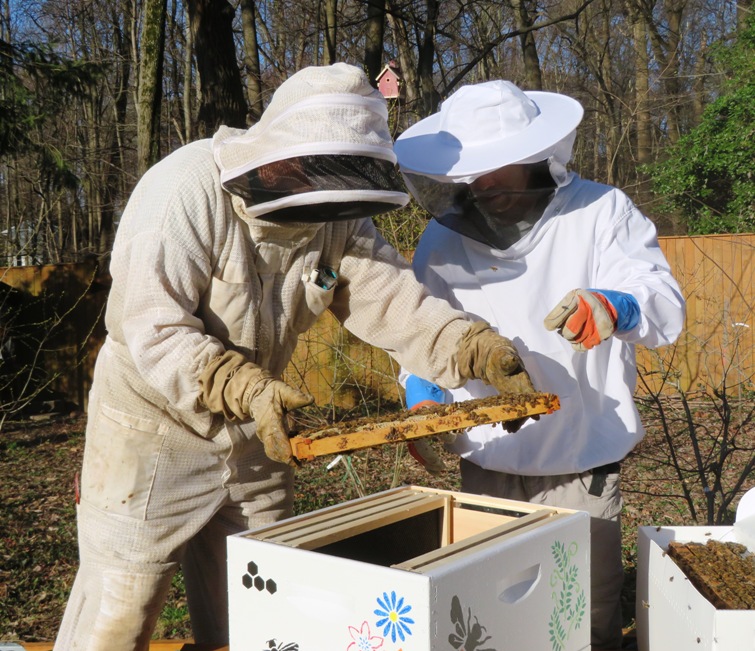
Robert also showed us the hives that failed late last year. There was evidence of mouse damage and wax moths. I wonder if my chickens might help keep mice under control. Robert did a lot of work to plant various things that bees love, including an almond tree. I believe he said he didn't get honey in the first year but in the second year, he got 30 pounds. I don't remember how many hives that was from. We thanked Robert for opening up his back yard to us. How was the bee suit? Well I'm glad it isn't heavy. Those things can get pretty warm. It seems to be made well. There are the really inexpensive ones and there are really expensive ones without a whole lot in between. The ones I bought lean towards the cheap side. It is fine when looking down but I found the bill of the hat had a tendency to pull downward so I kept pushing it up. Otherwise, it was o.k. |
|
Bees are essential to the human food supply. Scientists estimate that one out of every three bites of food eaten by humans exist because of pollinators like honeybees.
On August 30, 2019, our County Executive, Dr. Calvin Ball, passed an executive order proclaiming Howard County, Maryland to be a Bee City USA affiliate. This means the county is taking steps to create sustainable habitats for bees.
Ball said Howard County is one of the first counties in the nation to join the coalition, and according to WBALTV - Howard County becomes bee sanctuary county, he pledges to renew Bee City USA certification every year. Here in Savage, I am doing my part to support the honeybees. But I was slow to get started. Recall that I took the 2011 Beginning Beekeeping Course taught by the Howard County Beekeepers Association in 2011. I learned that there is a lot more to bees than chickens and then decided to get chickens instead of bees. After becoming comfortable with chickens, I once again considered getting bees. But too much time had passed after I had taken the beekeeping course. So I took it again in 2018. Was it time to get bees now? I was hesitant. But in 2021, I simply ran out of excuses and realized that there would never be a better time for me to start beekeeping. Here's why. Clearly, the time was right for beekeeping, so in early 2021, I became a beekeeper. |
|
I watched YouTube - Beekeeping for Beginners -- Hive Set Up and YouTube - First Year Of Beekeeping (basic equipment) starting your beehive. Based on this and talking to Brian C., I determined that I needed to acquire the following:
Brian really provided me with a lot of stuff. I'm guessing he saved me $300. I built an area to put the hives that would be level, solid, well drained, and keep an adequate distance between the hives and me when I am mowing. I spent about $300 in supplies for this. Other things that I didn't necessarily "need" to acquire but I did include: So far, I am pretty pleased with the paint and urethane. In the first year, it held up well to weathering and didn't fade. |
|
I got two hives. That seems to be standard for beginners. This way you can compare them and more easily determine if something is wrong. Where should I put them? The first consideration is my county's zoning requirements. Since I have a six foot tall privacy fence, anywhere in my back yard that is at least ten feet away from the fence will do. Things suggested for hive placement are
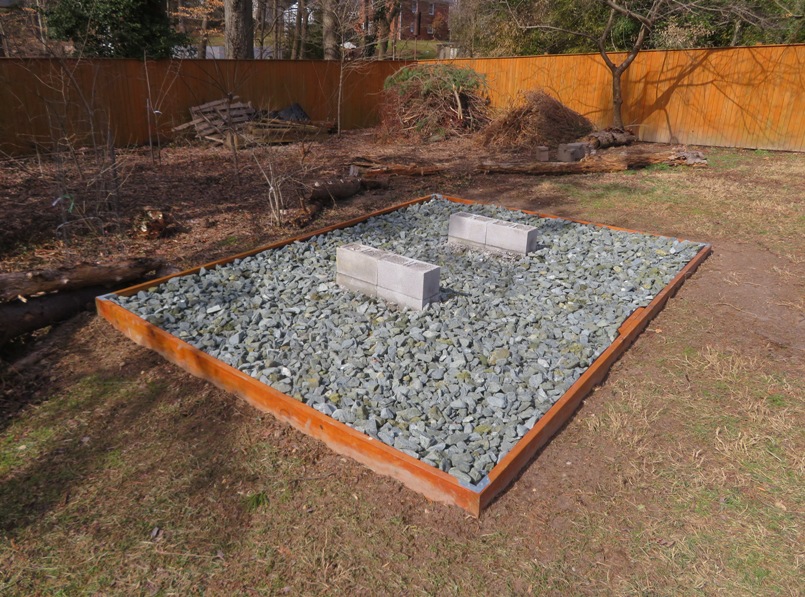
In the Baltimore area, prevailing winds generally come from west by northwest. Many experienced beekeepers suggest that the entrance of a beehive ideally should face towards the south or to the east. The southern exposure makes sense. During the winter months - at least in the northern hemisphere - the sun sits low on the southern horizon. The direct rays of sunshine on the entrance during the late fall and early spring enable a beehive to potentially gain some sunlight and extra flying hours. An eastern exposure is also valuable because when facing east, the bees tend to get an earlier start on foraging throughout the season regardless of the angle of the sun. - from Wildflower Meadows - Which Direction Should Beehives Face For Best Pollination? Regarding placement on our property, Norma and I agreed that putting the apiary due west of the shed and due east of the bee-loving winterberry bush is ideal. We figure this bush will get about eight feet high and eight feet wide. That means a four feet diameter. If I allow three feet of space between it and the apiary, then that means at least seven feet east from the trunk of the bush. This location will allow lots of morning sun from the southeast, shade from the deciduous trees to the west which will lose their leaves in the winter, and wind protection from the nearest fenceline which lies to the north and west. This location will be considerably further from our closest neighbor than the zoning requirement minimum. I built a foundation to provide an area giving me at least three feet around the hives in all directions. This foundation isn't raised much from the surrounding ground but it has weed cloth and gravel placed on top of that to prevent vegetation from growing and to ensure good drainage. On top of this, I placed cinder blocks and a table/platform to raise the hives 16 inches to prevent moisture buildup and make the work more ergonomic for me. The table is easily strong enough for me to stand on which will make lifting a honey-filled box much easier for my short stature. How far apart should I space the two hives? I usually recommend at least two feet between hives. - from Honey Bees Online - Frequently Asked Beekeeping Questions. Regarding the distance from my lawn to the hive, how close can I safely mow without fear of being stung? I have not been able to get an answer from any professional with a beekeeping website...just answers from people that post to forums. Their answers vary considerably between six inches and 30 feet. But one thing that multiple people have mentioned is that bees hate gas powered weed whackers more than mowers, possibly because of the high pitched sound. The best time to mow the lawn and not get stung by a bee is before 9a.m. or after 5p.m. - from GreenPal - When is the best time of day to mow and not get stung by a bee? My later personal experience is that mowing or weed whacking near the hive is best done a little after dusk. Do it when you can still see but the bees are getting ready for bed. Cool days are best too. Reiterating what was mentioned above, Proper beehive placement is important to reduce the risk of hive drifting and to allow easy access to the hive for inspections. If you are wondering how far apart beehives should be placed, it is a good rule of thumb to place hives 2 feet apart. - from Complete Beehives - How Far Apart Should Beehives be Placed? The base of a hive varies in size depending on the maker but 22"x17" seems to be at the larger end. I decided to build an elevated 8'x3' platform aligned north/south on which to place the two hives. They would face southeast. I dug out a 14'x10' perimeter in which ground contact pressure treated wood would be placed to hold gravel to level the area and help with drainage. Then I created a base for the platform by digging out an area, tamping gravel, and inserting cinder blocks, and pouring concrete to hold the cinder blocks in place. The photo below shows what it looks like before the concrete on January 14, 2021. Getting things perfectly level took a VERY long time but I've done enough retaining wall work to know what I was getting into. Do it once, do it right, never do it again...because if it isn't perfectly level, you might very well have to do it again someday. 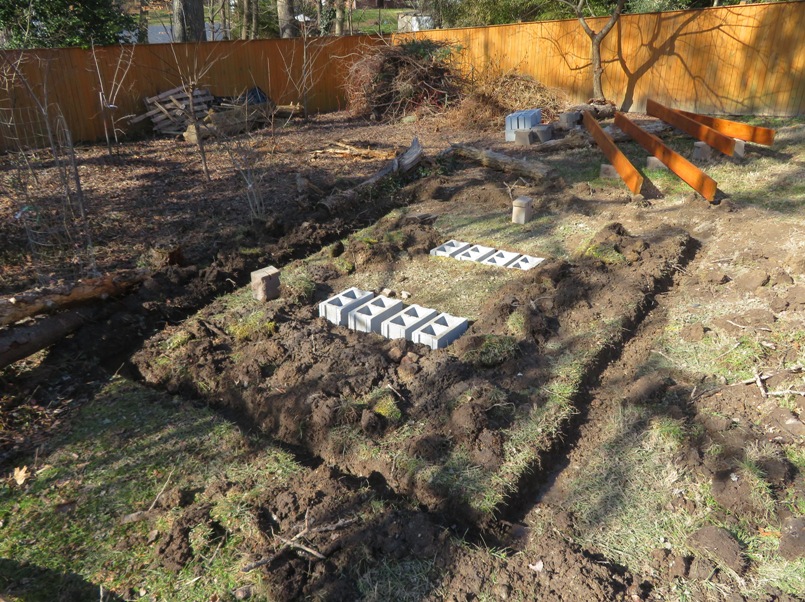
Next, I poured concrete around the cinder blocks. Then I installed and stained the border. I also leveled the ground. 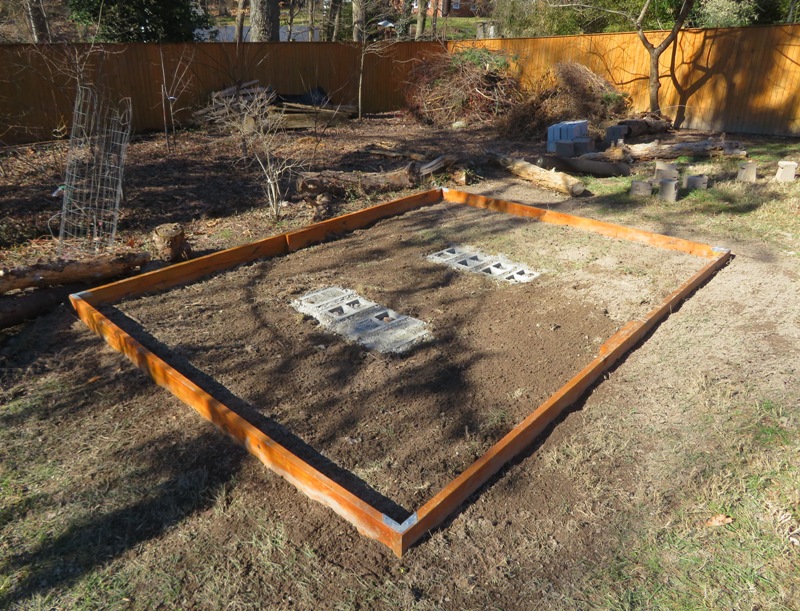
After that, I put down landscaping (weed) cloth. I spray painted marks to indicate where the concrete and cinder block foundation lies. I also used kevlar thread to sew together three sections of landscape cloth. 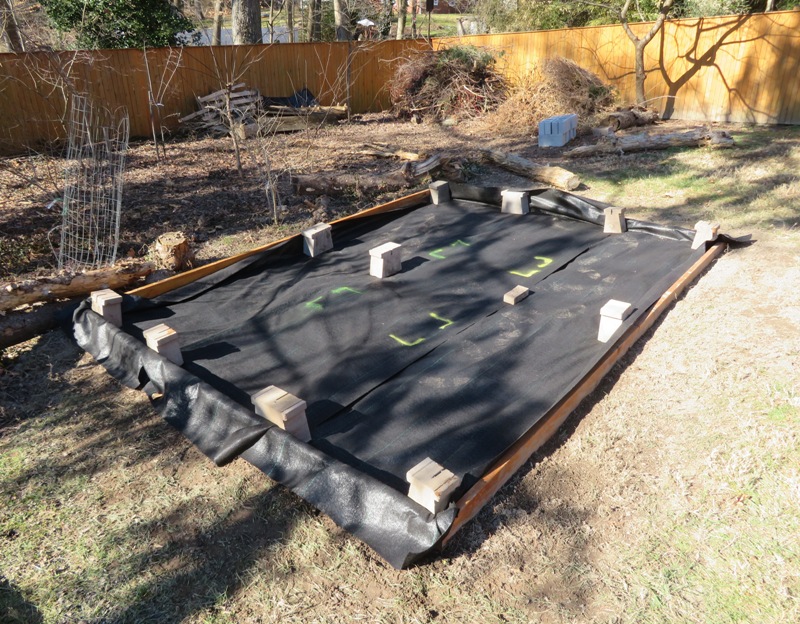
When I wasn't working outside preparing the foundation, I was inside getting things painted. 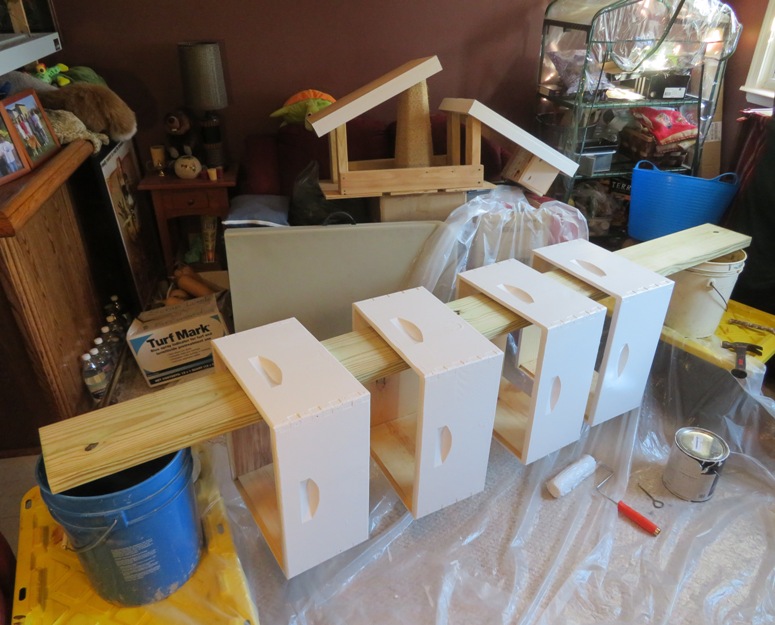
Implementing a bit of Saki-style, I did a lot of stenciling to make things look pretty. 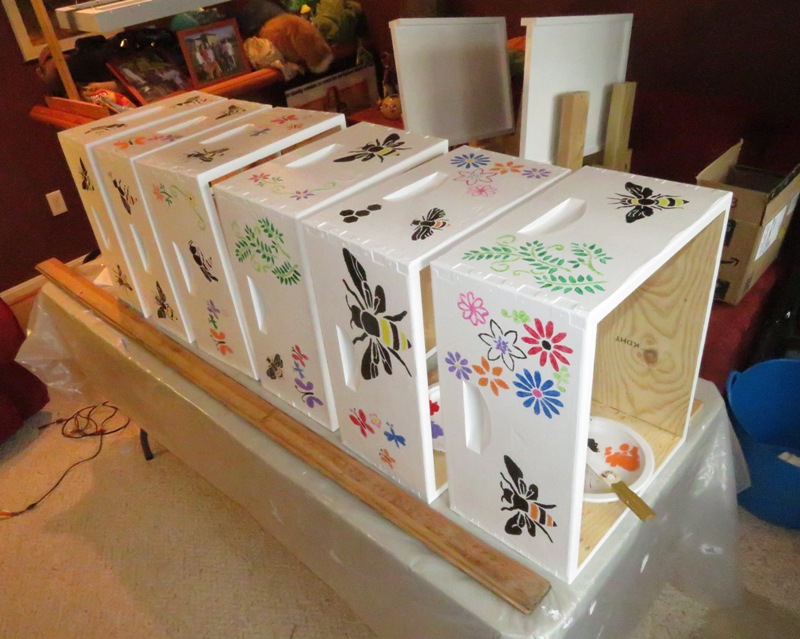
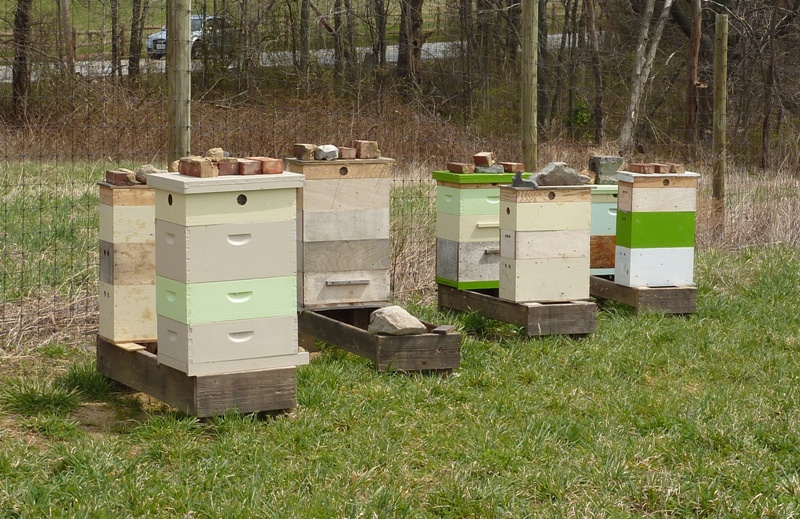
In this blog's cover photo, you can see that I filled the border with gravel. This levels the ground and provides good drainage. I built and stained a table platform to elevate the hives. 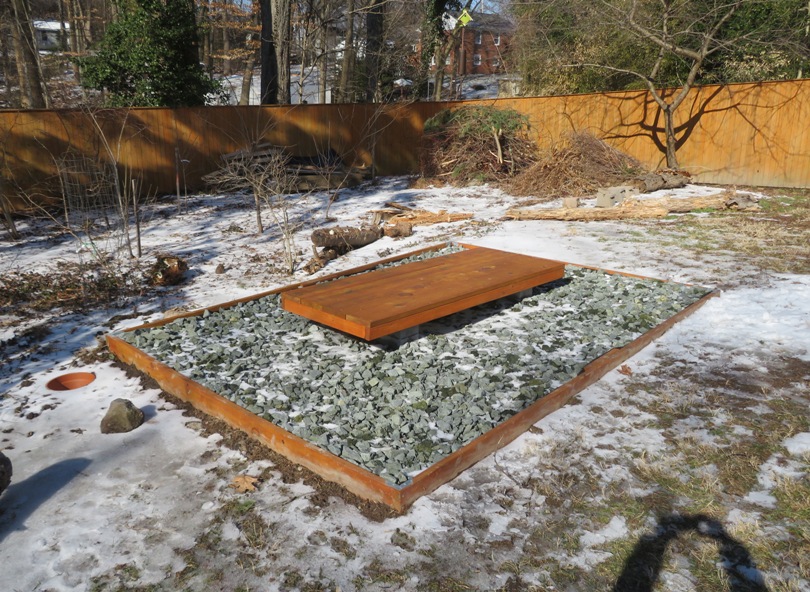
At the beekeeping class, one of the instructors said that bees are a gateway for chickens. For me, it is the other way around. It is all part of my master plan for building a small homestead. 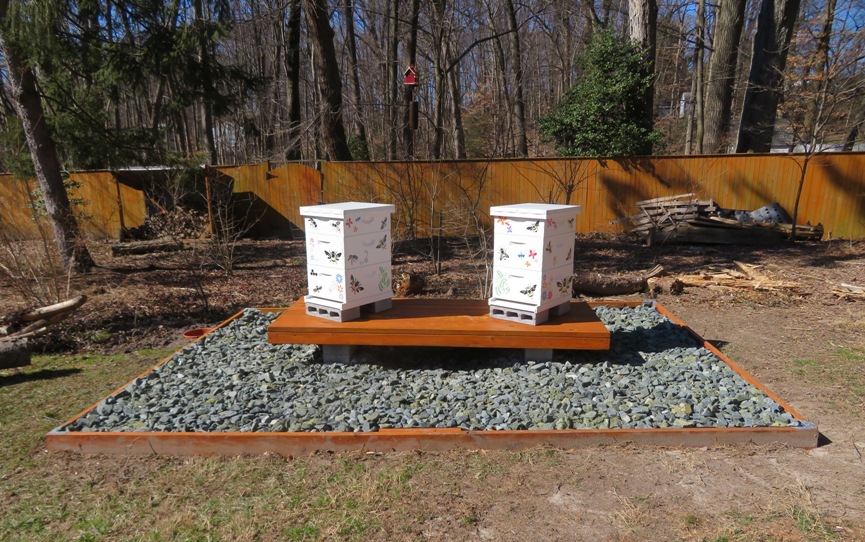
Here we have the hives and hive stand in the morning sun. Each box will contain ten wax-coated foundation frames where the worker bees will draw comb. The comb will be used by the queen to lay brood and for the workers to store honey. In the first year, I don't expect to get any honey but after that, maybe. 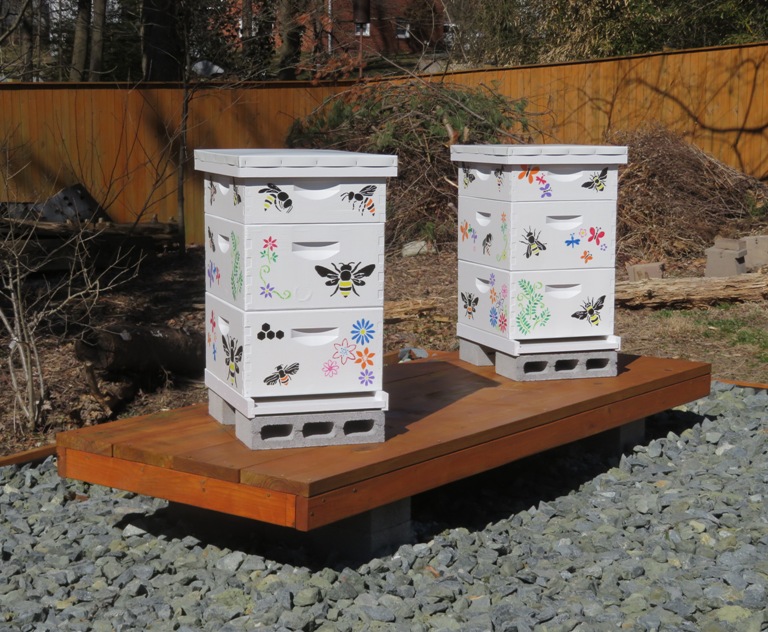
I have two "nucs" (nucleus colonies) on order from Western Maryland Apiaries in Frederick, Maryland. They should arrive in early April. I am ready for them. Do I look ready? 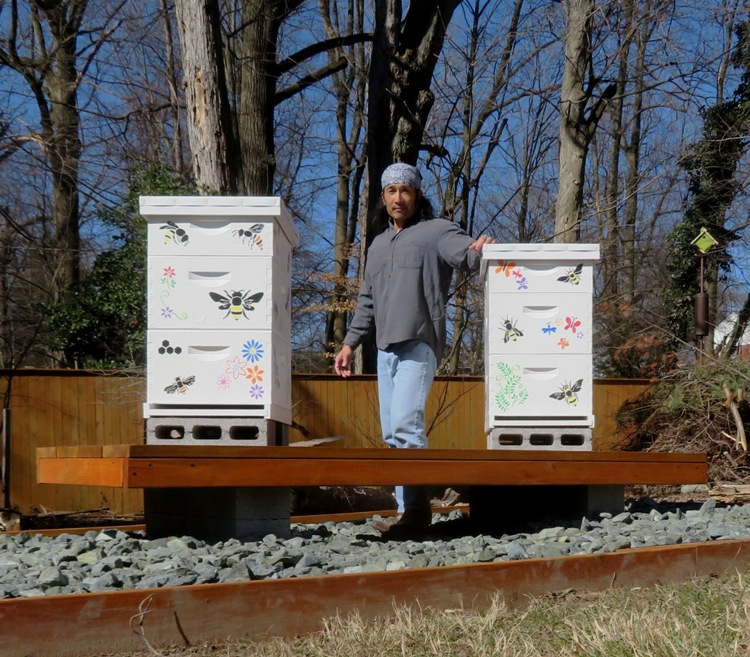
|
|
When purchasing bees, the two main choices are a package or a nuclear colony (aka nuc). I went with the latter. They cost more but are more mature, so they have a better chance of survival.
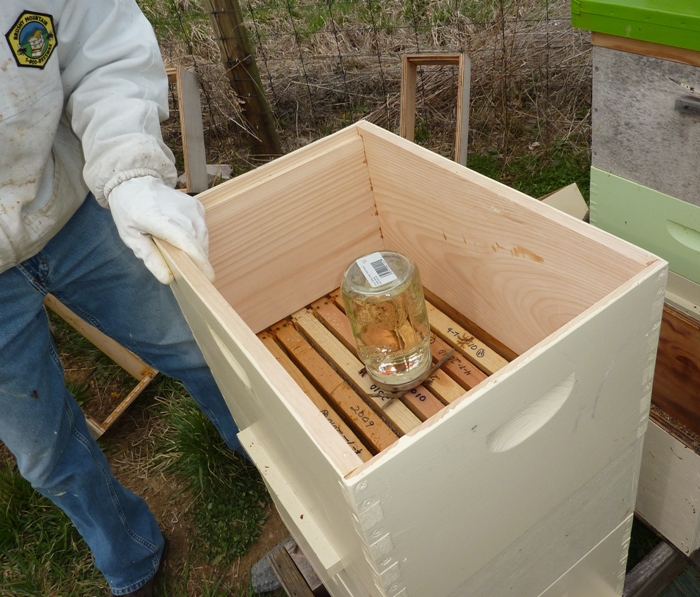
A nuc is a partially developed colony. That means that they already have some food stores built up, but they don't have a proper home yet. A package is a box of bees that can be sent through the mail. - from BeePods - Nucleus Colony or Packaged Bees – Which is right for you? I ordered my nucs in late January 2021. Then in late March, John Klapac (a local bee expert) told me that some arrived and were almost bursting at the seams. I scheduled a pickup for March 26, 2021. Norma and I made a date out of it. We drove out to Frederick with Daphne and picked up dinner at Burger King. Then we explored some trails out by the Monocacy River. John didn't want us arriving any sooner than 1930 because the bees go back to the hive at dusk which was around then. It was my first time meeting John. Unlike kayakers, I haven't determined if beekeepers have a certain "look." We loaded up three nucs and a queen (in a small cage) in my car. I purchased two nucs while one nuc and the queen was for Brian, whose order I was picking up. John told me they were Italian bees from Georgia (the state, not the country). 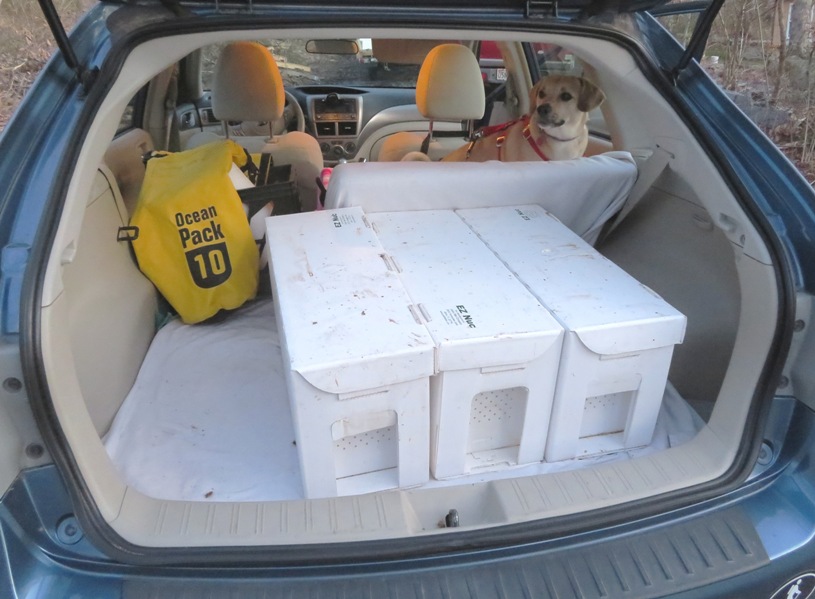
Below, I'm holding a box containing the queen and a few of her workers. 
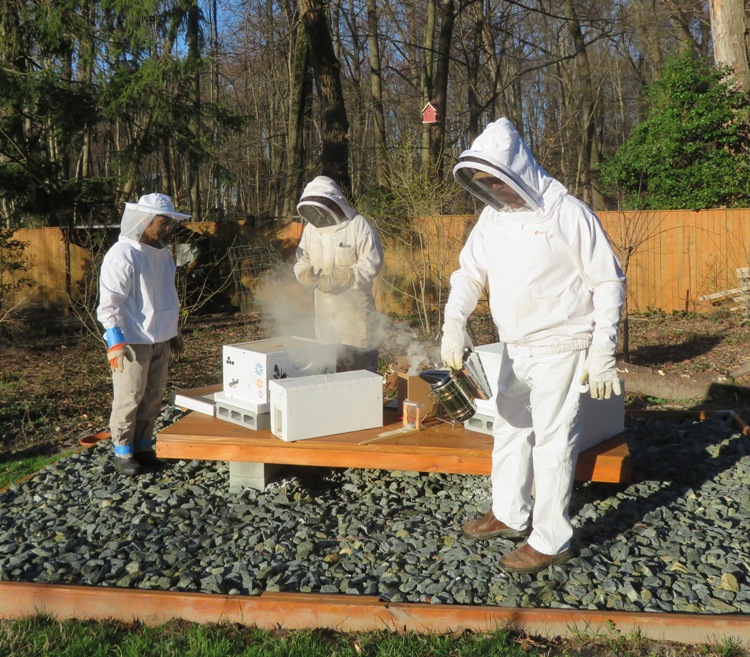
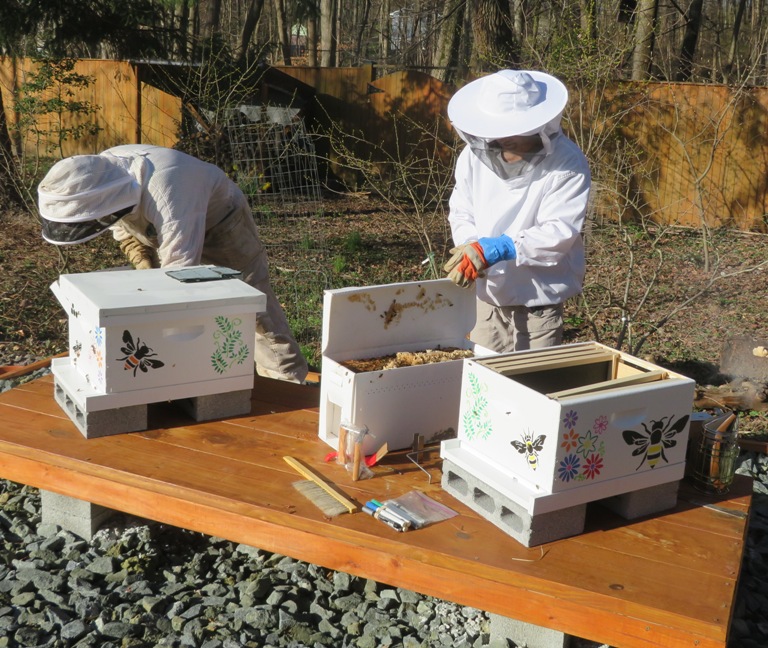
I spoke with John briefly but there were others coming in to pick up their bees so I didn't want to bother him. Bees were flying everywhere. He had hives in the back of his pickup and he pulled forward so we could park behind him. So the bees were looking for their hive where we were standing. A few got in the car but we managed to get them all out except one which ended up harassing Daphne on the drive home. But nobody got stung. At 0800 on March 27, 2021, Brian C., Eric M., and Sara came over. Eric is a very experienced beekeeper here in town. Between him and Brian, I was in good hands. Sara has bees on her property that Brian maintains. Eric actually has a business maintaining hives. I gathered up some dry pine needles and put them in my smoker. I fired it up, got suited up, and then went to introduce the bees from the first nuc to their new home in the south hive, after things were properly "smoked." 1 / 6
Smoking the area.
2 / 6
Me smoking the first nuc.
3 / 6

Each nuc is comprised of five frames.
4 / 6
Me lifting one of the edge frames.
5 / 6
Back side of first frame.
6 / 6
Eric examining a frame.
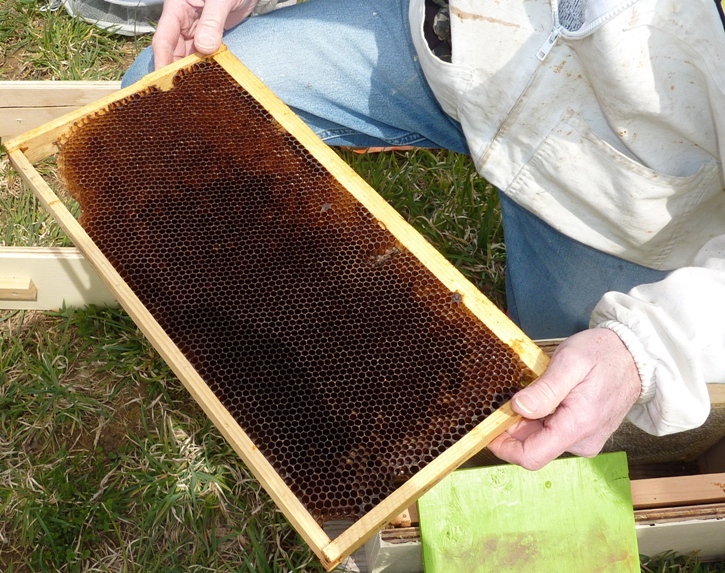
We studied each frame from the first nuc. The ones at the edges are less likely to have as much activity so they looked somewhat bare, as compared to the ones closer to the center. Eric scanned for the queen, which was unlikely to be on an edge frame. But he was also looking at the comb. Was there honey, nectar, brood, or pollen? For the frame shown below, there is capped brood towards the center (orange) and honey at the bottom (pale yellow). 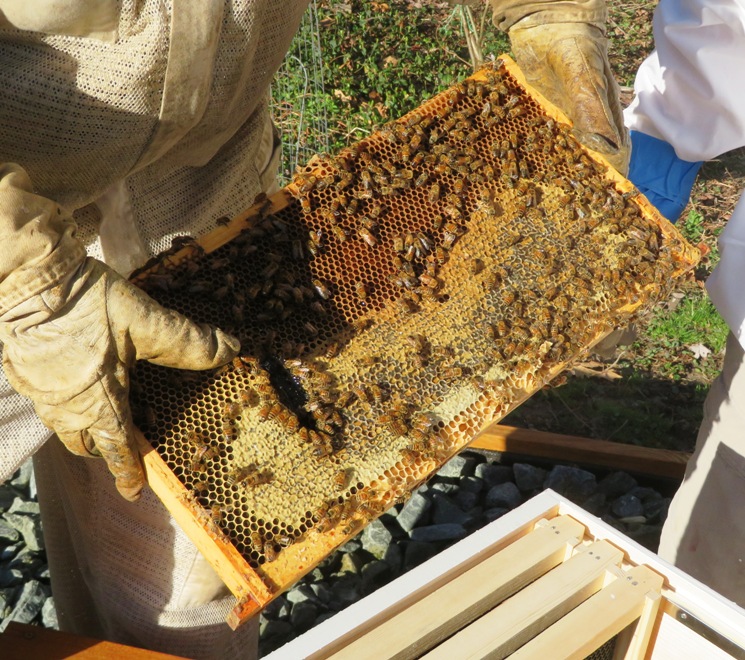
We repeated this process of tranferring frames from this nuc to the south hive, while we inspected each frame to determine the health of the colony and to look for the queen. 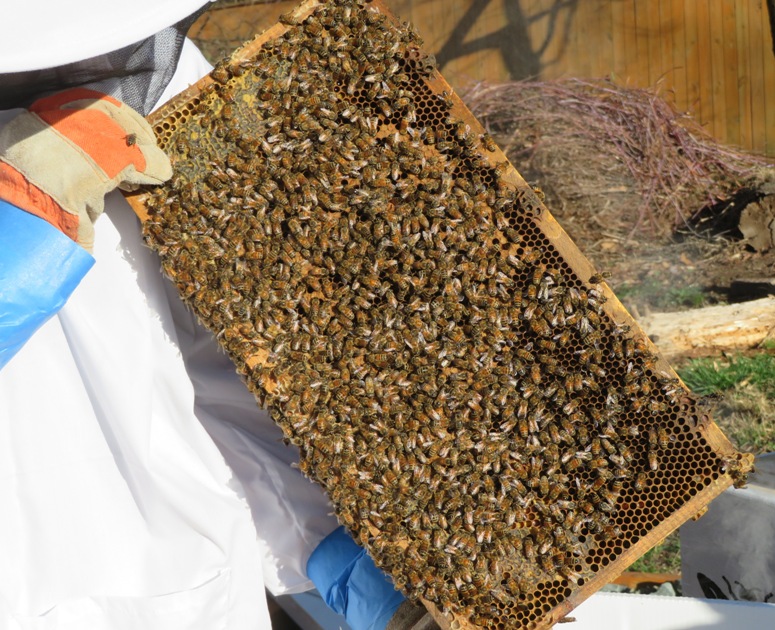
We couldn't have asked for a nicer day. It was cool, sunny, and almost windless. The bees seemed to be happy and in good health. 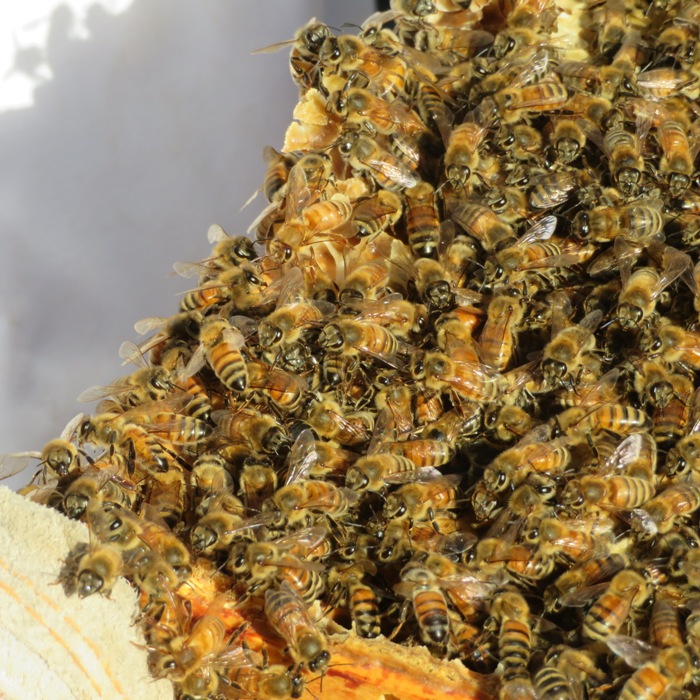
Eventually, Eric found the queen. I would not have recognized her. I kept identifying drones. He and Brian said she was a little scrawny and small. She looked like she might have been in a fight and was not as healthy looking as what they would have liked. Eric captured her in a marking cage and then touched her thorax with a white paint pen to mark her. This makes her easy to identify. 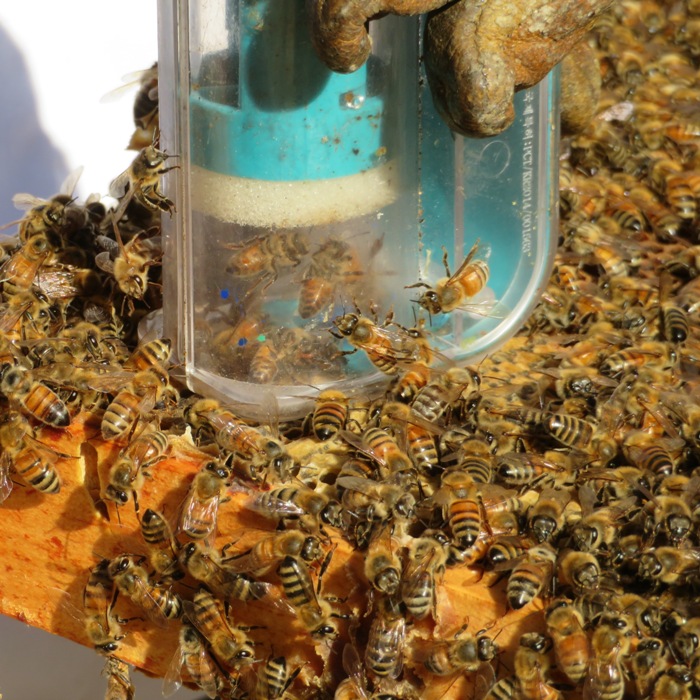
After transferring all the frames from the first nuc to my south hive, we laid a pollen patty across the top of the frames. The pollen patty provides them with a good source of protein to help the colony thrive. Pollen patties do not contain pollen, but are designed to simulate the protein that pollen supplies the bee hive. There are many different recipes but most will contain a pollen substitute like Bee-pro or Ultra Bee with other ingredients added. - from Deseret Hive Supply - Do Your Bees need Pollen Patties? 
Having finished transferring the first nuc, we sealed up the south hive. 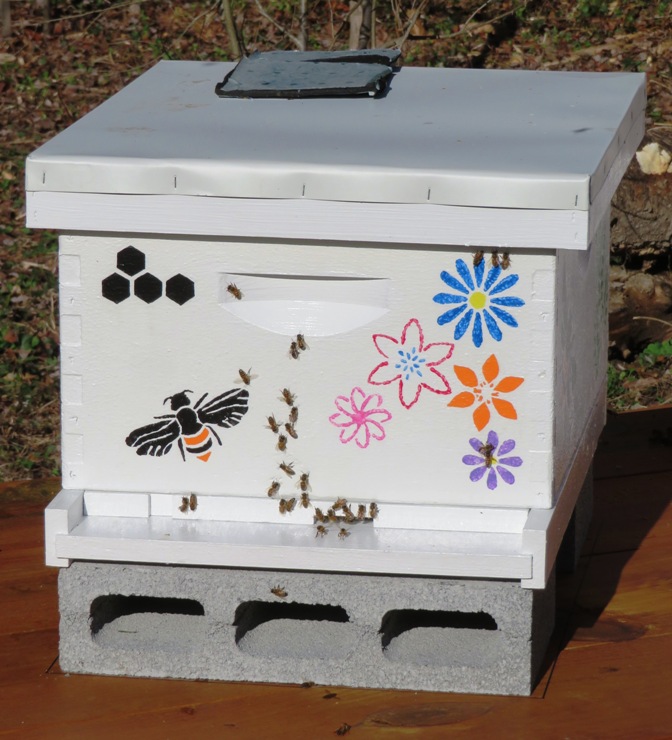
Next, we moved onto the north hive. Opening up the second nuc, we noticed that the bees were building new comb on top of the frames. This colony was really flourishing and I could see why John was wanting to get rid of them as soon as he could. Eric used his hive tool to cut off comb outside of the frame. This is called burr comb. It was dripping with honey which I tasted. Yes, it was delicious. 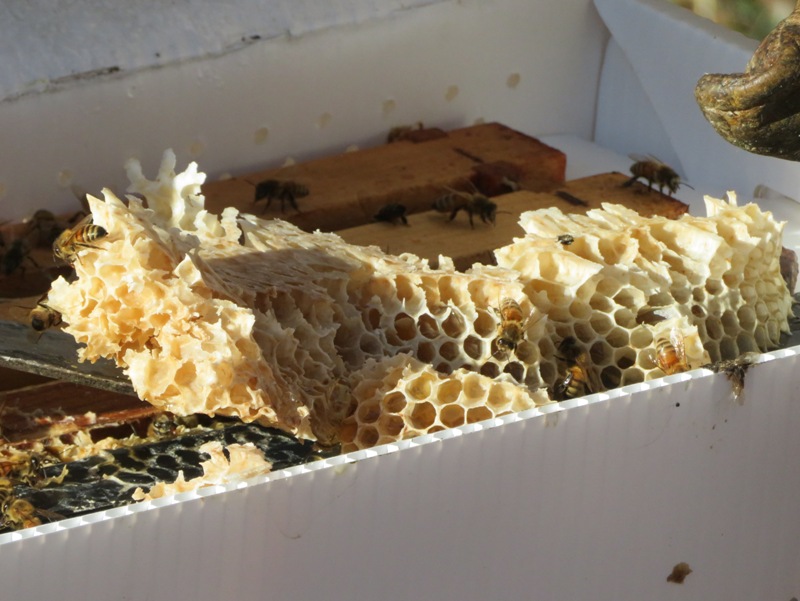
We continued moving frames from the second nuc over to the north hive, examining each to determine the health of the colony. 1 / 3
The north hive is on the right.
2 / 3
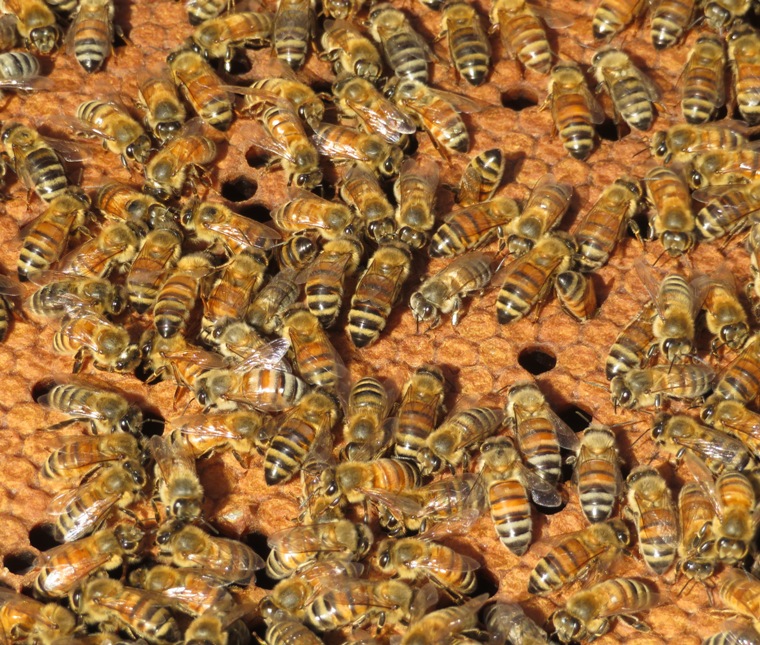
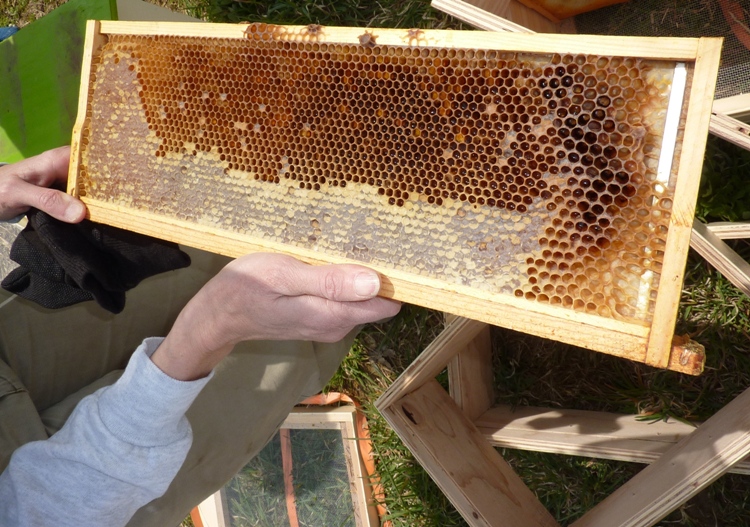
Notice all the capped brood.
3 / 3
Densely packed bees.
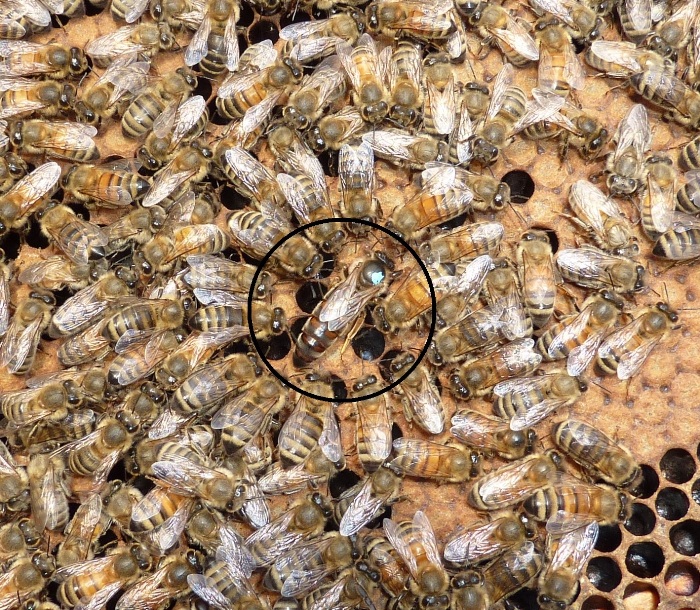
Eric or Brian (I forget which), picked out the north hive queen. This one looked much healthier than the one from the south. Eric caught her and marked her with a white dot. 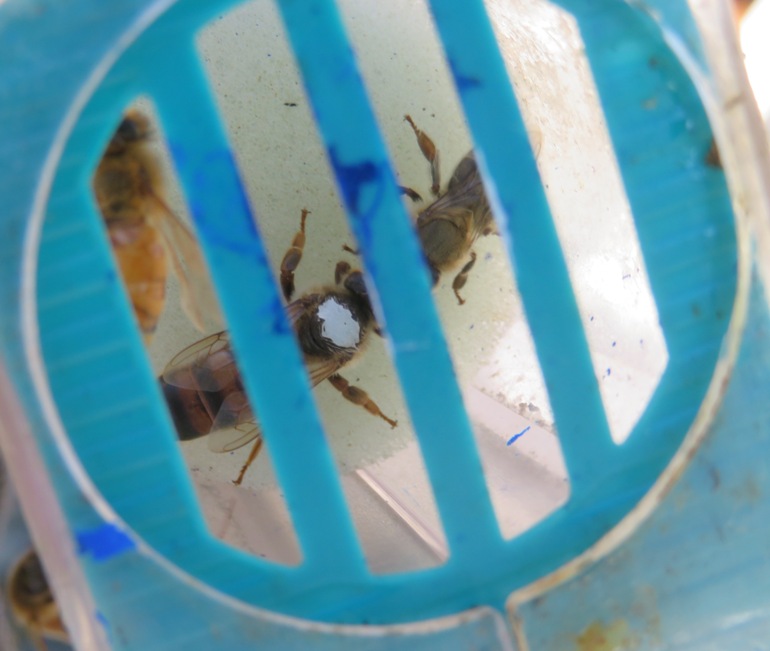
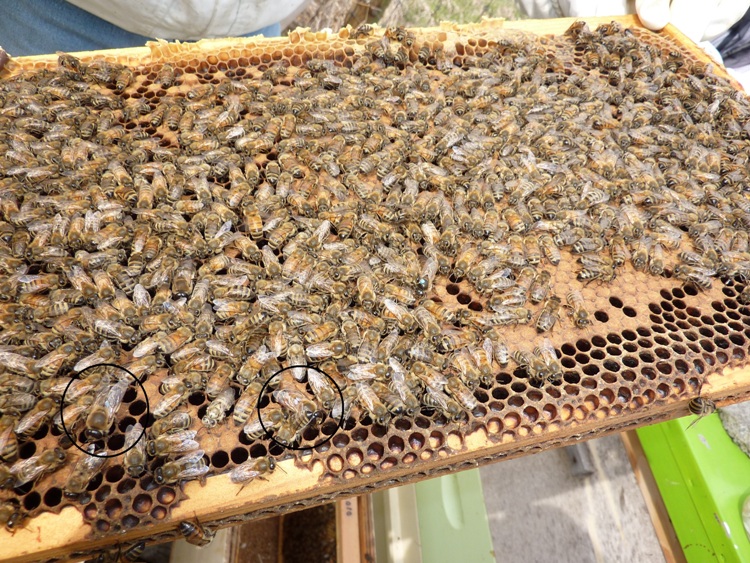
Looking at the frames, we saw a few eggs, which I circled in red below. They resemble a skinny grain of rice placed in the middle of the cell. 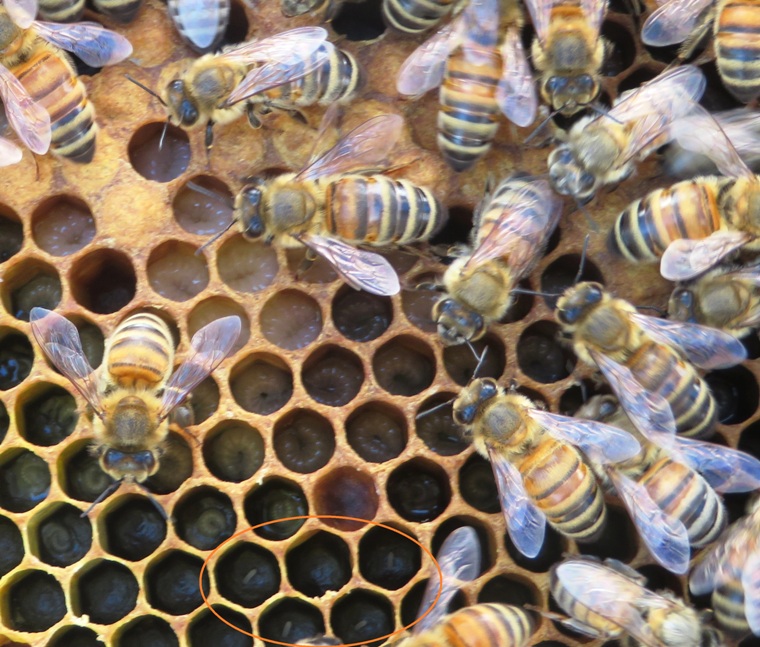
Continuing with our frame inspection, we saw lots of larvae in open cells, along with a lot of open cells full of nectar. After a few days, the workers will seal up the cells containing larvae and then the larvae will turn into pupae before emerging as adults. We saw plenty of young adults. They look like slightly smaller versions of the older adults...sort of like teenagers. 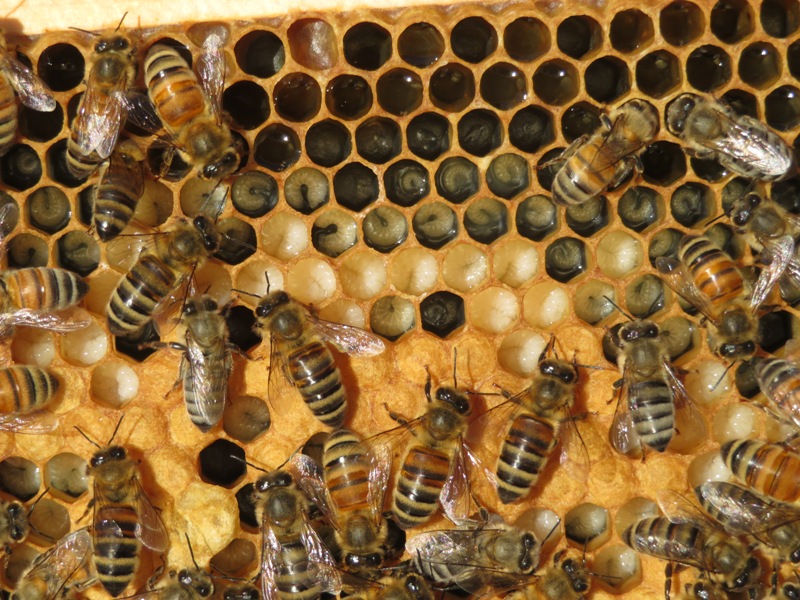
Eventually, we released the north hive queen. 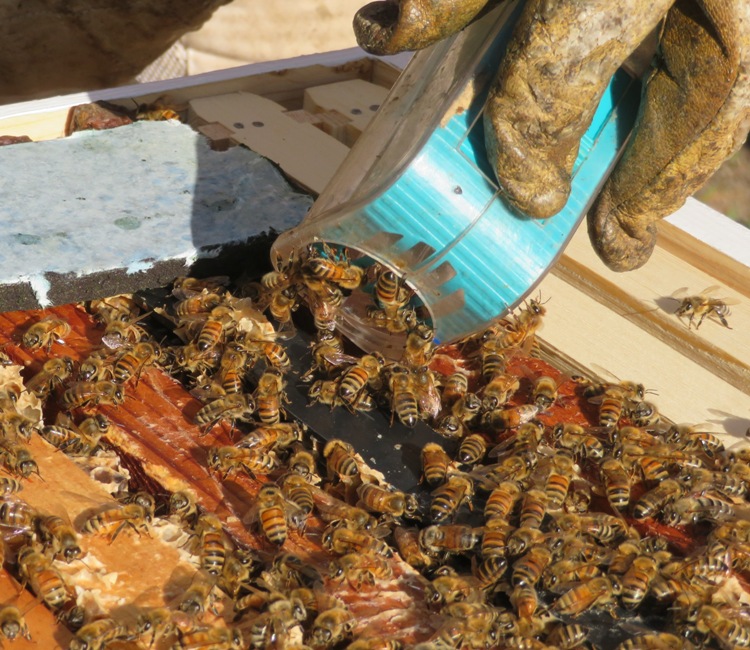
In the picture below, the queen is circled in red. 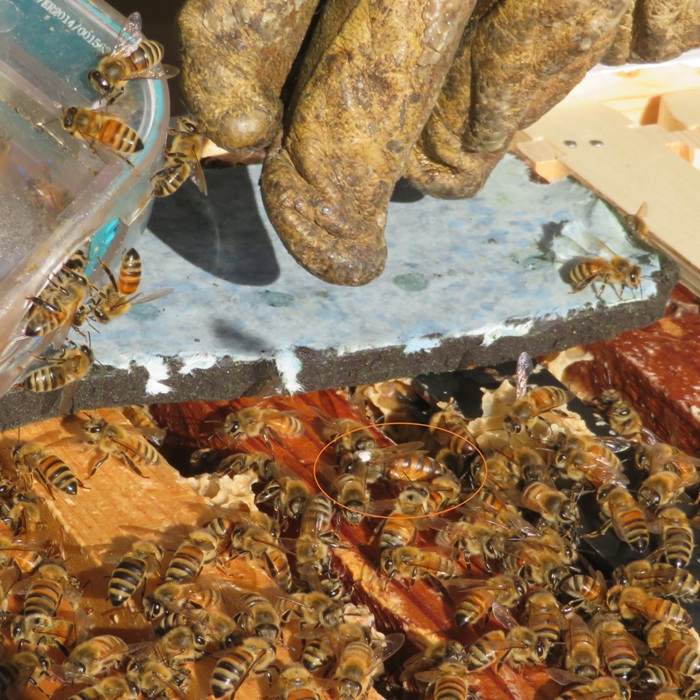
From left to right in the below snapshot are Eric, me, Brian, and Sara. Norma was taking pictures. Daphne was locked in the garden, far enough away from the bees to avoid disturbing them. 
At first, I thought we were done. But then Eric and Brian expressed concern about the first queen. They didn't think she would do so well and it might be best to replace her with the queen that I purchased for Brian. I went along with this but that meant our work was far from over. We opened up the first hive and captured the queen. Brian said he would take her and maybe introduce her to one of his existing colonies that was already strong. But a growing colony needs a strong queen. So we got his queen and held her near the colony. She was still in her cage but the workers could smell her. Did they view her as a friend or a foe? They weren't trying to sting her through the screen so that was a good sign. Eric put her cage between two frames and then put the hive back together. The cage is sealed at one end by candy. It will take the workers a few days to eat the candy and then release the queen. By that time, her scent will be familiar to them and she will reign as the new queen. Thinking we were done, we then noticed that the old queen had escaped from her marking cage. The marking cage has slats that the workers can pass through but the queen cannot...or at least isn't supposed to be able to because she is larger. But this scrawny queen could and did. We went back to the hive and opened it up once more. Checking each frame, we could not find her. But then Eric found her on the inside of the hive box, covered by workers. They were "balling" her. That means they we dogpiling her to raise her body temperature and kill her. They recognized that there was a newer, healthier queen and hence, the old queen was no longer needed. I was amazed they could make a decision so quickly. If it was the federal government, it would have taken several months. Eric caught her again and made sure she didn't escape. Then we closed up the hive. Despite all the people and all the time spent working with the bees, nobody got stung. |
|
Imagine having sex while flying, only to have your penis explode! Believe it or not, this is what happens to male bees. Glad I'm not one of them. For more information, see Honey Bee Mating: A Graphic Example of Sexual Suicide Among Insects.
|
|
Two bees that are old friends meet up. One notices that the other is looking thin, pale, and weak. The other says she has been suffering from American Foulbrood Disease. The first bee then says that she should attend Bar Mitzvahs because the food is so good and the people there are very friendly. A few weeks pass and the bees meet up again. This time, the former sickly bee is looking very healthy. The first bee comments on this but also notices that the other bee is wearing a yarmulke (the small round cap that religious Jews often wear). This prompts the first bee to ask the second bee if she converted to Judaism. The second bee replies, "Oh no, I didn't convert. I just didn't want them to think I was a WASP."
- told to me by Trudy S. |
|
Who can guess what this is? When I asked co-workers and Facebook friends, I got a lot of great answers:
I won this at a raffle at my beekeeping class in 2018. It is a queen bee catcher. The slats are designed so that the queen bee cant fit through but I think the worker bees can. And unlike a hair clip, it doesn't close all the way so the queen can't be crushed. I don't know if I'll ever use it but at only $5.95, I feel it has already earned its keep with the guessing game. 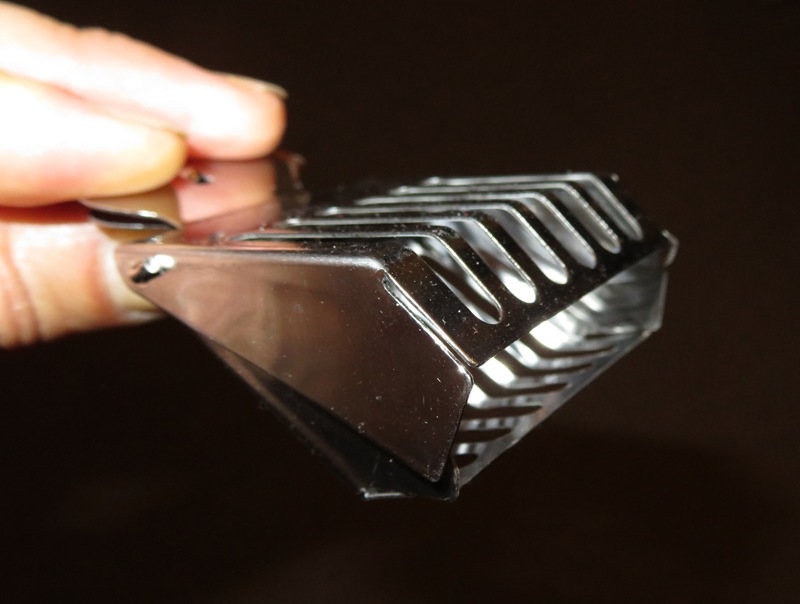
|
|
In the animal world, males and females are pretty much produced randomly. A mother doesn't choose the gender of her offspring. But in a bee colony, the male pupa are clustered together as are the female pupa. They aren't mixed randomly. So is the queen able to squeeze out an egg of whatever gender she wants (assuming she has mated)? Or does she just lay eggs and then the workers move them if they are male? I also read that a worker can lay a male egg. So does a fertilized queen only lay female eggs while the workers lay drone eggs?
Answer: The workers draw out cell size based on the colony's needs and time of year, and drone cells are larger. The queen effectively measures the cell size prior to laying and lays the appropriate unfertilized or fertilized egg. So she can choose the gender of her offspring. Workers all have undeveloped ovaries. Royal jelly in the queen's diet is what helps them develop fully. When a colony is queenless for too long (usually about two weeks) and no egg pheromones are detected, the colony goes to survival mode and develops laying workers to pass their genetics on in the world. Males are unfertilized. They have grandfathers but no fathers. |
|
I tend to document my hive inspections with my camera and this website. Other folks may prefer to use a hive inspection sheet. Here are some options.
|