|
In most of Spring and some of Summer 2020, I spent a lot of time at home because of the Coronavirus pandemic. This gave me a lot of time to work in the yard and work on Norma's "honey-do" list. |

|
In most of Spring and some of Summer 2020, I spent a lot of time at home because of the Coronavirus pandemic. This gave me a lot of time to work in the yard and work on Norma's "honey-do" list. |
|
I tend to do lots of big projects during November through March because I don't generally do any paddling then. But with all this time on my hands, I decided to work on one task that I was reserving for much later. The task? Connecting the rain box behind our garage to our garden.
Why now? Because just a few months ago, we had our white oak tree cut down so the garden could get more sunlight. Prior to this, I was hesitant to lay down pipe between the rain box (server) and the outlet at the garden (client) because this path would be near the oak tree and could damage its roots. But now it is no longer an issue. The rain box to tap into is an "Intermediate Bulk Container (IBC) Tote" that holds about 225 gallons. I installed it in 2012. It collects rainwater from the south side of our garage roof. The spigot pipe that drains it is about 1.75 inches in diameter so water flows out very quickly. I wanted to make sure any pipes delivering this water were also large. Additionally, such pipes also need to be sturdy so that I wouldn't need to worry about breakage underground, even if a small vehicle drove over them. So I chose to use two inch (inner) diameter schedule-40 PR 280 PSI PVC. Obviously, the deeper I buy it, the more weight it will be able to handle. I remember reading that at a depth of two feet with properly compacted soil above, a significant amount of weight could be supported above without damage to the pipe. Unfortunately, I have not been able to find the source where I initially read this. I decided to call the place where the water flows out at the garden area the "well." The water would need to travel about 70 feet from rain box to the well. This was the first task. Digging a two foot deep trench is a lot of work. I thought I was done digging trenches after I got out of the Marines but thirty years later, I'm still doing it. I guess it is a good skill to have. So as long as I'm down in the trenches, what else can I do? How about lay an electric line? I put in such a line to power my chicken coop on October 25-26, 2014. This delivers electricity from my garage to my coop. I decided to do something similar to provide power to the shed. But I did not intend to finish this task now...rather, I would just get it started. Using the same trench for laying pipe, I would also lay electric cable from the garage to the garden. Later, I would run the cable to the shed. My choice of material would be 12 gauge UF-B wire for outdoor use. I learned that if it is buried two feet deep, I don't need to protect it with conduit. At 24 inches you can bury underground feeder cable, using PVC conduit to 18 inches below ground only where the wire comes up. - from Family Handyman - How to Bury Underground Cable Once I started digging, it rained. This caused soil to erode downhill and some sections of my trench to cave in. But it wasn't all bad. The rain also softened up the ground. While water on the south side of the garage goes to the rain box, on the north side, it simply runs down a gutter downspout and then travels downhill. Much of it traverses over a steep area where I dug my trench. Not a good thing. So I decided to redirect the water to an area where it would have time to seep into the ground rather than erode. For this, I would use four inch diameter corrugated drainage pipe. Fortunately, I have a lot of this stuff lying around. So here are my tasks:  |
|
On June 7-12, 2020, I completed my task.
tasks.
After putting stakes in the ground and stretching a string between them to mark where to dig, I started digging my trenches to lay the PVC pipes. This started at the rain box where I later added a piece of wood with a hole drilled in it to hold the pipe in place. 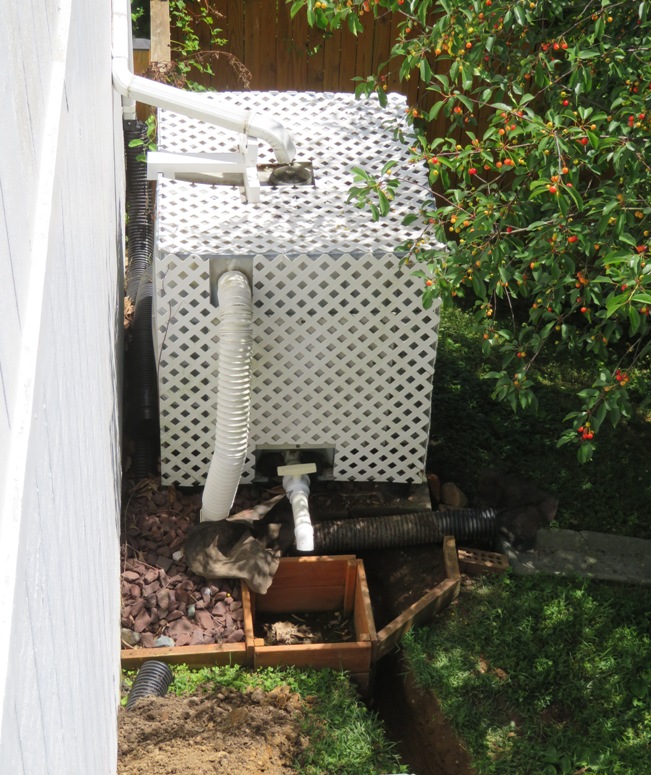
The trench extended away from the rain box and slightly downhill. I had to dig under the conduit that holds the electric cable used to power the chicken coop. This trench then makes a right angle where it heads downhill. At that point, it is two feet deep. 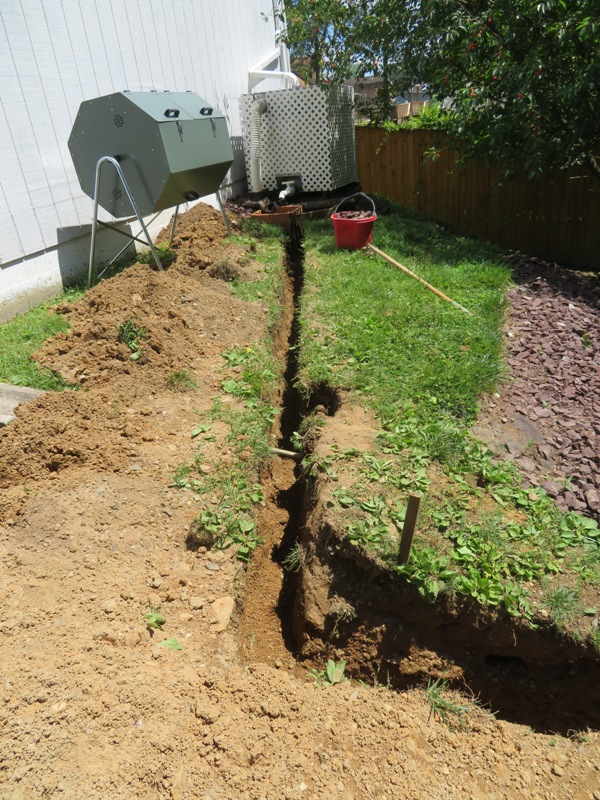
In the picture below, the trench continues downhill to the garden after making a 45 degree bend. Notice that I had to dig under another piece of conduit that runs to the coop. 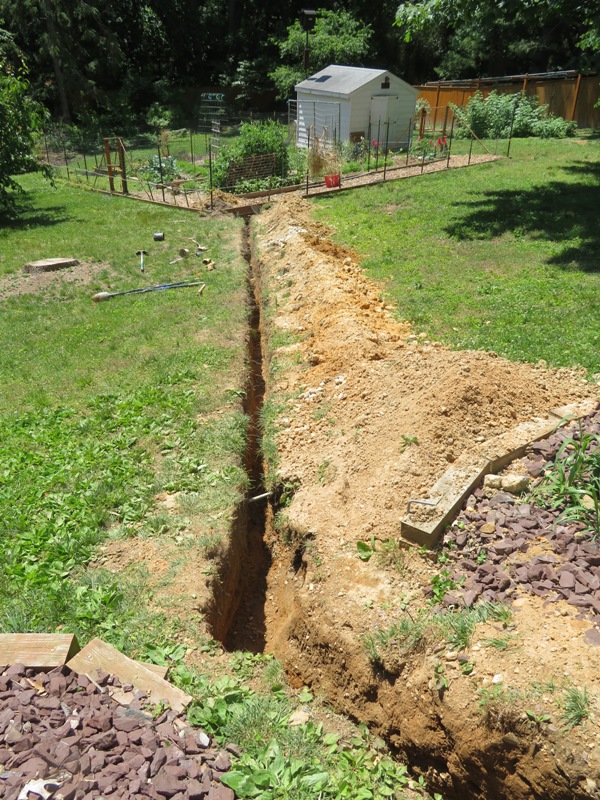
I had to cut away part of the underground groundhog fence to dig my way to the garden. Here, I dug a hole big enough to insert the well. 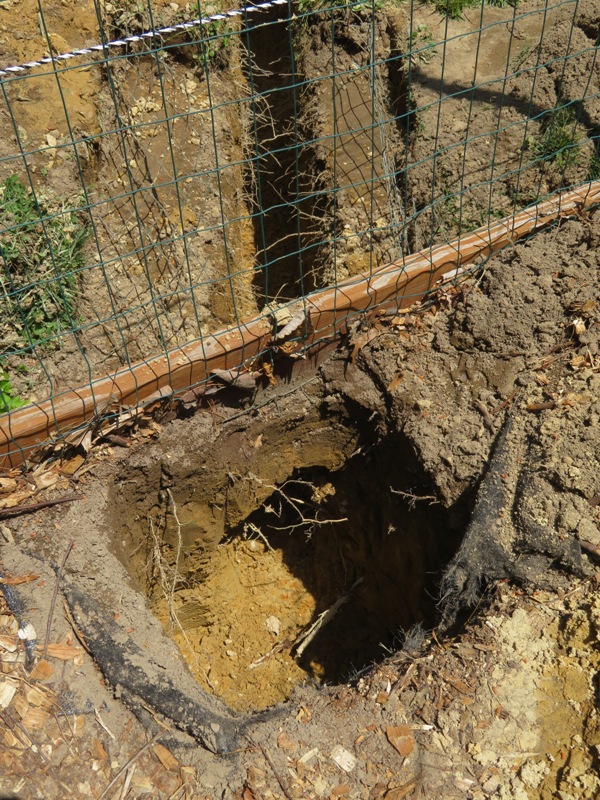
This well, not yet shown, stands two feet high. It is made of pressure treated scrap lumber and then primed and painted with exterior paint to make it more durable to underground conditions. The well holds the PVC pipe in place, provides a heavy platform for filling buckets, and allows me to reach inside and unscrew an end cap at the lowest point so the pipes can be drained in the winter. Here are the trenches as seen from my garage roof. 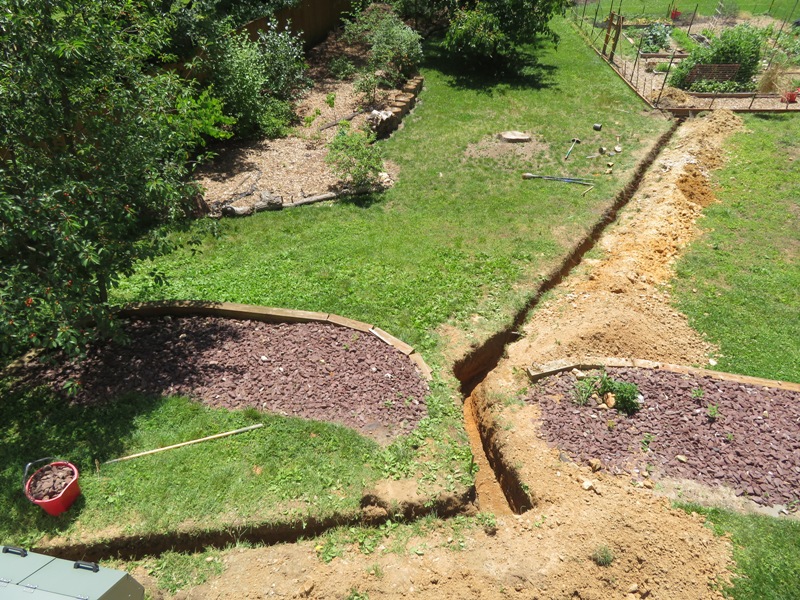
I mentioned digging under conduit. I also had to dig under a terra cotta pipe. Not sure what this pipe is used for. 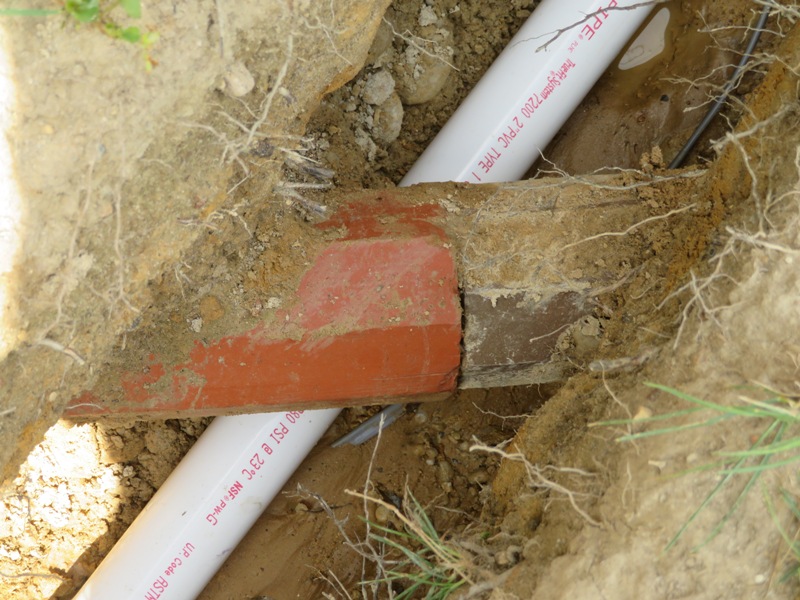
I hate working with PVC. It is not at all forgiving. I put on the purple primer, then the cement, and then rush to connect the parts. If I work fast enough and am in a good position to apply a lot of force, I can get a good connection. But if the cement starts to dry, I get debris on the cement, or am in an awkward position, then I may only get a partial connection. Fortunately, I'm not dealing with high water pressure and if there is a leak, then it is only rainwater. But I certainly don't want a connection to come undone. So if there was such a concern, I reinforced things with FiberFix. 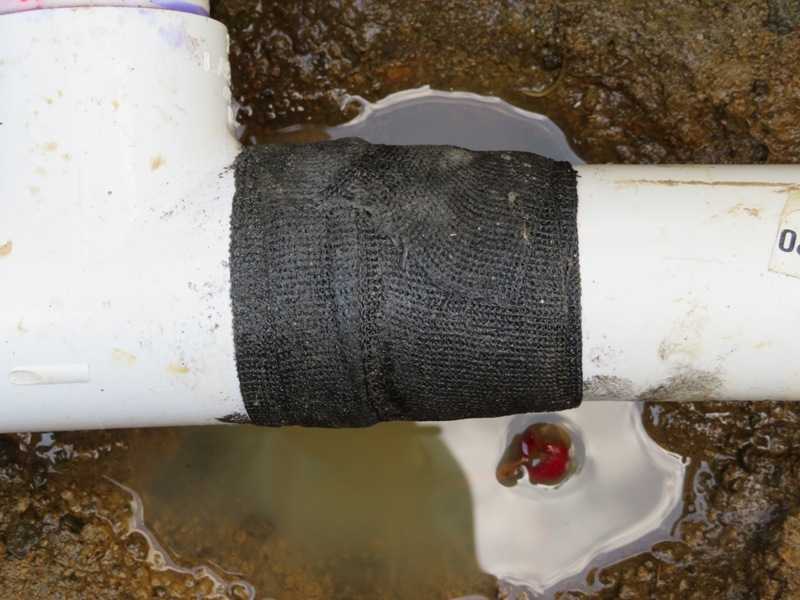
I love this stuff! There were a couple of places where I couldn't get a perfect 180 degree connection so I employed FiberFix to enhance the structural integrity. My biggest frustrations dealt with getting a good connection when working with PVC cement. During those times, I kept thinking to myself, "This is why plumbers make so much money." For tips on cementing PVC, see How to Solvent Weld with Oatey Products. 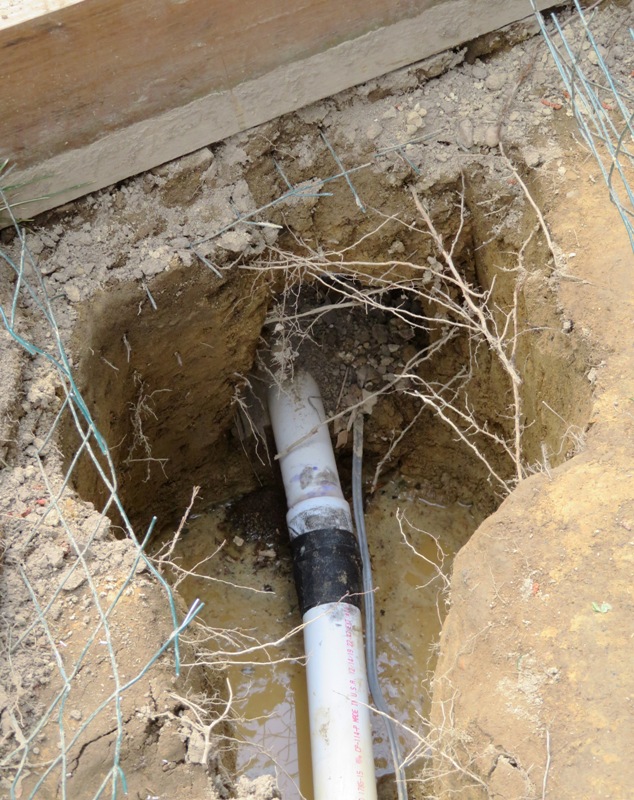
Here's the well. 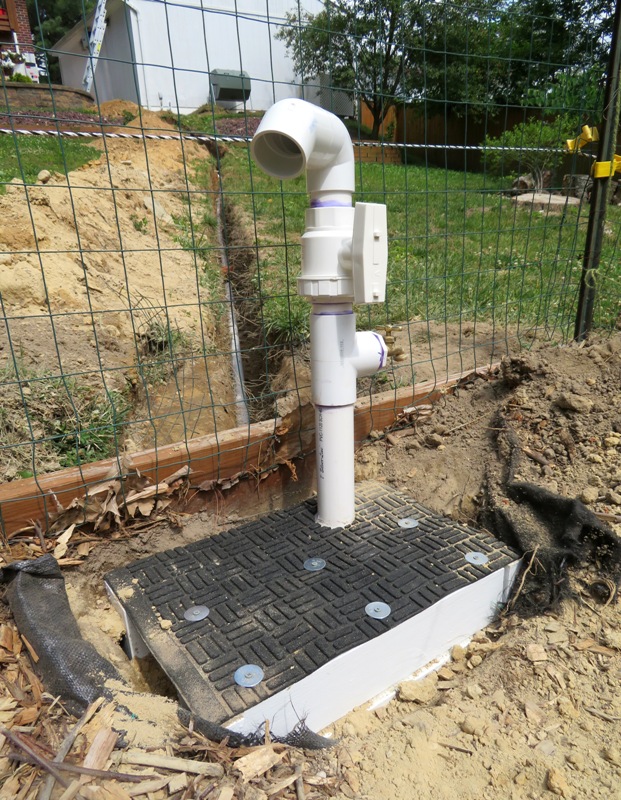
Here's the PVC work at the rain box. 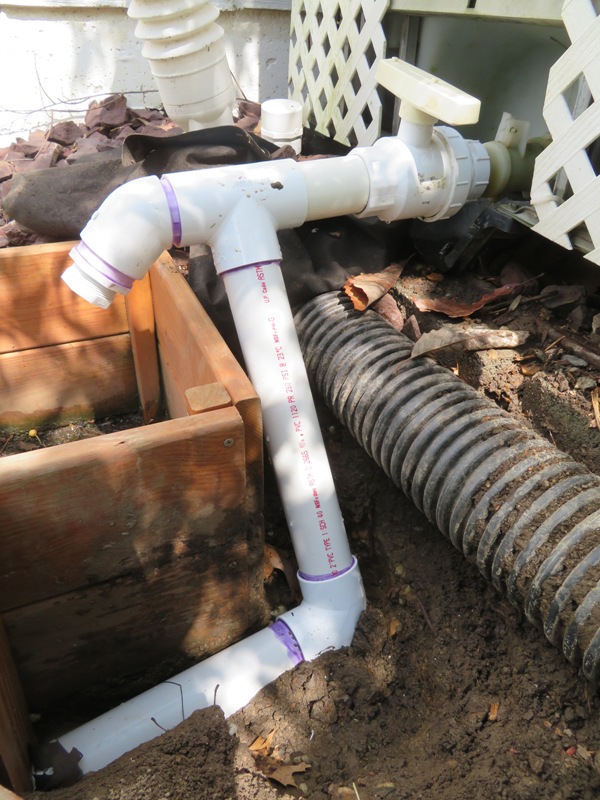
Next, I ran conduit to the garage. 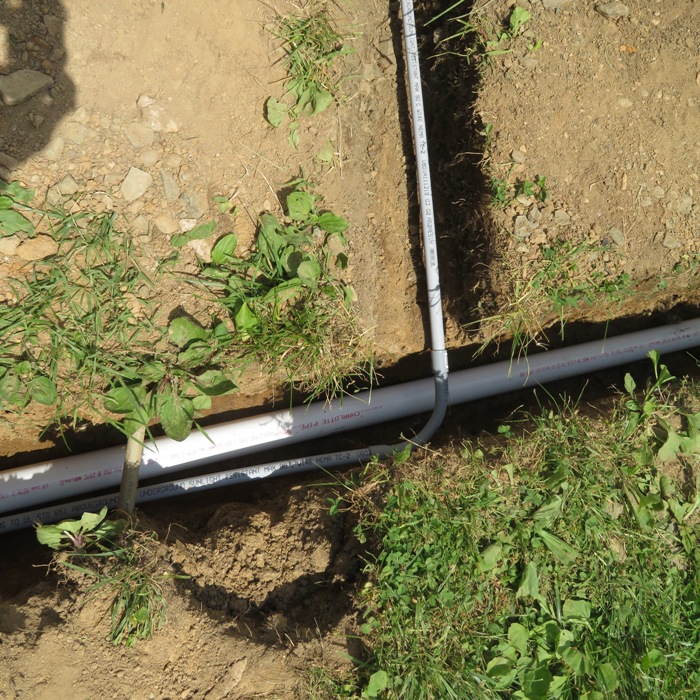
This protects the electric line that will run to the garden. But I only need the conduit when the wire is at a depth of less than two feet. Where the conduit ends, I inserted a lot of silicone to keep things dry. In the picture below, the conduit on the left runs to the chicken coop while the conduit on the right runs to the garden. 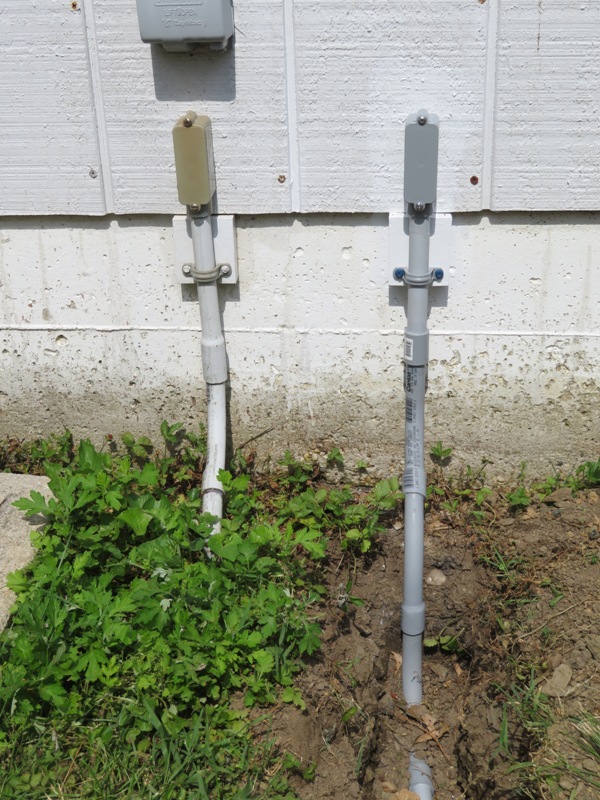
At the other end, the electrical wire runs to the well. Here, you can also see the PVC end cap that is used to drain the pipes. 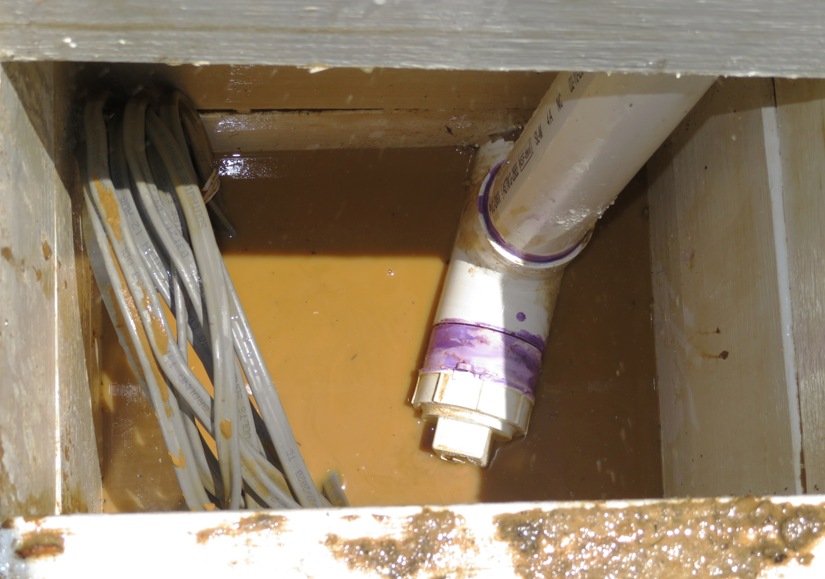
One feature that I added was the ability to tap into the line, should I choose to add another rain barrel for capturing storm water from the north side of the garage. 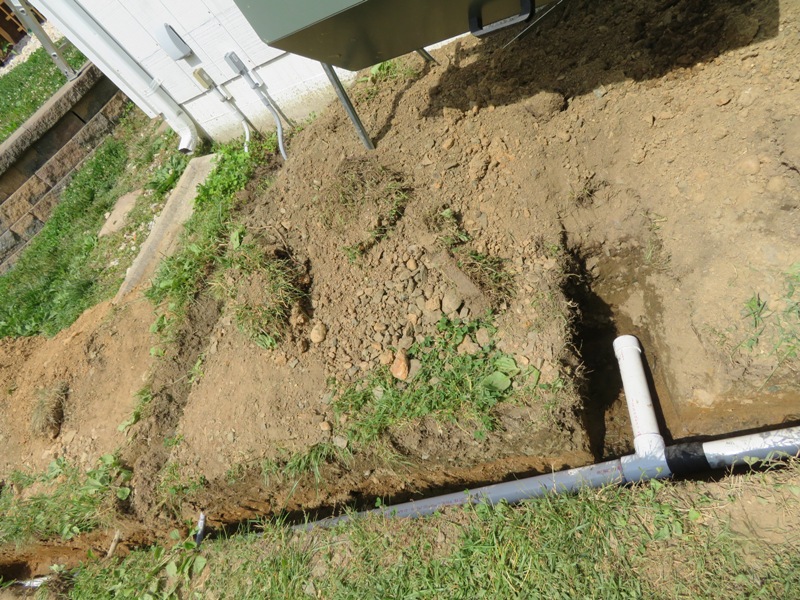
For my own reference, this extension is eight feet south of the northwest corner of the garage and about 3-4 feet west of the west end of the garage. The end cap is not glued in place. 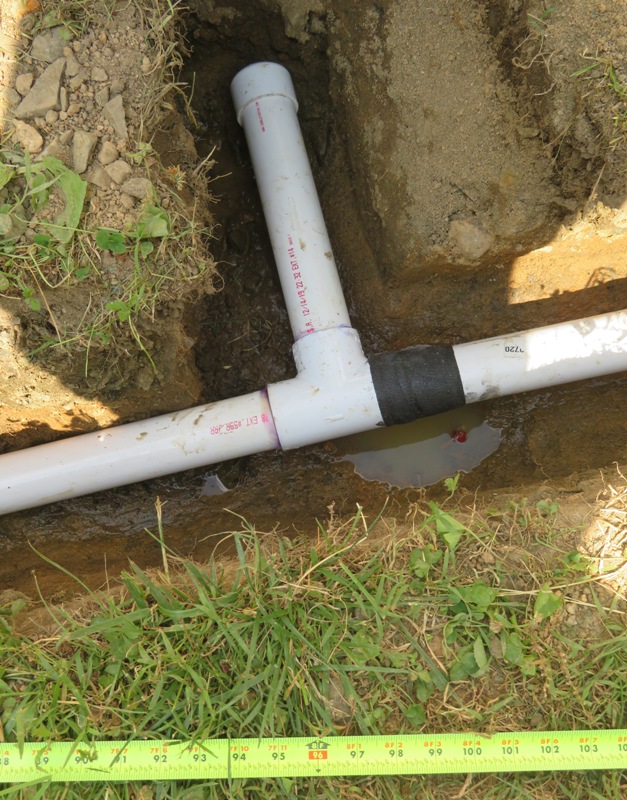
At the top of this page is another view of the trenches but this time with the PVC in place. To prevent storm water from the north side of the garage roof from eroding away my work, I diverted the gutter downspout on the northwest corner of the garage underground and then to a rock area where Norma once tried to grow apple trees. 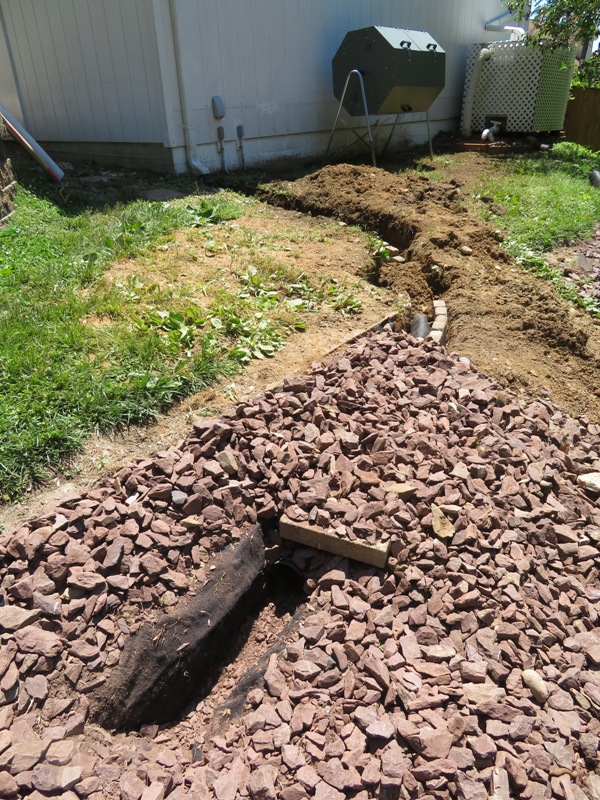
A lot of water can flow out this downspout when it rains hard so I wanted to make sure there was plenty of room for overflow. The corrugated pipe used for this is not buried very deep so to give it additional structural support to prevent crushing, I placed bricks alongside it. 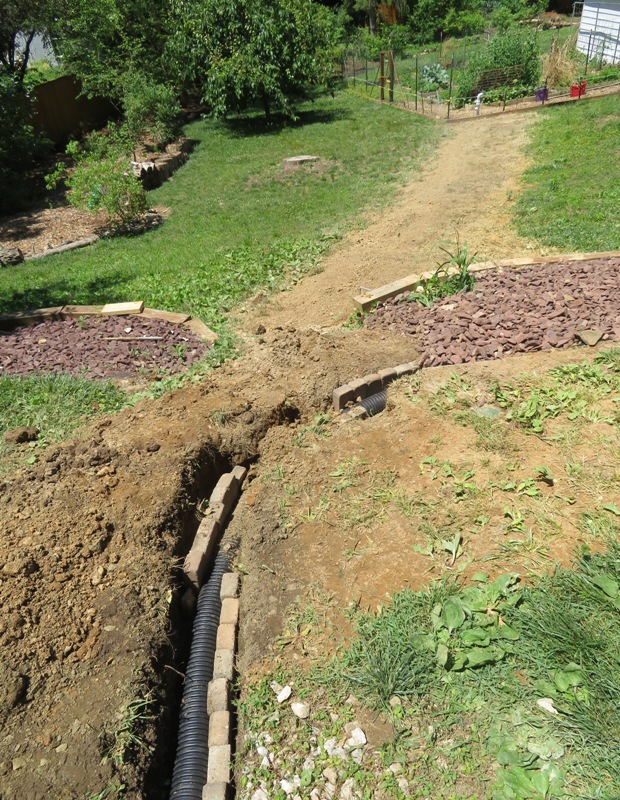
I found these bricks at the Patuxent Sand Esker near the trailhead. It seems folks left lots of leftover construction material in this area. Their trash is my treasure. How much did all this cost? Will it ever pay for itself? If you think about how much money we might save on water, the answer is no. But it will definitely make Norma's life much easier when it comes to maintaining her garden. And once I add electricity to the shed, I expect that will also help. |
|
I finished this project on June 12, 2020. I then showed it to Norma, who was most pleased.
At the rain box, you can see a PVC pipe which runs into the ground. 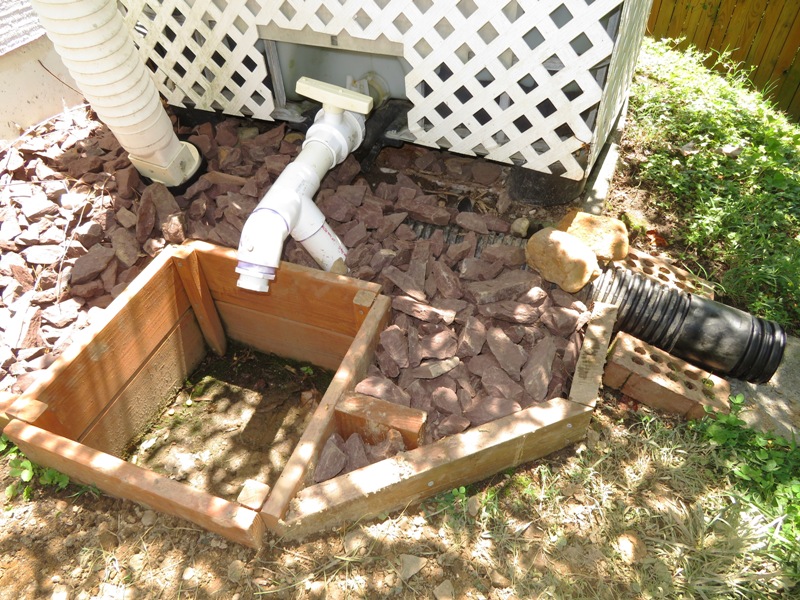
This feeds the line that runs to the garden. There is also the PVC line that simply ends here which was used for filling five gallon buckets directly from the source. But it now has a screw-in end cap. When the cap is in place, the water goes to the garden. But when the cap is removed, water flows out freely. We may want to use it for filling buckets in the future. I filled the trenches with dirt and used all my 150 pounds to compress the soil as best I could. Maybe we'll plant grass in the autumn or maybe I'll just let weeds spread to it. I don't really care that much. The chickens will probably dig holes for their dust baths. I'm more concerned about just having something green growing. Any form of vegetation will help prevent the soil from eroding away. 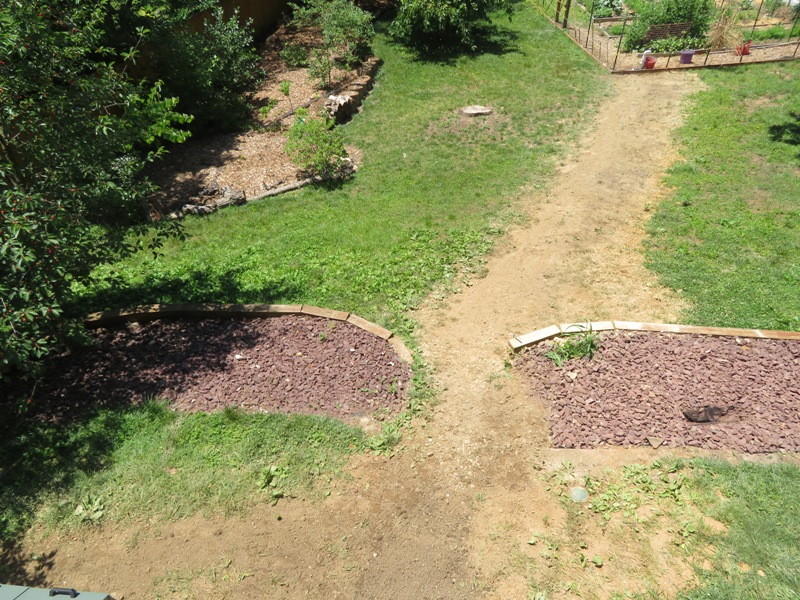
Below is the well in action. Click on the image to start the video. On the side is a hose bib that Norma can use to screw in a hose. But if we want to fill a bucket, the main spout can't be beat. It fills a five gallon bucket in a mere six seconds! 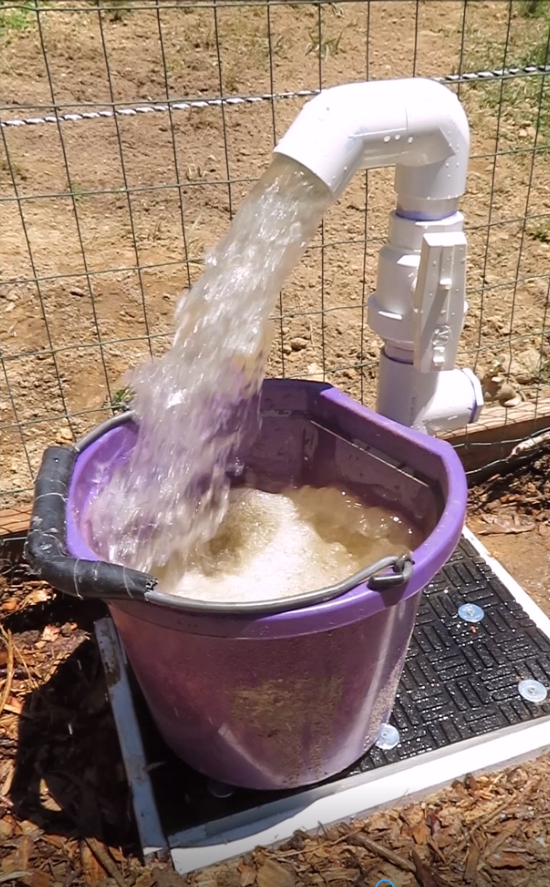
This project was not my easiest or most difficult. But if there is one thing that all my home improvement projects have in common it is lessons learned. So what did I learn? |
|
I'm not done. When it comes to home improvement tasks, I don't think I ever will be. Perhaps that is a good thing...not necessarily always wanting more but rather having the ability to do something about it. So what else do I need to do?
When I was working near the west side of the garage, I noticed a soft spot in one section of the outer wall. This means I need to replace a piece of dry rotted wall panel. I've done this before and I can easily do it again in a couple of days. This includes painting it with primer and two coats of exterior Valspar Duramax paint. I mentioned that I ran an electric cable from the garage to the garden. That was done so I wouldn't need to dig another trench. But now I need to connect the electric cable to the shed, which is where we ultimately want power. For this, I figure I'll set up conduit from the well to the shed with a junction box somewhere in between since the current cable is not long enough. At the shed, I'll set up a couple of outdoor electric outlets, a light inside and just outside the entrance to the shed, and maybe a spotlight or two to illuminate the garden. The work I did to redirect the water flowing out the gutter downspout that services the north side of the garage roof is a fast, cheap, and temporary solution. I'd like to see how much water Norma uses to water her garden. Will she empty the rain box it is tapped into? If so, maybe I can install another rain box to capture water on the north side of the garage. Norma has spoken about (me) building another retaining wall to create more level surface in the back yard. The first was completed on September 19, 2015. A second wall could open doors for other projects to include building a cistern and creating a rain garden. This could get expensive but it is also something our local government wants so maybe we can get at least partial reimbursement for such tasks. I've asked Norma to look into Clean H2oward - CleanScapes to learn more about this. To summarize, my future related projects are On June 21-26, 2020, I finished the second task, providing power to the shed. |