|
This page describes the work done on my house to install a geothermal heat pump. I mention the choices I made and evaluate performance. |

|
This page describes the work done on my house to install a geothermal heat pump. I mention the choices I made and evaluate performance. |
|
In February 2011, shortly after installing additional roof insulation, I wrote
The house that Norma and I own is heated by oil. Our boiler is serviced by Laurel Fuel Oil and our fuel is purchased from them too. They have provided good service and their rates seem reasonable. However, the amount we pay each winter seems unusually high for such a small house. This could, in part, be due to the fact that our Weil-Mclain P-366 boiler is about 20 years old. But it still works fine and the insurance people say it complies with UL listing and CSA, so it is hard to justify spending a couple thousand dollars to have it removed and get a new, more energy efficient one installed. But that is not an option we have yet to discard...just a last resort. - from Attic insulation In 2012, I felt it was time to consider other heating alternatives. Our existing system was not using oil efficiently and the cost for this oil was likely only going to go up. Natural gas, on the other hand, might become more plentiful as new domestic sources became abundant. President Obama called America the "Saudi Arabia of natural gas"... - from U.S. News and World Report, "Obama: U.S. 'Saudi Arabia of Natural Gas'" January 26, 2012 Rising oil costs, dependence on foreign reserves, cheaper energy alternatives, more environmentally clean alternatives, new technology, and government tax incentives all influenced my decision that it was time to consider a home heating upgrade. This page documents my notes for the things that influenced my decision to pick the heating source that I did in the latter half of 2012. I considered  |
|
Letting heat out of the house in the winter is like throwing money in the wind. So during our first few winters, Norma and I did what we could to reduce our heating costs without spending too much money.
Before making a big purchase, I like to know ahead of time how much money I will save and how long it will take to recoup my investment. This means I need to monitor the costs I am trying to reduce. So for the 2011-2012 winter, we used 168.6 gallons of oil and spent a total of $789.80. If we assume we ran the boiler from mid-November to mid-March, then this averages out to $197.45 per month for heating. Some of this heating also pre-heats the water that goes to our electric Duron Censible State Water Heater which only has a single heating element. Unfortunately, I have no way of determining how much oil it uses. This pre-heating makes my water heater an indirect-fired hot water tank. Weil-McLain high efficiency indirect fired water heaters produce twice the peak flow of a tankless coil; at least 50% more than a comparably sized direct-fired gas water heater; and three times as much as an electric unit. - from Weil-McLain high efficiency indirect fired water heater product offering The following winter, we started our oil boiler at 75% capacity around October 8, 2012. Is 168.6 gallons of oil typical usage for one winter at our house? No. It is less than average. But I haven't collected data over more than just this one winter to determine what our average usage would be. But consider the following monthly average and actual temperatures for Baltimore, Maryland: Average temperatures: November: 47 December: 37 January: 33 February: 36 March: 44 Actual temperatures in winter 2011/2012: November: 51 December: 42 January: 38 February: 42 March 54 This information is based on data from Weather.com and Weather Underground According to "Today in Energy - U.S. Household Winter Natural Gas Heating Expenditures Expected to be Lowest since 2002-03" (a broken link as of 2023), Mild weather is the big driver of lower natural gas expenditures this winter for households. As a result of above-normal temperatures this winter, Energy Information Administration (EIA) projects that households will need less natural gas for heating, consuming an average level of about 62.3 thousand cubic feet this winter. That's down more than 10% from the level used last winter and the lowest estimated household winter natural gas heating use in more than 10 years. The number of heating degree days from October through February was down 11% compared to the 30-year average. Let's assume (because of a lack of better data) that the heating degree days has a strong a direct correlation with the consumption of oil heat (a safe assumption, in my opinion) and that this data, which represents the entire United States, also represents Savage, Maryland. Furthermore, let's assume that our 30-year average will be also be the average for the next several years (probably not such a safe assumption but again, for the lack of better data, let's go with this). Lastly, let's assume the cost of heating oil will be the same as it currently is for the next several years (probably not the case). This means ($3.77 + $3.95)/2 = $3.86 per gallon. Then one could claim that if our number of heating days was down 11% in the winter of 2011-2012 as compared to the average, then our average consumption for heating oil is 168.6 + (0.11 * 168.6) = 187.15 gallons. This means our average cost for heating oil in one winter is 187.15 * $3.86 = $722.38. Adding on the cost of annual maintenance, service, and parts brings things to $722.38 + $130 + $14.72 = $867.10 per winter for heating, using oil. One might argue that the $14.72 is a one-time cost but with such an old system, I think it is reasonable to factor in some annual cost for parts. Hence, this averages out to a mid-November to mid-March monthly rate of $216.78. According to a BGE Home folder I received, the energy cost for the average American home amounts to $2,200 annually. This same source claims heating generally accounts for 29% of energy costs. I don't know if water heating is included in this figure. This means that the average American spends about $2,200 * 29% = $638 per year on heating. So we are paying more than we should. Adding insult to injury, According to the National Association of Home Builders, the average home size in the United States was 2,700 square feet in 2009, up from 1,400 square feet in 1970. - from U.S. Home Size - Infoplease.com Our house has a finished square footage of 1,240. This means it is 1,240/2,700 = 46% the size of the average American home. Certainly our heating cost is not 46% of $638. It is actually 135%! So despite having a much smaller home than average, our heating costs are higher than average! Something has to change. |
|
Our oil furnace boiler is old and inefficient, to say the least. I was told by a technician from Laurel Fuel Oil that it uses about a gallon per hour of continuous use. Based on similar products from the same period, I'm estimating our boiler has about 70% efficicency. By comparison, new Energy Star boilers have at least an 85% Annual Fuel Utilization Efficiency (AFUE) rating. Some of the high-end gas boilers have an efficiency of 95%!
My educated guess is that our boiler produces 115,000 BTU based on modern oil boilers at 85% efficiency using the same amount of fuel (one gallon per hour) and producing 140,000 BTU. An 85% efficient boiler is 21% more efficient than one with 70% efficiency. This means that a boiler with 21% greater efficiency than a 115,000 BTU boiler will produce 140,000 BTUs. Using this approximation and the Weil-McLain boiler manual sent to me (no, it doesn't list the efficiency or BTU), our boiler requires at least 16.5 square inches of ventilation to the outside which we have. To learn more about boiler efficiency, read Energy Savers: Furnaces and Boilers. There are ways to make an old oil-fired boiler more efficient without buying a new one but I'm more interested in significant long-term savings and doing something good for the environment, not just my wallet. Our house and boiler have their drawbacks, mainly because both are old. But one advantage we have is that we spend almost all out time on the top floor (prior to 2024) and since heat rises, things remain much warmer than if we spend time in the basement. Of course we pay for that in the summer. |
|
I really understand very little about boilers. It seems like all they do is burn fuel to heat water which gets circulated throughout the house to heat the air, right? Obviously, there is much more to it than that. Getting a new boiler and switching the type of fuel is one way to significantly increase efficiency but there are other ways to get more bang for the buck at a lower cost.
Rather than replace the whole boiler, why not just replace the burner or certain other parts? Many boilers and furnaces in today's homes are oversized, particularly if you've upgraded the energy efficiency of your home. It is simple to reduce the heating capacity of your oil boiler or furnace to make it operate more efficiently by having a technician install a smaller nozzle. The cost is minimal and it could cut fuel bills by as much as 10%. If you have an old, inefficient burner, though, you may want to replace the whole burner. A flame retention burner will block airflow up the chimney when the unit isn't running, saving up to 20% on fuel costs at a cost of about $500. - from The Encyclopedia of Alternative Energy and Sustainable Living However, with such an old boiler like the one we have, upgrading/replacing parts may not be the best choice. Many people prefer to purchase new boilers rather than to repair old ones. This simply is not a wise economic move if your boiler is below seven years old. There is still a lot of life in that boiler. Tune up, some adjustments and parts replacement is all it needs. However, if the boiler is no longer energy efficient and it is 15-20 years old, a decision to purchase a new one is more logical and practical. - from gas-boiler.org "Boiler Service Cost," (a broken link as of 2023) |
|
So what do we need to heat our house more efficiently and save money in the long run? According to "eBay Guides - How many BTUs do I need to heat my house" (a broken link as of 2018), we live in zone three which means we need 40-45 British Thermal Units (BTUs) per square foot. Our finished square footage is 1,240 while our main floor is 880. We generally don't care about heating the basement but if we decide to sell, we will want to make sure the new owners are comfortable if they make use of the whole house. This means our lower threshold is 1,240 * 45 = 55,800 BTUs if we use the boiler solely for heating the house. Since our home isn't exactly the best insulated, I'd want a little more.
What Size Boiler Is Needed Per Square Foot of a House? also provides information for calculating the number of BTUs needed in a heater but it doesn't take into account the climate so I prefer the previous source. If and when we get a new boiler, if it also supports the water heater, then I'll want to get one with similar output, about 115,000 BTUs. Otherwise, I'd be willing to settle for one with as few as 65,000 BTUs. |
|
What energy source should we use? I prefer natural gas because we can get it piped to our house so we would never have to rely on delivery again. Also, Norma likes the idea of having a gas stove and oven for cooking, though ours presently works fine so that won't change for awhile. I called BGE to inquire about getting a natural gas pipe hooked up to our house. On April 14, 2011, Mary of BGE left a message on Norma's phone to inform us that natural gas is available in our area. It would cost $740 for the first 100 feet to be connected to the house. There may be other charges. If interested, we should call 410-470-8436. The e-mail they sent prior to the call included the following:
Our new business call center would be able to assist you with the connection. In order to obtain the information, please call 410-850-4620 or 1-800-233-1854 Monday through Friday from 7am to 4:30pm. If you have further questions, please contact us at myhomerep@bge.com. My former house uses natural gas for heat. After all the different taxes and service charges are taken into account, as of December 2011, the cost is $1.03 per therm. I elaborate on this in Water Heating - On-demand (tankless). If we assume 93% efficiency for a natural gas boiler then according to Fuel Comparison Calculator, the cost per 100,000 BTUs is $1.11 and the carbon dioxide emissions is 12.9 pounds per 100,000 BTUs. In comparison, as of December 2011, the cost for a gallon of fuel oil is $3.77. Our ~20 year old oil boiler is about 70% efficient, based on standard models built around that time. Fuel Comparison Calculator claims the cost per 100,000 BTUs is $3.79 and the carbon dioxide emissions is 20 pounds per 100,000 BTUs. This means for an equivalent amount of heat, an energy efficient natural gas boiler will reduce our heating costs 71% while reducing our carbon dioxide emissions by 36%. But wait! There's more. According to BGE Smart Energy Savers Energy Program, we may qualify for discounts from BGE if we go with natural gas. BGE doesn't make any money if we use heating oil or liquid propane so they want us to use natural gas. I'm guessing that the government also supports their rebate program because it encourages clean energy. To be eligible, 1. One must be a BGE residential customer applying through the Home Performance with ENERGY STAR Program only. 2. This offer is open to all BGE residential electric and/or gas distribution customers, regardless of their electricity and/or gas supplier. Participants applying for Home Performance with ENERGY STAR incentives must have: a. Central A/C unit, air source heat pump, or other primary electric heating system, and receive electric distribution service from BGE or b. Gas furnace or gas boiler, and receive gas service from BGE. Projects must be installed in the BGE service territory. Gas boilers are not eligible to receive rebate payments as part of Baltimore Gas & Electric's Home Performance with ENERGY STAR Program or as part of the BGE Residential Heating & Cooling Equipment Program. But getting back to the direct cost difference between oil and natural gas, recall from Cutting and monitoring costs that in an average winter, we can expect to use 187.15 gallons of oil. Based on December 2011 fuel oil costs, this is equivalent to $705.56 and 18,616,240 BTU of heat. This many BTUs can be provided by natural gas for only $206.64. Thus, we can expect a savings (just in oil/gas cost) of $498.92 per winter. What about the cost for maintenance and service of a natural gas boiler? In homes where I've lived that use natural gas for heat but don't have a boiler (forced air is used instead), there really isn't any maintenance or service fee unless something goes wrong, which seems to be never. But for boilers, I think this is different and the maintenance/service fee is comparable to that of an oil boiler. A comprehensive boiler service will cost from $240 to $288 for a standard efficiency unit and from $128 to $256 for a high efficiency, energy star rated condensing boiler. The effective method of getting the best boiler service cost is to secure and compare quotes from at least three boiler service companies. They have incentives, freebies and other promo plans to motivate their target markets to avail of their services. - from gas-boiler.org "Boiler Service Cost," (a broken link as of 2018) So what is the difference between a conventional (what I have) versus a condensing boiler? Condensing boilers are water heaters in which a high efficiency (typically greater than 90%) is achieved by using the waste heat in the flue gases to pre-heat the cold water entering the boiler. They may be fueled by gas or oil and are called condensing boilers because the water vapour produced during combustion is condensed into water, which leaves the system via a drain. Condensing boiler manufacturers claim that up to 98% thermal efficiency can be achieved, compared to 70%-80% with conventional designs (based on the higher heating value of fuels). Typical models offer efficiencies around 90%, which brings most brands of condensing gas boiler in to the highest available categories for energy efficiency. Condensing boilers are up to 50% more expensive to buy and install than conventional types in the UK and the US. - from Wikipedia - Condensing boiler |
|
Spending more on an energy efficient gas boiler will pay in the long run, given enough time. Based on December 2001 web searches, a gas boiler with about 95% efficiency will cost between $3,000 and $4,000. CostOwl.com - How Much Does a Furnace Cost? says
With materials and labor, you can expect to spend $2,500 to $5,000 to install a new gas furnace or replace an old furnace. On average, it will cost $3,000. That includes the price of the unit and labor. It will cost roughly $700 to $1,000 for furnace installation. The job can easily cost more as the job becomes more complex. That is simply the cost for a basic installation with no complications that will make it more difficult and time consuming for your HVAC service. Weil-McLain WM97+ 70, 70,000 BTU Wall Mount Gas Boiler has a 97% AFUE rating. Our old boiler is a Weil-McLain and despite its age, it is reliable so I would certainly be willing to purchase another Weil-McLain. Weil-McLain Ultra Series 3-UE Gas Boiler UG-80 has a 95.2% AFUE rating, and costs about $3,500. ComfortUSA - Boilers lists several possibilities. |
|
In May 2012, I had BGE Home come out to give us a price quote for removing the oil boiler, removing the oil tank, purchasing and installing an Energy Star rated gas boiler, purchasing and installing an Energy Star rated gas water heater, setting up the gas exhaust system, and doing drywall work to hide the exhaust pipes that would exit through the north end of the house. Not included in this cost is the price for running a gas line to the house. BGE would handle that and they are a different company from BGE Home.
I got quotes for two options. The first includes a Columbia UB90-75 90% efficient gas boiler and a Rheem 43VP40E2 67% efficient gas water heater. The estimated annual operating cost for this water heater is $272, which is 60% the cost of our current electric water heater. Our boiler helps out with heating water about 50% in the winter. So a ballpark estimate is that 1/4 * 50% = 12.5% of the hot water we use is heated by oil. Assuming this, the actual electric operating cost for the water heater is $238...a savings of $160.76. Total cost for this option is $13,072. Adding on the $740 to run a gas line to the house brings the total to $13,812. The second quote includes an ECR 97gb 97% efficient condensing water boiler and a Rheem 43VP40E2 gas water heater. The total cost for this option is $14,313. Adding on the $740 to run a gas line to the house brings the total to $15,053. I mentioned in Oil versus natural gas boiler that a 93% efficient natural gas boiler will reduce our heating costs 71%. Based on this, I estimate that the 90% efficient gas boiler would reduce our heating costs by 71% * 90/93 = 69%. This means an annual savings in heating costs of $867.10 * 69% = $598.30. Add on the savings from water heating and the total annual savings comes to $759.06. The 97% efficiency natural gas boiler will reduce our heating costs 71% * 97/93 = 74%, resulting in an annual savings in heating of $867.10 * 74% = $641.65. Once the savings from water heating is also included, the total annual savings is $802.41 per year. Thus, for the first option that uses a 90% efficient gas boiler, the estimated return on investment is $13,812/$759.06 = 18.20 years. For the second option that calls for a 97% efficient gas boiler, the estimated return on investment is $15,053/$802.41 = 18.80 years. I got other price quotes. Don Stilling from Chesapeake Heating and Cooling came out and checked things over. He made a great impression but never got back to me with a price. Too bad. He seems like a great guy and I am more inclined to go with a small company like his. Next, I spoke to Jeff Hutchins at Cool Breeze Heating and Air Conditioning who quoted me $12,900 for a Weil McClain Ultra 105, 95.3% efficiency gas boiler with a matched Weil McClain Series 3, 40 gallon indirect fired hot water tank. This price does not include removal of the old oil tank. An indirect fired hot water tank is like the one I currently have which is helped out by the boiler. From what I've been told, this will give me the most bang for my buck...even more than a tankless hot water heater which I find hard to believe. Lastly, I spoke to John Van Horne of Arundel Heating and Cooling. Their Better Business Bureau rating is A+ and they are listed in the Howard County Best Pick Reports Quality Home Services Guide 2013. This is a pretty big company though not as big as BGE Home. I thought a bigger company would charge me significantly more than a smaller one but this was not the case. He quoted me $12,941, also for a for a Weil McClain Ultra 105 96% efficiency gas boiler with a matched Weil McClain 40 gallon indirect fired hot water tank. This price does not include removal of the old oil tank. Annual maintenance would be about $147. If nothing else, it seems the Weil McClain Ultra 105 gas boiler with a matched Weil McClain 40 gallon indirect fired hot water tank is the way to go being as two companies both recommended them independently. I'm guessing we have a medium efficiency electric water heater. How does this compare to a high efficiency gas storage water heater? American Council for an Energy-Efficient Economy (ACEEE) (a broken link as of 2020) says such a unit costs $323 in energy per year. Deducting 12.5% if the unit were to also receive help from the gas boiler would mean an actual annual energy cost of $282.63, a savings of $116.13 for a high efficiency unit. In terms of return on investment for the dual Weil McClain option, I estimate that the 95.3% efficiency natural gas boiler will reduce our heating costs 71% * 95.3/93 = 72.76%, resulting in an annual savings in heating of $867.10 * 72.76% = $630.87. I was unable to find good data regarding energy usage for the Weil McClain 40 gallon indirect fired hot water tank so I'm assuming it will save me $116.13 annually. This means a yearly energy savings of $630.87 + $116.13 = $747. Regarding cost, if I go with Arundel Heating and Cooling, then I am looking at $12,941 plus $740 for the gas line plus about $300 for the old oil tank removal if I work through a fellow by the name of John Straman. This means a total cost of $13,981. So the estimated return on investment is $13,981/$747 = 18.72 years. I am surprised that the costs between different companies makes so little difference in terms of return on investment. I did not tell any company what the others were charging so as far as I can tell, their quotes were independent. One big difference about the return on investment for going from oil/electric to gas as compared to going solar is that for solar, the return on investment is very quick due to government incentives. Not so with oil/electric to gas. But this means that once making the switch from oil/electric to gas, the savings will be constant, whereas the savings from solar are relatively smaller after the tax breaks have already gone into play. An important question is whether or not we will live in our house long enough for the conversion to gas to pay for itself. The likely answer is no. But one thing that was not factored in is the increase in value to my home once a gas boiler and water heater is installed. Every source I read says that the value of my home will go up. But I only found one source that mentioned just how much. According to chpkgas.com "Chesapeake Natural Living, April 2011" (now a broken link): If you don't currently have all gas appliances at home, perhaps it is time to consider replacing electric appliances with natural gas appliances to improve resale value. At least that's what a new study by the National Association of Home Builders discovered. The national survey, prepared for by the Energy Solutions Center by the National Association of Home Builders in November 2010, asked NAHB's builder members to compare the prices of newly built single-family homes with only electric equipment. According to the study, homes powered by gas fuel sold for higher prices than electric homes - regardless of the size of the home. The gas home, on average, sold for 6% more than the electric home. I'm not saying our home will increase in value 6% because we go from an oil boiler and electric water heater to a natural gas boiler and water heater. The study above was done on NEW homes that used natural gas appliances, which I assume means stove and oven in addition to heat and hot water. So instead, let's assume that our home value increases only 4%. Having paid $274,900 in December 2009, that means an increase in value of $10,996. It would really probably be more than that because I am talking about replacing a 20+ year old boiler with a new one but for now, we'll just assume $10,996. Thus, if we sold the house before the switch to natural gas paid for itself, then we would reap the costs in increased resale value as long we we lived here for at least ($13,981 - $10,996)/$747 = four years! |
|
After coming up with my return on investment figures for switching from oil to natural gas, Norma mentioned that it might be difficult to sell the house if it lacks central air. Right now, we use three window air conditioning units. Recall that we spend almost all our time on the upper floor. This means we stay warmer in the winter. But we also stay warmer in the summer. So keeping cool is a challenge. We try to use the ceiling fans I installed and if it is cooler outside than inside, we use the whole house fan in the attic to draw air in from the outside. But this only goes so far. In July and August, the Baltimore area can get really hot and humid. The window air conditioning units are noisy and don't do a great job of keeping the place cool.
But back to the resale concern. I asked five of my male co-workers (85% of my co-workers are male) if they would buy a house that lacks central air. Four of them said no. One mentioned that a lot of people who look to buy in Howard County have a pretty good amount of money and wouldn't want to go without central air, even if that meant paying much less for a house. One of my wise co-workers (Steve O.) suggested I keep my oil boiler and get a heat pump and air handler. Then the heat pump could be wired to the boiler so that the boiler goes on when it is too cold for the heat pump to function efficiently. Of course, this would require that our house be set up with a forced air system and have ductwork installed. Not a small task but perhaps the one with the most reward. According to "Energy Savers: Heat Pump Systems" (a broken link as of 2020): For climates with moderate heating and cooling needs, heat pumps offer an energy-efficient alternative to furnaces and air conditioners. Like your refrigerator, heat pumps use electricity to move heat from a cool space into a warm, making the cool space cooler and the warm space warmer. During the heating season, heat pumps move heat from the cool outdoors into your warm house; during the cooling season, heat pumps move heat from your cool house into the warm outdoors. Because they move heat rather than generate heat, heat pumps can provide up to four times the amount of energy they consume. The most common type of heat pump is the air-source heat pump, which transfers heat between your house and the outside air. If you heat with electricity, a heat pump can trim the amount of electricity you use for heating by as much as 30%-40%. High-efficiency heat pumps also dehumidify better than standard central air conditioners, resulting in less energy usage and more cooling comfort in summer months. However, the efficiency of most air-source heat pumps as a heat source drops dramatically at low temperatures, generally making them unsuitable for cold climates, although there are systems that can overcome that problem. According to HowStuffWorks: How Heat Pumps Work: Heat pumps also work extremely efficiently, because they simply transfer heat, rather than burn fuel to create it. This makes them a little more green than a gas-burning furnace. And they don't just heat and cool buildings. If you've ever enjoyed a hot tub or heated swimming pool, then you probably have a heat pump to thank. They work best in moderate climates, so if you don't experience extreme heat and cold in your neck of the woods, then using a heat pump instead of a furnace and air conditioner could help you save a little money each month. Now I wouldn't necessarily say the Baltimore area of Maryland has a moderate climate. According to Wikipedia - Baltimore, our July average high temperature is 90.6 degrees while our January average low is 29.4. But like I said, we could have our boiler rigged up to turn on when the heat pump can't do its job. Plus, Norma and I aren't exactly into keeping the place toasty warm in the winter or super cool in the summer. So maybe we could have it all. We could keep our inefficient oil boiler and water heater that still work, but rely on the boiler much less, have air conditioning, cut our heating costs, and do something good for the environment. I contacted Jeff of Cool Breeze and John of Arundel Cooling and Heating again. I explained to them both my intention and asked for their input. I also asked about geothermal. John said, "Geothermal is a great long term value if you plan on staying in your home for at least the next ten years." According to "Energy Savers: Geothermal Heat Pumps" (now a broken link): the installation price of a geothermal system can be several times that of an air-source system of the same heating and cooling capacity. |
|
The focus of this web page is heating but since we're now talking about heat pumps and saving money, I feel it is now also important to address cooling since a heat pump and air handler do indeed provide air conditioning. I have not done a study as to how much electricity we spend on air conditioning. I certainly could but the fact of the matter is that we really aren't comfortable with as little as we run our air conditioners so gathering data on how much it costs to keep us mildly uncomfortable in the summer isn't terribly useful although it does establish a bottom line in term of the minimum we would spend on cooling without central air.
So instead, I'll just use data based on surveys for the common household. According to Carbonrally - air conditioner costs (a non-existent website as of 2020) Air conditioning alone is responsible for about 16% of the average household's annual electricity bill. That comes out to nearly 2,800 kilowatt hours (kWh) of electricity per year for homes with central air conditioning and 950 kWh for households using room air conditioners (i.e., window units). At an average nationwide cost of 10 cents per kWh, the average air conditioning system costs $280 to run each year. Since we have window units, let's assume our consumption is indeed 950 kWh and that we pay 12 cents per kilowatt hour. In actuality, as of July 2012, we pay 8.87 center per kilowatt hour to Dominion Energy Solutions but once you add in all the taxes, surcharges, and delivery service, it comes out to 12.3719 center per kilowatt hour so for now, let's just assume 12 cents per kilowatt hour. This means that if we were comfortable, our cooling costs would be 950 * $0.12 = $114 annually. We have done a few things to try to keep us cooler without running the air conditioning. I installed two ceiling fans, we insulated the attic, we open the windows at night, and we run the whole house fan with the windows open when it is cooler outside than inside on warm days to draw air in. We have three window air conditioning units that came with the house when we bought it. I have the instruction manuals for them but they aren't very helpful as they don't list the Energy Efficiency Ratio (EER) or SEER rating. These models are old enough so I couldn't find this information on-line either but at the time, at least one of these units had an Energy Star certification. The original owner manually wrote on one of the manuals that one of the window air conditioning units has an 11.0 EER so for lack of better data, I'm going to assume that is the case for all three. What is the difference between EER and SEER? SEER stands for seasonal energy efficiency rating. It's a benchmark of how much electricity a given A/C system uses to deliver each Btu/h of cooling power compared to another one under a standard, fixed set of rating conditions. This benchmark system is managed by the Department of Energy, and they decide what the testing standards are. The higher the SEER number is, the higher the score the system has received on the D.O.E. mandated efficiency tests. In the old days, A/C systems were given only an EER (energy efficiency rating, without the "seasonal" prefix). EER ratings are still used today in addition to the SEER rating. But some felt that EER system was not a good system for measuring the efficiency of the system over time, because it failed to take into account the fact that it takes some systems much longer to reach peak efficiency after they come on. And no system runs constantly throughout the entire cooling season. This factor was not considered in the EER tests. The other issue was that in most parts of the country, the system is not going to be running in 95F outdoor temperatures used for EER tests very often (if at all) during the cooling season. So the 82F outdoor temperature was chosen for the SEER tests. So the SEER system was born a few decades ago to include those factors (cycling efficiency and 82F outdoor temperatures) into the testing process. - from "SEER ratings versus actual efficiency" (a broken link as of 2023) For my caluclations, I'm going to assume EER and SEER are the same thing. They are indeed very related. The "Home Depot Central Heating and Cooling Systems" brochure shows the relationship between annual cooling costs and SEER. There isn't an exact entry for our $114 per year situation but this can easily be interpolated as the relationship is linear. In Carbonrally, it mentions that folks with central air use much more electricity (2.95 times as much) than people with window units. Why is that? Perhaps people with window units cool only the space they need whereas the central air units cool the whole house. This makes it hard to compare actual projected cooling costs between switching from window units to central air. But one of my requirements in a central air system is the ability to run only the air handler to simply circulate the cool air from the basement to the upstairs. The cost of this should be minor while it might actually save money and make us more comfortable. Maybe it will make up for the difference in cooling costs for switching systems. I really don't know. So for now, I will only compare kilowatt usage when comparing cooling systems and assume that regardless of the system, our usage is the same given equal SEER. |
|
Jeff of Cool Breeze said he didn't need to come out and see me again since he already knows the layout of our house based on our previous visit. I asked him to give me a quote by July 9 but he never got back to me.
John of Arundel Cooling and Heating came out and we spoke for about 90 minutes. He really knows his stuff and explains things well. He suggested two systems. Carrier Infinity Series, two stage heat pump 25HNB624A
Carrier Infinity Series, inverter heat pump with Greenspeed technology 25VNA024A
|
|
Now that I know what a conventional heat pump can do for us, what about a geothermal heat pump?
According to the U.S. Environmental Protection Agency, geothermal systems are the most energy-efficient, environmentally clean, and cost effective space conditioning systems available today." Here are some questions I came up with after reading about geothermal, and talking to some of my very intelligent co-workers: Pipes used for geothermal are made from a special polyethylene and has a life expectancy of 100 years. Pipes are welded together at 500 degrees for 20 minutes to ensure strong, permanent bonds. They are then surrounded by grout to ensure better thermal conductivity. According to Michael Isom of Michael Barlow Well Drilling Service, Inc., the pipes are warranted for 50 years. After the pipes are installed, they are presure tested and the fusions are warranted for a year. In the unlikely event that a leak is found after the warranty expires, repairs frequently cost around $500. Michael has found pipes in geothermal wells to be less prone to damage than pipes in water wells. He knows of no problems with geothermal wells resulting from the 2012 Maryland earthquake. 4-6 feet. This makes sense as it must certainly be below the frost line and be unaffected by any surface temperatures to take advantage of the 55-57 degree constant temperature deeper down. For us, a vertical well closed ground loop water to air system would be the best choice due to our property layout. Michael Isom said the pipes that run from the well to the heat pump will be at least four feet deep. According to John of Arundel Heating and Cooling, the cost of running the air conditioner in the lower (more energy efficient) setting is about the same as running a 60 watt light bulb. Not only does this setting cool the house but it also dehumidifies. But if I don't even want to use that much energy, I can just run the fan and circulate the cooler air in the basement throughout the house. According to John of Arundel Heating and Cooling, I am not fond of installing a humidifier in an attic, just because of having water in the attic during the winter and the possibility of freezing up. What he says makes sense. Especially with it freezing, when we would need it the most is when it would not work. Also if something broke, it could introduce mold. According to North American Geo - Dominion Geothermal (a broken link as of 2020), the answer is yes. A properly sized ground-source GeoThermal ground source heat pump (GSHP) systems can provide 100% of your heating and cooling requirements and at the same time provide domestic hot water. Outside temperatures do not affect GeoThermal GSHP systems. This makes sense if you think of the way a heat pump operates. For a non-geothermal heat pump, the ability to transfer heat diminishes as the temperature drops with 38 degrees often being the threshold where an auxiliary heat source is needed. But with a geothermal system, rather than transfer heat/cold to a variable outside temperature, it deals with a non-varying temperature which is well above the threshold for efficient heating via heat pump. This is the theoretical answer. Realistically, the answer is no. Once it gets very cold, the heat pump just won't be able to keep the house warm even though the air it blows will be 98-101 degrees. Remember that my 1952 house has little wall insulation. So I'll still need an alternative heat source (e.g. oil boiler) for when things get really cold. But the geothermal system will easily meet my cooling needs, blowing air that is about 20 degrees cooler. Even with a very efficient conventional heat pump, I would still need to use an auxiliary heat source (i.e. my oil boiler) on those really cold days. Though that might mean I would just use a little oil instead of a lot, I would still need to get it serviced, which costs $144 each time. Eliminating this cost would make me a happy camper. According to Geothermal Genius, GSHP systems are generally sized to meet all your cooling needs. Depending on heating needs, a GSHP system usually supplies 80-100 percent of your design heating load. Sizing the system to handle your entire heating needs may result in slightly lower heating costs, but the savings may not offset the added total of the larger system. Additionally, a dual system can easily be added to existing furnaces for those wishing to have a dual-fuel heating system. Dual-fuel systems use the GSHP system as the main heating source, and a fossil fuel furnace as a supplement in extremely cold weather should additional heat be needed. It will take some trial and error to find the right balance but it sounds like once the outside temperature is 25-32 degrees or colder, the oil boiler might need to turn on. Also according to Dominion Geothermal, A GeoThermal GSHP systems is highly reliable. With only three moving parts, service life of the unit is 25+ years under normal use. Many manufacturers offer a 10 year coverage on major parts. The manufacturers of the polyethylene earth loop, used for for the underground heat energy transfer, warrant their product for 50 years. Independent tests show a useful life-span of over 200 years. Arundel Heating and Cooling warrants their heat pump and air handler for 10 years parts and labor. The air compressor is also warranted for 10 years. According to Hot Water with a Residential Geothermal Heat Pump If you plan on using your ground source heat pump for hot water, you'll need to add a desuperheater. A desuperheater captures the heat that is naturally lost by running the heat pump. As efficient as a geothermal heat pump is, there is a small amount of heat produced by the pump that is not used to heat your home. A desuperheater captures this expended heat and pumps it to the hot water tank. Additionally, according to North American Geo - Dominion Geothermal (a broken link as of 2020), they also have the ability to provide domestic hot water at a savings in water heating costs of up to 100%. According to North American Geo - Dominion Geothermal (a broken link as of 2020), The GeoThermal GSHP units have extremely long service lives of 25+ years and under normal use only require periodic checks and filter changes. The other half of the system, the earth loop located in the ground, is 100% maintenance free, will never freeze, and carries a 50+ year warranty. According to Geothermal Genius, GSHPs are very quiet, providing a pleasant environment inside & outside of the home. GSHPs have no noisy fan units to disturb outdoor activities, on or near the patio. For the GT-PX Split Geothermal Heat Pump, GT-PE Outdoor Split Geothermal Heat Pump, and other Carrier geothermal heat pumps, Puron refrigerant is an environmentally sound refrigerant designed not to harm the earth's ozone layer. Federal law requires that all manufacturers phase out ozone depleting refrigerants in the next few years. Puron refrigerant is approved by the US Environmental Protection Agency as a replacement from Freon 22. In the well, a glycol (grain alcohol) and water mixture is used. The glycol is a safe form of anti-freeze. According to John of Arundel Heating and Cooling, the system does has a time delay, which is there in case of a power outage or surge. There is also a surge protector that can be mounted in your service panel. About 70 percent of the energy used by a geothermal heat pump system comes in the form of renewable energy from the ground. High-efficiency geothermal systems are on average 48 percent more efficient than gas furnaces, 75 percent more efficient than oil furnaces, and 43 percent more efficient when in the cooling mode. According to data supplied by the U.S. Department of Energy (DOE) Office of Geothermal Technologies, nearly 40% of all U.S. emissions of carbon dioxide are the result of heating, cooling, and hot water systems in residential and commercial buildings. This is roughly equivalent to the amount of carbon dioxide contributed by automobiles and public transportation. Because geothermal pump heating systems do not burn fossil fuels for heat production, they generate far fewer greenhouse gas emissions than a conventional furnace. They also provide higher air quality because there are no emissions of carbon monoxide. In general, a 3-ton residential geothermal heat pump system produces an average of about one pound less carbon dioxide per hour compared to a conventional system. Over an average 20-year lifespan, installation of 100,000 units of residential geothermal systems can reduce greenhouse gas emissions by almost 1.1 million metric tons of carbon equivalents. That would be the equivalent of removing 58,700 cars from our highways or planting more than 120,000 acres of trees. - from "Geothermal Heat Pumps: Environmental Benefits and Efficiency" (a broken link as of 2023) Additionally, ...greenhouse gas emissions associated with the use of a geothermal heat pump are 55 to 60 percent lower than those from a standard air-source heat pump. In most areas of the United States, geothermal heat pumps had the lowest CO2 emissions and the lowest overall environmental impact of any space conditioning technology evaluated by the EPA. Putting a geoexchange system in a typical home is equal, in greenhouse gas reduction, to planting an acre of trees. - from Environmental Impact of Geothermal Heat Pumps |
|
I know that having central air will increase the value of our home signficantly when compared to the cost of installation. But how will a geothermal system increase the value as compared to a conventional heat pump? Let's step back and look at this from a different point of view. Our house already has solar photovoltaic solar panels. We can store about 450 gallons of rain water in rain barrels/boxes to use for watering plants. I am hoping to eventually get a new roof on the house and solar panels for heating water (and possibly more photovoltaic panels put on). After all this, it would be pretty hard to deny that our house is "green." And according to Green homes sell for 9% more in California, that would significantly increase the value of our house as compared to non-green homes. Of course this data only applies to California but what often starts in California ends up spreading to the rest of the country and I believe this will be the trend, especially for a place like Howard County that has so many educated and liberal people.
As with my photovoltaic solar panels, there are a number of tax incentives for those wishing to have a geothermal heat pump installed. See Maryland is Perfect for Geo, Geo is Perfect for Maryland for more information. But sadly, as of 2012, Howard County no longer offers any incentives for geothermal or solar. So much for the county, which in 2011, was ranked the third wealthiest county by median household income in the United States by the U.S. Census Bureau. - from Wikipedia - Howard County, Maryland Arundel Heating and Cooling
Chilltrol
Love's Heating and Air
Choosing a company
|
|
Now let's compare geo to solar energy. In solar energy, I documented the costs and savings associated with my photovoltaic solar panels. The up front cost for the solar work (not the roof work) was $24,485. It saves me $568 per year in energy costs. This system should pay for itself in a little under five years after all the tax incentives are taken into account. But this is a best-case and unrealistic scenario where SRECs maintain their value from the initial time of purchase.
In contrast, for geothermal heating and cooling, the up front cost is $23,370; compared with the cost of solar, the difference is about 4.5%. The expected savings per year in energy costs for geothermal is $559.44; compared with the energy savings from solar, the difference is about 1.5%. The return on investment for geo is greater than the photovoltaic solar panels if you consider the tax incentives and the expected increase in property value. Regarding the latter, it really doesn't apply so much for the solar panels, as I describe in Solar energy - Increasing the value of your home?. In contrast, geothermal isn't so location dependent. What's more, going from having no forced air and a very old oil boiler to having forced air through a new geothermal system will undoubtedly increase the value of my home. |
|
On August 31, 2012, I mailed the signed contracts with the first payment installation fees to Arundel Heating and Cooling and Michael Barlow Well Drilling Service, Inc. I already provided Barlow with a survey drawing of our property so they could get the required digging permits from the county. I also sent Arundel the information for the WhisperFit-Lite 153; 80 CFM Low Profile Ceiling Fan, Model number: FV-08VFL2 so their electricians could prepare to install this in our bathroom.
The work was scheduled to commence in mid to late October. I removed a chain link fence post so Barlow could get one of their digging machines into the back yard. The work actually began on the week of November 5, 2012. Hurricane Sandy hit on October 28 and 29 which prevented earlier commencement. John, from Arundel Cooling came by with Rob and Josh who did the duct work over the next few days. Later, they brought Tommy who did the electrical work. This was no easy task as our small house didn't allow much room for them to work or put in ducts. They made plans then had to switch to new plans because they kept running into beams, pipes, wires, or junction boxes. But they got the work done and did a great job. They put a return in my closet that pulled air from the basement to the air handler in the attic that allowed me to still use most of my closet. If I had to do this part over again, I would have had them install a rectangular, rather than a round duct in the closet so it could be flush up against the side and take up less usable space. They also had vents in the kitchen that hung from the ceiling and dropped down about a foot through the plastic light covers. These did not block the lighting or detract from the overall appearance of the kitchen. The WhisperFit-Lite 153 fan was put in the bathroom to suck moist air out and put it outside via a pipe that ran into the attic then out the soffit. This fan ran via its own switch, with all wires hidden behind the drywall. The well was drilled on November 7. That was an amazing process which reminded me of the movie "Armageddon." Three guys brought in a huge vehicle and maneuvered it into position without damaging my or my neighbor's trees. 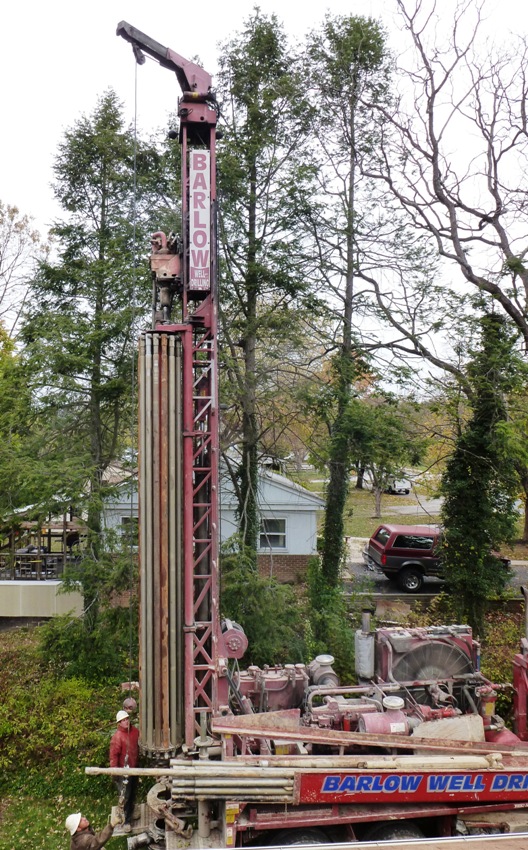
Then they started digging. The machine is fully automated so there isn't much manual work to be done. It is also very loud. I climbed up on the roof to watch. Click the below image to start a video. 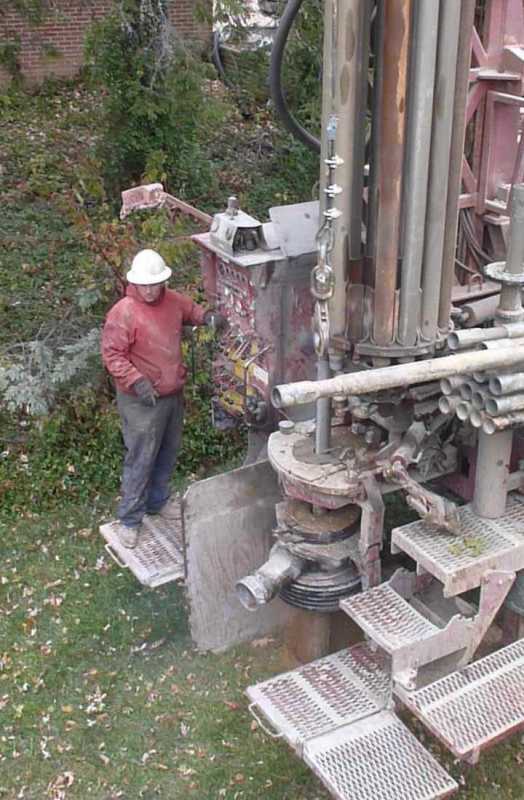
First, they hit dirt. 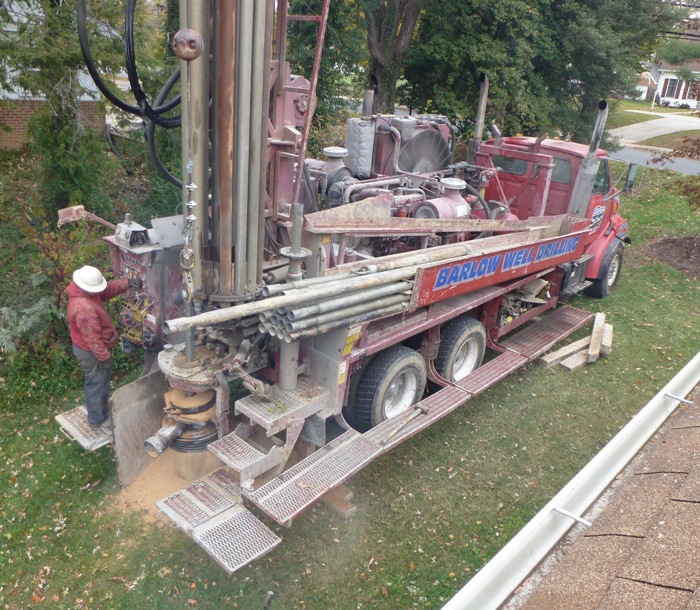
Then they hit sand. Next, they hit rock. 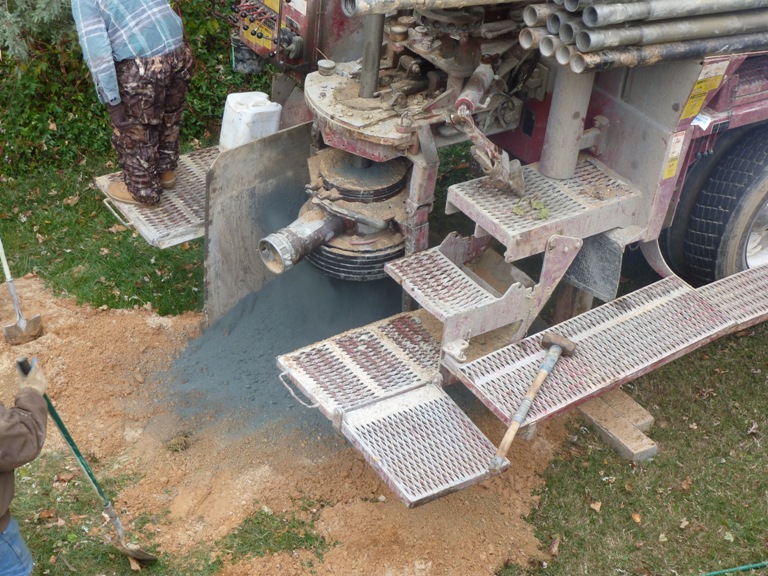
Shortly after, some stuff started coming out of the ground that looked like milkshake. 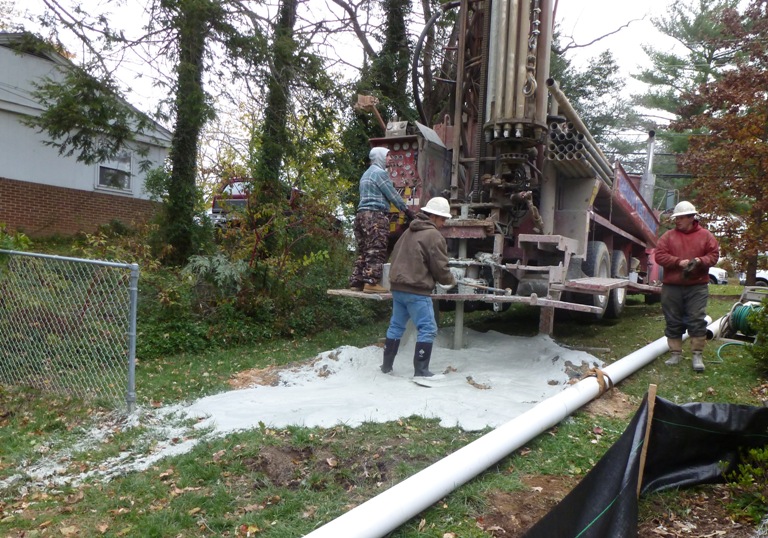
Next, they switched from a drill bit with three small round grinders to a single. A little later, they hit more rock and lots of water. Click the below image to start a video. 
Some of this might have been water that was forced into the hole, possibly to keep things from overheating. The liquid that came out looked like watery grey paint though I suspect much of that might have just been crushed rock mixed with the water. Mike told me that after 40 feet, they hit rock and that was pretty much it for the rest of the way down to 300 feet. Their staked tarps caught the runoff, thereby keeping it from messing up most of my yard or getting into the Little Patuxent River. Norma had me move the runoff to her garden beds and our fruit trees. I told her about one of my co-workers who vacationed in Iceland. He told me they had a big volcanic eruption which they expected would devastate their farms. Instead, it increased crop production significantly. So Norma figured all the crushed rock dug up from the well drilling might do the same for her garden. It made no difference. After drilling, they inserted black pipes into the hole. These would hold the glycol mixture. They ran down into the well which was partially lined with PVC. 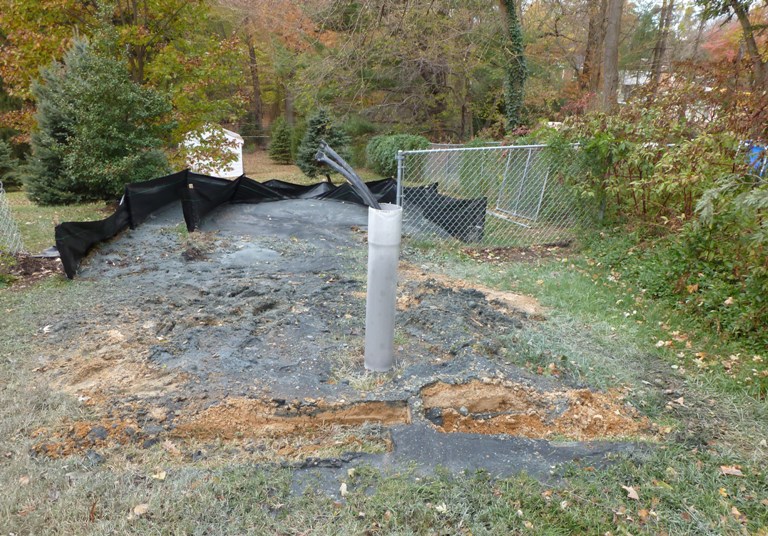
Two days later, a couple of guys came back to fill the hole with grout, which will aid in temperature transfer between the ground and the glycol. This wasn't just bathroom tile grout. It was specially made for transferring heat. The well drillers came back to dig a trench where they laid a pipe to connect the well to the heat pump. If you have a nice lawn (which I don't), then you'll have to start all over again to get your yard looking pretty. My yard took a beating with the drilling, trenching, and big vehicles driving on the grass. But you know what they say, "You have to crack a few eggs to make an omelet." 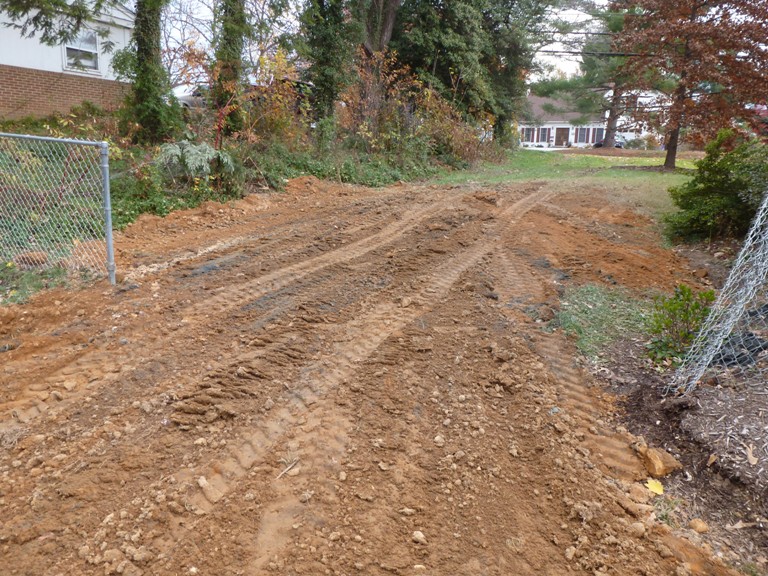
Just make sure to include any costs for getting your yard back in order on your tax return when claiming the 30% federal tax refund for geothermal heating/cooling. Based on satellite photos, I estimate about 1,500 square feet of lawn is in need of repair to include fixing about 20 feet of fence line. To cover two inches at 1,500 square feet with dirt would require about nine cubic yards. It took 10 days to complete the job. For each day, I started work real early (about 0600), then came home around 0820 so I could be here when the workers arrived. I wanted to talk to them, find out what they planned to do for the day, and be there to answer any questions. This was a good thing as they ran into the obstacles I mentioned (beams, pipes, junction boxes, etc.). It was much better for me to be home so they could show me the issues rather than describe them via phone. I would take care of stuff at home, then head back to work around 1100 and work until late. I felt comfortable leaving the guys in my home alone to work. On November 15, a crew from Barlow's came by to flush out the system and fill the well pipe with a glycol mixture. Bill of Arundel Cooling (Josh's father) then hooked up the system. Next, Bill gave me an overview of the Carrier Infinity Control programmable thermostat. He set it so that the oil boiler would come on when the outside air temperature is 30 degrees. At that moment, on November 15, 2012, I had geothermal heat working in my house. I was surprised at how quiet the sysytem is. It is far quieter than my oil boiler. Even outside, the heat pump is quiet. I can hear it under the deck but it is not all that noticeable. It is far quieter than the 2007 air conditioner at my townhouse. One thing I was told by one of the drillers is that after a full heating and cooling cycle (sometime in late summer or early autumn 2013), it is possible that there could be a pressure drop in the pipes after they expand. The system may stop working until the system is repressurized, which is not difficult. My attic (see attic insulation) was once a place where I could store things. But those days are now gone. The duct work takes up a LOT of space...more than I originally expected. Not that I'm complaining about the lack of space in the attic. It is well worth the cost to have a more comfortable and energy efficient house. But if you are considering getting a forced air system installed in your house and you store stuff in your attic, you should definitely make plans to store your junk elsewhere. The air handler they installed is not small. 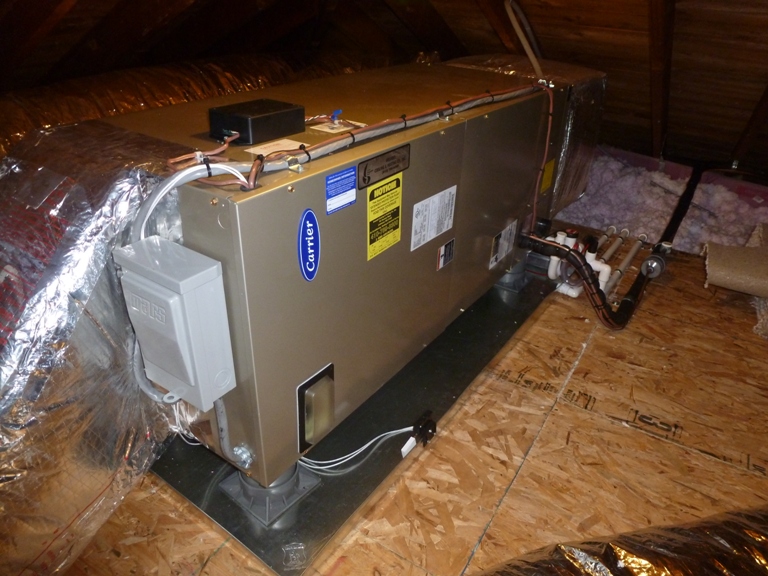
Rob and Josh had to take apart the air handler then reassemble it in the attic because it wouldn't fit through the attic entrance. John said they could have used a smaller one but in order to qualify for all the rebates, I needed a larger one in order to bring the efficiency rating up to the standard required for the rebate. The other half of the efficiency equation is the heat pump. 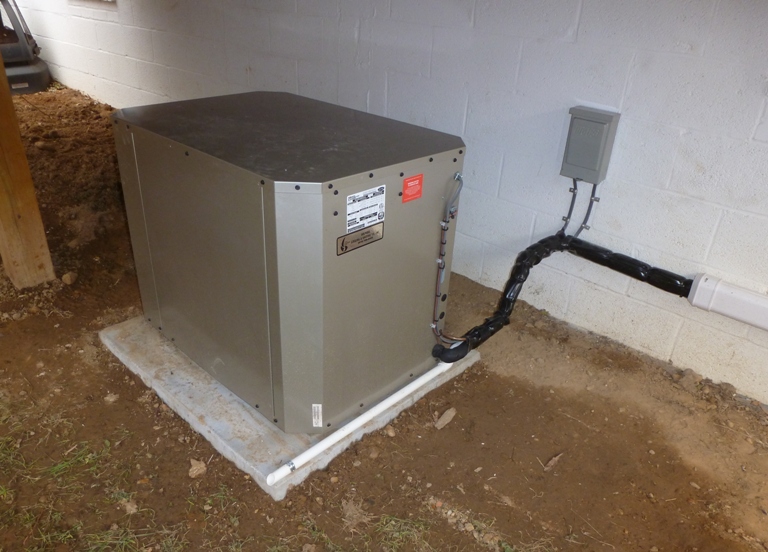
The thermostat tells us both the inside and the outside temperature. We had problems with this at first as it sometimes gave a reading that was much hotter than the actual outside temperature. John (not Van Horne) came out on November 28 and determined that the outside thermometer (he called it a "thermister") was in the heat pump box and not getting an accurate reading. It was likely picking up a interference from the heat pump or picking up heat when the sun hit the heat pump. What seemed strange at first is that even though the outside temperature read 39 degrees on the thermostat, the oil boiler still came on when the actual temperature was under 30. I'm guessing that is because we still have another thermostat in the basement that is only hooked to the oil boiler. John tried moving the thermister to a different part of the heat pump but that didn't work either. So he moved it outside the box about 3.5 feet so it attached to my deck in the shade. He then took a reading from the thermostat and compared it to the actual outside temperature. All good. John then patched up a small hole in the insulation that I pointed out. He promised someone would be back to put a PVC case around the wire that runs out of the heat pump, up my house wall to the thermister. That was taken care of the next day. Monitoring the outside temperature and comparing it to NOAA, I found the thermostat sometimes gave us readings about five degrees warmer but I attribute this to the fact that it is still attached to the house in a location that might be a little warmer than the actual air temperature. Also on November 28, I received a "Well Completion Report" from the state of Maryland. It confirmed that the depth of the hole really is 300 feet. Forty feet of six-inch diameter plastic pipe was used to keep softer materials from caving in the well. Then, once the closed circuit pipe was placed in the well, 1,000 pounds of bentonite clay grout was used with 500 gallons of water to fill in the well and aid in heat transfer. The report also mentioned what they found when digging at various depths. Schist rocks are metamorphic. These rocks can be formed from basalt, an igneous rock; shale, a sedimentary rock; or slate, a metamorphic rock. Through tremendous heat and pressure, these rocks were transformed into this new kind of rock. Using the thermostat, I lowered the temperature for which the oil boiler was to turn on to 28 degrees on December 23, 2012. My goal is to find the optimal threshold for minimizing our heating costs while still remaining comfortable during the winter. John Van Horne set me up with an inspection with the county which was done on January 10, 2013. This was a two step process. I had to meet with both an electrical inspector and a mechanical inspector. The prior went very fast. The latter took a little longer because the guy wasn't familiar with the system I had. So be sure to save all your documentation. They couldn't give me a time estimate of when they would arrive until that morning or the afternoon prior and even then, one of the inspectors arrived about 45 minutes after the end of his time window. During the week of January 20, 2013, we had some very cold temperatures. Highs remained below freezing and lows were well under 20 degrees. The heat pump was doing fine with the oil boiler coming on when the outside temperature is 28 or below so I decided to take things one step further after consulting with John. I dropped the oil boiler threshold to 26. How well the system performs will be based on two things: how much oil we use and how the system affects our electric bill. After all, for us, heating is all about electricity and oil. At the time the system became operational, the oil gauge looked like it does in the below pic. I'd like to go a whole winter without buying more oil. We'll see if that is the case. 
|
|
On May 30, 2013, we turned on our heat pump in the cooling mode. It pumped out air but it didn't feel cold. But I decided to give it a chance. Maybe it took awhile. But a day later, it was actually cooler outside than inside. Clearly something was wrong. I contacted John. Justin was sent out to take a look at things the next day. Justin spoke to Billy who told him to look at the Network Interface Module (NIM) board in the air handler. Apparently, this went bad. I'm thinking it might have been during the power outage we had a few weeks ago. I think a transformer blew. There were loud noises coming from our street when the power went out. I remember those noises a year ago when power went out. There could have been a power surge but I would think the system would have been protected. Justin got the air conditioner working by having it run in the secondary mode which is less efficient. They would have to order a new part which would arrive in a few days. But at least I would have cool air in the meantime. It seems this part is much too fragile.
On June 7, 2013, Stephen came out to replace the NIM board. This took 5-10 minutes. Of course the system was under warranty but I had my concerns as to what would happen if that was not the case. He said replacing such a board costs about $300 but he didn't expect there would be a charge even if the warranty expired since it was noted that this was a problem due to a design flaw of the system. On June 13, 2013, we had a big storm. A tornado was spotted in Laurel. In Savage, a few trees took damage. Norma worked from home that day and noticed that the lights flickered. Then the heat pump stopped producing cold air. I contacted John that night and the next day, Stephen came out to check on things. He found that the problem was a blown fuse. He said these are common fuses that can be purchased at a hardware store and easily replaced by pulling out the outdoor disconnect and simply replacing. One would need an electrical tester to see which of the two fuses is bad. In the receipt for the work order, Stephen wrote Recommended electrical department install additional surge protection because house seems to be prone to electrical surges. I monitor our electric bill meticulously. I expected our summer bills to be slightly higher than previous summers because we are using a central air conditioner rather than window air conditioners. I didn't think the difference would be significant. But it was. Something was wrong. I adjusted the setting so that the fan would run in "low" mode. I remember John telling me that in the low mode, I would feel very little air coming out of the vents. But quite a bit was coming out. It shook the blinds and actually made us chilly. So I contacted Arundel Heating and Cooling and asked them to send someone out. On August 8, 2013, Billy arrived and adjusted the system. He spoke to the folks at Carrier for awhile and disconnected a wire that should not have been connected. I checked the system later that day and noticed no difference. The fan still blew hard, even in the low mode. Billy came back the next day and tested out the thermostat. He said it wasn't working properly so he replaced it with a newer one, the SYSTXCCITN01 Carrier Infinity Touch. On September 1, 2013, I took some poster board and covered up 75% of my upstairs return. The reason for this is so that more air will be drawn from the downstairs return. Indeed, more air is being drawn downstairs as a result of this. The downstairs area does not have vents, only a return. So the air doesn't circulate well and it tends to be humid down there though nowhere near as humid as it was before I had the old leaking electric water heater replaced by a solar one. If this change doesn't increase the air circulation in the basement, then I'll have to take things a step further. On October 6, 2013, our house was recognized as one of several on the "4th Annual Maryland Tour of Solar and Green Homes." This means it was listed in a booklet and open to the public for the afternoon. What makes our home green? We use solar photovoltaic panels, solar thermal water heater, geothermal heat pump, rain barrels, extra insulation in the attic, composting, and a pellet stove which burns fuel made from sawdust and other wood waste. All this in a home built in 1952! The event was a success. I had about 25 attendees, mostly neighbors, co-workers, and kayakers, and there was never any down time. It lasted from 1100 to 1800. In November 2013, John G. of Arundel Heating and Cooling came out to give me a price quote for installing the Square D model #SDSA1175 whole house surge protector. Since I have had problems with power surges affecting the heating and cooling system, they gave me a discount. Normally it would have cost $750 for the surge protector and installation but they were willing to charge me $575. That still sounded pretty expensive to me and one of my co-workers agreed. I contacted some other companies and much to my surprise, most of them never got back to me or said that they don't install whole house surge protectors. But Bayside Electric Company did get back to me and came out to give me a quote: $350 for a Surgeassure model TE/1C40. They have an A+ rating with the Better Business Bureau. I decided to go with that and had the work done on December 6, 2013. It took two guys less than an hour to install. The only inconvenience is that the breakers on the right side of the box had to be moved down so that the surge protector could occupy the top position, thereby placing it closest to the incoming line. On December 12, 2013, I came home to a 55 degree house. It should have been 70 degrees. The thermostat said the system was in heating mode but the air coming out of the vents was cold. I went outside and noticed that the heat pump under the deck was not running. The breakers to the heat pump were on. I replaced the two "Littlefuse Class RK5 Time Delay, Dual Element FLNR 30, L1G20F, ND70-67 30 amp fuses made for 250 VAC or less" with two "easyID BP/FRN-R-30ID Cooper Bussmann Indicating Dual-Element, Time-Delay, 250 Vac Cartridge Fuses." I know that's a big mouthful but the main thing is that they look similar and are made for 30 amps. The latter were more expensive because they have an indicator so one can visually determine if the fuse is bad. Otherwise, I don't know how to tell. Anyway, after replacing the fuses, I turned the system back on and nothing changed. I contact Arundel Heating and Cooling who sent Steve Z. out the next morning. He checked things over and determined that both the old and the new fuses were fine. The problem was in the air handler up in the attic. There was a 24 vac heat wire at the module barely on its terminal. He stripped and resecured the wire. The heat pump came back on but only for three minutes. He reset the control board outside, waited though the time delay, the hooked up the gauges. After that, the unit came back on and ran through a 15 minute cycle without shutting off again. I am glad that Arundel Heating and Cooling is very responsive but I am not so sure if I am a fan of Carrier products. This is the fourth time now that I've had problems with it. The concept of geothermal heating and cooling is great, but I don't think I'd choose Carrier again. On the morning of December 14, 2013, we awoke to a cold house. Air was coming out of the vents but it was cold, despite the display saying things were running in heating mode. I called Arundel Heating and Cooling and they sent out Bill M. who arrived later that morning. He determined that the refrigerant was low. He said this sometimes happens with the geothermal systems. I guess it is like air in your tires where the molecules get closer together when it is cold. He added 0.75 pound of refrigerant and this got things back up and running. On the morning of December 15, 2013, we again woke to a cold house. It was the same problem we encountered on the 12th and the 14th. For once, I am regretting that I ever got into the whole "green technlogy." I think we would have been better off just sticking with the old oil boiler. Maybe I will take my words back or regret saying this but as of December 15, this is how I actually feel. I think there are companies out there that push technology that doesn't yet have the bugs worked out. Billy returned to fix the problem. He worked on it for awhile and wasn't able to give me a confident answer as to what the problem might be. He said I should contact the company that drilled the well and ask them to check that the anti-freeze (glycol?) in the closed loop water mixture is at least 15%. I was really worried when he said this because as with all the companies I've seen that install geothermal heat pumps, Arundel Heating and Cooling does not do their own drilling. I was worried that this would just end with finger pointing between two companies with the customer (me) being the victim. He said that if this happens again, I could reset the breaker to the air handler to clear lock outs. The only thing he did was increase the water flow to the maximum. When he says "water," he means the glycol anti-freeze mixture in the closed loop well. He said he would contact the manufacturer tomorrow and then get back to me. I thought about why our heat pump quit working when it did. What made the times when it quit working different than other times. Billy seemed to think that having the thermostat go from 70 to 58 had something to do with it but if it can't handle these temperature fluctuations, then what is the point of having a programmable thermostat? In the work order, he wrote if possible, the temperature setback should be no more than six degrees from the highest set temperature at the thermostat. I thought that maybe the pellet stove might have something to do with it. When it is in the high mode, the temperature can actually get above what the heat pump thermostat is set for. Maybe the heat pump thermostat then shuts off as a safety mechanism because it thinks it is providing too much heat. I decided to test this theory out by abstaining from using the pellet stove. On December 17, 2013, I came home at about 1715. The temperature was 70 degrees as it should have been. Then I went out. I came home around 2030 and the temperature should have still been 70 degrees but it was instead 64 degrees. I put my hand near a vent...cold air. The heat pump thermostat said it was in heating mode but when I went outside, the heat pump was not working. Billy said the next time this happens, I should turn the breaker for the air handler off and wait a few seconds before turning it on again. This should reboot the system. I did that but nothing changed. I tried it again, also switching the breaker off and then on for the heat pump. Still no difference. Why the heat pump quit working when it did is beyond me. It wasn't exceptionally cold...it was about 33 or 34 degrees when it quit working and it was heating things to a toasty warm 70 degrees before it quit working. This discredited my theory about the safety mechanism shutoff. Billy came out again on December 18. He tested various things but found no problems. He did increase the rate of flow of the fluid in the geothermal loop but that was the only change he made. He did not know why my reseting the circuit breaker for the air handler did not reboot the system and clear the lockout. Of course once he left, things were working fine. By the morning of December 19, things were not working again. I think I've gotten a little desensitized to the whole thing as I am not so stressed out anymore. On December 20, a couple of guys from Barlow Drilling came by. They checked the glycol level in the loop. It was indeed 20% so that was not the problem. They checked various other things too. Nothing really stood out as being "the" problem. They noticed that there was ice on the uninsulated part of the "line set" but since the system had been off, that wasn't necessarily unusual. The line set is the thing that the refrigerant runs through. The pressure of the fluid in the geothermal loop was a little low (10 psi) so they added more to bring it up to about 40 psi. Why was it low? When they first installed it (~50-55 psi), they told me that after one full year, that might need to add more. With temperature changes, the pipes expand and contract so this is normal. The operating range is 3-55 psi. The pressure wasn't low enough to indicate a leak or to explain why the heat pump was not working. Norma and I mentioned that we have the system set to 70 in the evening when we are home and 58 when we are asleep. The driller didn't think this would cause the system to shut down but he did feel that it wouldn't run as efficiently as if there was less variance. I changed our temperature setting so that it is a max of 70 and a min of 60. The driller spoke to Billy on the phone who had previously indicated that the system was locking out on freeze protection. Things were running fine when they left. The loop temperature was 53 going into the heat pump and 46 coming out, which is normal for the heating cycle. There was some talk that perhaps the expansion valve is faulty. On December 22, the heat pump quit working again. It might have stopped working earlier than that. It had been pretty warm so we really hadn't been using it for warming. We actually tried to put it in the cooling mode to remove the humidity in the house since Norma had just rented and used a carpet cleaner. I did all the usual stuff: rebooted the air handler at the breaker and listened to the heat pump to see if it was running. Nothing. On December 24, Billy and another guy came out again. They removed the refrigerant from the heat pump (not the geothermal loop) and weighed it to make sure it met factory specifications. In the end, they determined that a control board in the heat pump and the thermal expansion valve (TXV) had to be replaced. They had to order this from Carrier. On January 2, 2014, Billy returned and replaced the thermal expansion value and the control board in the heat pump. Things are up and running again. On January 20, 2014, the heat pump was not running and the house was nine degrees colder than it should have been. Cold air was coming from the vents even though the system was in heating mode. The heat pump was not running. It appears we are having the same problem. Billy was out the next morning. He restarted the system and the heat pump ran but the air it was putting out was lukewarm. Unlike previous issues, there was no sign of lock out and no errors were generated. Thus, it is very difficult for Billy to debug the problem. He said he will return with a thermal camera to check the heating coil in the air handler. On January 23, 2014, John Van Horne came over and we spoke for awhile. Prior to his arrival, he reviewed all the problems I've been having with the heat pump. He was in touch with Chris Moorely, a Carrier technician. They sometimes turn to Chris when confronted with a very difficult problem. If Billy was not able to resolve the problem, then they would see what Chris could do. Arundel Heating and Cooling has installed several Carrier geothermal heat pumps but have not encountered any having as many problems as mine. John assured me that my heat pump was covered under a 10 year parts, compressor, and labor warranty. On January 24, 2014, Billy returned with the thermal imaging camera and resolved the problem. He found a burnt wire to the flow controller where an electrical short had occurred. On February 3, 2014, our heat pump stopped working again. Same symptoms as before. I contacted Arundel Heating and Cooling and they sent out Billy the next day. He said the themal expansion valve went bad again. He said they are sometimes not of very good quality and sometimes it takes a few tries before you get one that is good. Since they were in stock, he could return Thursday to replace the bad one. He did just that and things were back to normal again. I also asked Billy about something I observed the previous week when I was home early. Our thermostat is set to bring the temperature from 60 to 70 degrees at 1700. But it was 1550 and the temperature was 62 degrees and the heat pump was blowing warm air. He said that the heat pump will often start heating up to 90 minutes prior to ensure the desired temperature is reached at the designated time. In other words, it doesn't start heating at the programmed time...it ensures the chosen temperature is achieved at the programmed time. It starts up to 90 minutes prior so it can run in the most energy efficient mode. Good to know. I got Billy to show me how to adjust the threshold at which the oil boiler comes on: I asked him about the "heat source" screen. It gives me three choices: system in control, hot water only, and heat pump only. When I select "heat pump only", the button is not highlighted like the others. But he assured me that it is a valid choice. I mentioned that on September 1, 2013, I tried covering up 75% of the upstairs return. That made the system too noisy though it definitely did increase the amount of air drawn from the basement. I reduced coverage to 50% which still had a noticeable difference in the air taken from the basement but it wasn't sufficient. In November 2013, I ordered Tjernlund Level to Level Aireshare Fan - 75 CFM, Model# ASLL and Tjernlund SWT Switch It Wireless Thermostat for $269.88. In January 2013, I cut a hole in the floor of my office and set things up so that air was pulled from the main floor and forced into the downstairs bedroom. This forces warm air into the downstairs bedroom in the winter so that the oil boiler will be used less to heat the basement. In the summer, it forces dry air into the basement and increases air circulation. In both cases, it creates a high pressure system so that air flows up to the main floor or into the return. The system isn't loud but it isn't silent either. It is definitely moving a lot of air but it hasn't made a noticeable difference in the warmth of the basement during the winter. Still, it must make some difference. One thing I hate about the oil boiler is that it needs ventilation to let in fresh air so it operates efficiently and safely. But that means cold air gets into the house. It seems counterproductive since I am trying to heat the house. Newer boilers ensure the fresh air only gets to the boiler and not the space around it but I'm not willing to make such an investment. When the oil boiler got used a lot, the residual heat from the boiler would heat up the space where the cold air was coming in. But now that it isn't used so much, that space gets very cold. I am concerned that the pipes will freeze. I figured I could invent a vent damper that only opens when the boiler is on. That way, cold air only gets in when it is really needed. After some searching on-line, I found a device invented by our good friends, the Canadians, that does just that. I spoke with a few experts about this device and they thought it was a good idea so I purchaed it from Amazon.com on February 19, 2014. It is called HMI Hoyme Manufacturing Inc. Motorized Fresh Air Damper for Combustion - 6" SF1 for One Heating Appliance. I was planning on installing it myself until I looked closer at the electrical schematic diagram and installation instructions. I had Billy of Arundel Heating and Cooling come out to install it on December 31, 2014 for $265. I spent an additional $7.08 for a rectangular to round ventilation register adaptor so the damper could fit onto the rectangular vent. This significantly reduced the air flow to the outside but as I mentioned earlier, I estimate that I only need 16.5 square inches of ventilation. The damper provides 18.8 square inches (six inch diameter). So if anyting, this downsizing is more like right-sizing. I also added two inch thick styrofoam board insulation around the metal register and wrapped this in Reflectix fire resistant insulation. On October 11, 2014, I submitted an on-line BGE application to be enrolled in the Peak Rewards program. This will give us credits towards our summer energy bill. The technician showed up on October 24 and looked at our system. Because it is a Carrier 230 volt system, it could not be enrolled in the program. It needs to be at least 240 volts. The switch is not compatible. On February 3, 2015, I came home from work to a cold house. The air handler was working but the heat pump was not (typical problem). I switched the breakers for both the air handler and the heat pump off and then on. Once the system rebooted, everything ran fine. I called Arundel Heating and Cooling and they sent out Billy. The problem is that everything was working fine when he arrived. He needs to be able to see the error code to fix the problem. If I reboot the system, the error code gets cleared. So next time, I should just call Arundel Heating and Cooling rather than reboot the system, assuming they can come out soon. On February 18, 2015, we lost heat again. This time we didn't reset anything. Billy came out and made an adjustment to the temperature settings. A couple of days prior, I set "HP lockout" to 15 while "hydronic lockout" was set to 23. Billy changed these to 20 and 23, respectively. On the wee hours of March 6, 2015, it got down to around single digit numbers. The house was cold when I awoke. I called Arundel Heating and Cooling and they sent Billy. He checked things over and determined that the heat pump was fine...it was the oil boiler. He hit the red reset button and it came on but he said it was in desperate need of servicing. I thought we had it serviced last March but maybe not. Perhaps the guy just came out to replace a switch. Billy reset the thermostat so that instead of running in "system control" mode, it is now running in "heat pump only" mode. I tested the boiler myself by adjusting the downstairs thermostat, hitting the reset button, and turning on the boiler. It rumbled hard enough to shake the boiler room and spit out a lot of smoke. After about two seconds of that, I shut it off. I can get it serviced soon or wait until just before next winter. Things should be warming up so we might not need it for awhile. But last year, we had a big snow day on March 17 so you never know. On March 7, 2015, I had the carpets in the house professionally cleaned. The fellow who cleaned them suggested I run the air conditioner to dry things out. I did that for a few hours but it didn't help much, largely because most of the dampness was downstairs. That night I turned on the heat. It wasn't working properly. Only cold air was blowing. I could have waited until Monday and had Billy come back but with it being Saturday, I didn't want to wait so I just flipped the breakers off and then on. That fixed things. On March 13, 2015, Laurel Oil and Fuel came out to perform service and maintenance on our boiler. It cost $151.15. On March 20, 2015, Norma noticed that the oil boiler was not working. She called up Laurel Oil and Fuel. They sent someone out that day. The flame retention ring of the gun assembly had fallen off. That is why it wouldn't start. The serviceman pressed it back in. There is no other way to keep it in so if it falls off again, then we will need a new burner. They may have some reconditioned ones which would cost $300-$400 to buy and have installed. Or, a new one and be bought and installed for $1,000. Based on my previous conversations with Scott, a new burner could improve the efficiency of our boiler. There was no charge for this service since we recently had maintenance performed. On March 30, 2015, Norma came home to a cold house. Air was blowing out the vents but it was cold. The next day, Billy came out. He determined that there was a leak in the evaporator coil. He ordered a new one. On April 3, Billy returned and replaced the defective part. No charge. On May 31, 2015, we turned on the air conditioner for the first time this year. It blew cold air just fine for awhile. After a few hours, the air wasn't cold and the heat pump quit working. I reset the circuit breakers and once again cold air blew but only for about an hour. The heat pump stopped again. Billy came out on June 1, 2015. He could not identify the problem but thought it could be the newer refrigerant he used the last time he serviced the unit. He gave me his cell phone number and asked me to call him directly the next time the problem occurs. We have some cool days coming up so that might not be for awhile. He returned on June 9 and removed refrigerant after finding the system over charged. On August 30, 2015, the heat pump quit cooling. It might have started earlier but we didn't notice it until then because we had some nice days that didn't require us to use the heat pump. Unlike previous periods of inoperability, both the air handler and the heat pump were running. Before, the heat pump always quit. I contacted Arundel Heating and Cooling the next day and they sent Billy out that afternoon. He found that our Puron refrigerant was about two pounds low. He checked for a leak but couldn't find it. He replaced the refrigerant and then things worked fine. On August 31, 2015, the air handler was blowing warm air when it should have been cold. Billy came out the next day. He found the system to be totally out of refrigerant. A major leak was found in the evaporator coil. This part was replaced previously but found to be defective again. Billy returned on September 2 and replaced the evaporator coil. He charged the system with six pounds and three ounces of 410A refrigerant. Things were fine after that. On November 17, 2015, the air handler was blowing cool air when it should have been warm. Billy came out the next day. He found the thermal expansion value to be defective. The part was ordered. On November 25, he returned and replaced it (for the third time!). On September 9, 2016, things stopped working. Unlike before, even the console went black. Then a few hours later, everything came on. I wasn't home at the time but Norma was. The next morning, someone from Arundel Heating and Cooling came out to check things out. There were no error codes in the system. In the attic, the drain line was clean but a couple of wires were loose. These are wires near the drain line cleaning tube that run outside the air handler. They are held together with nuts. These wires were in contact but may have had a bad connection. So they were tightened up. The technician showed me the drain line. He said I could pour some bleach down the cleaning tube every once in awhile to clean it if I want but it was looking pretty clean even though it had never been cleaned. A clear 'U' shaped section shows if water has accummulated and none has. There is a brush next to the cleaning tube that I can use to scrub things but he said I should not push the brush in any more than needed because I could hit the plunger, which appears as a very small black square button on a red circle. Down below, the technician checked the drain pipe near the heat pump. Water had been coming out as one would expect on such hot, humid days as we've had. But there was debris in the tube which could have prevented water from draining out easily. So the technician went back to the attic and blew out the debris to ensure the water drain line was clear. In late December 2016, the heating system wasn't producing very hot air. It was more warm than hot. So on December 23, I reached out to Arundel Heating and Cooling. Billy came out later that day. He said the system was low in refrigerant so he added a half pound of R410-a and that fixed things. While Carrier has produced many good systems, it sounds like this particular generation of products has had difficulties. On February 2, 2017 the heating system wasn't putting out enough heat. Billy came out the next day and checked the system. He changed the cubic feet per minute air flow so more air blew. But then the air didn't seem hot enough. So Billy returned on February 7, 2017. He adjusted the air flow to 675 cubic feet per minute to increase pick up across the indoor coil. This resolved the issue. On September 29, 2017, the oil boiler was serviced. On July 22, 2020, we had a storm that knocked out the power. When it returned, the system wasn't putting out cool air. Billy came out the next day and said that the pump for the geothermal loop is burned up so the coolant is not circulating. It was due to lightning damage. I guess this makes sense since our whole house surge protector doesn't protect things outside and Billy said there is nothing that can be done to prevent such damage. He can't determine if there are other issues because things are too hot and there are safety shutoff mechanisms when this occurs. He ordered this part from Carrier. This part is covered under the Carrier 10 year warranty. The part arrived July 29, 2020. Billy installed it and everything was good. On September 15, 2021, the oil boiler was serviced and we purchased 168.2 gallons of oil at $3.43 per gallon. The total cost for the oil was $575.93 while the servicing and maintenance of the boiler cost $198. Around December 2023, we had the oil boiler serviced and purchased oil. It is definitely showing its age. Around this same time, we had a major home renovation done. I had Arundel Heating and Cooling add two ducts to blow air into the basement. They tapped into the air handler in the attic and ran the ducts on the east side of our chimney on the main floor. I then built a bookcase to hide these ducts. I just had them run the ducts into the boiler room. Then I finished the job, installing ducts that ran to vents in the rooms to the south and north sides of the boiler room (our entertainment room and spare bedroom, respectively). On July 8, 2024, the power went out. There wasn't a storm but I heard a branch fell in Baldwin Common that knocked out a transformer. Our air handler was working but the air was not cool. After resetting the breakers, I could hear the heat pump turn on briefly so I knew it was getting power. Billy came out and looked at things. He said the pump for the geothermal loop quit working. Unlike the last time, this was a mechanical failure...not an electrical one. At first, we were told it would take eight weeks to get a new part but a "workaround" was found. I guess that means they found a different pump that would work. Billy installed it on July 12, 2024 and got things running. Things are no longer under warranty so it cost me $1,473 for the initial diagnosis, the part, and a second visit to replace the part. The name of the part is "flow control circulator." |
|
Having owned a geothermal heating and cooling system for a few years, I have my opinions about it.
Advantages
Disadvantages
|
|
On or before June 12, 2012, the Maryland Energy Administration stated the following in Residential Clean Energy Grant Program:
With 2012 HB 1186 [also see hb1186], Maryland became the first state in the country to make the energy generated by geothermal heating and cooling (GHC) technologies eligible for the [renewable portfolio standard] RPS as a Tier 1 renewable source. To qualify, the GHC technologies must meet ENERGY STAR standards and displace electric or non-natural gas heating and/or old and presumed inefficient air conditioning. Homeowners will be eligible to receive Renewable Energy Credits (RECs) for GHC systems that are commissioned on or after January 1, 2013. For more information, see Maryland Energy Administration - Geothermal Heating and Cooling. The paperwork to apply for this program was submitted by me on April 30, 2013. On July 12, 2013, I received a letter from the State of Maryland Public Service Commission stating that my application for certification as a Geothermal Heating and Cooling Renewable Energy Facility (REF) for the Maryland Renewable Energy Portfolio Standard Program was approved. On July 13, 2013, I set up an account for myself at PJM Environmental Information Services (EIS) Home. I have no idea what PJM stands for. RECs services are administrated through the Generation Attribute Tracking System (GATS), which is owned and operated by PJM EIS. On July 16, 2013, I registered my generator unit information. On July 30, 2013, my system was registered as an approved facility. On August 8-13, 2013, Kevin Lucas, Director of Energy Market Strategies for Maryland Energy Administration, told me that mine is the first geothermal system that has been registered in Maryland. That being the case, it was a little challenging to get things figured out with submitting information on-line and making sense of things on the PJM EIS website. This was new for all of us. But I was told by Kevin that my system would generate 7.62 RECs per year and that it is a 7.03 kW system. Recall that I mentioned Maryland became the first state in the country to make the energy generated by geothermal heating and cooling (GHC) technologies eligible for the RPS as a Tier 1 renewable source. Combine this with the fact that my system is the first geothermal system that has been registered in Maryland and it is safe to say that my system is the first in the country to be approved to generate geothermal RECs. The "Residential Geothermal Heating and Cooling" form that lists my "Maryland Renewable Energy Facility Certificate Number" also lists my "Total of Climate Master Heating and Cooling Savings" (aka Coolmaster report) which shows a saving of 7,618 kWh (~7.62 MWh) a year. This is my geothermal "generation" and is what should be used to enter info into GATS. On my PJM-EIS page, under "Asset Management," I was thinking that I would click on "Enter Generation" and then under "Geothermal Generation (MWh)," enter 7.618/12 = 0.63483333 as my monthly generation but this table only allows me to enter in whole numbers and it expects MWh. Also on my PJM-EIS page, under "Asset Management," I can click on "Upload kWh Generation," then click on "Enter generation as text." I should then be able to enter my monthly info according to "actual generation." If all goes well, it will allow me to enter 7,618/12 = 635 (rounded). Kevin felt this was the best choice: "As long as you keep the units of measure correct, you should end up with 7.62 RECs per year." Thus, for January through July 2013, I tried to enter the following: 73802,,635,,01/2013 73802,,635,,02/2013 73802,,635,,03/2013 73802,,635,,04/2013 73802,,635,,05/2013 73802,,635,,06/2013 73802,,635,,07/2013 Unfortunately, this was rejected with the following error message: No data was loaded. Please resolve your errors and try again. Error - Line #1, Facility ID 73802: Facility enters generation in MWh; Kevin Lucas suggested I contact the GATS help desk so on August 19, 2013, I sent them an e-mail and also contacted them via their "contact us" page. I heard back from them with the following reply: We do not track Geo-Thermal at the KWH level, only the MWh level. Each month you will need to track your data and any remainders. For a month that does not have a full MWh of generation accumulated...you will just leave that month blank. For each month you do have a full MWh of generation tracked you would enter "1" and keep track of the remainder. Hence, under the "Asset Management" section, I pulled up the "Enter Generation" page and then entered the following for my MWh generation in 2013. In parenthesis are my cumulative MWh generation which do not appear on the page but is instead for my own personal use. January: 0 (0.635) February: 1 (1.27) March: 0 (1.905) April: 1 (2.54) May: 1 (3.175) June: 0 (3.81) July: 1 (4.445) August: 1 (5.08) September: 0 (5.715) October: 1 (6.35) November: 0 (6.985) December: 1 (7.62) This was done on August 24, 2013. In September 2013, I noticed that my GRECs (I don't know what they are actually called but that's what I'm calling them) appeared in the system. The next step is learning how to sell them. I asked about that and received the following reply. We create RECS once per month (the same as SRECS). We will process your generation and the RECS will be placed in your CEPS section of your account. There is training materials in your account to assist you as well. Please log into your account and at the bottom of the main page, you will see a "Training and Reference Materials" section. There is information there about selling RECS. We do not get involved in the selling process nor can we advise you on a purchaser. Under the "Training and Reference Material" section on the user main page upon login page, I clicked on "GATS Solution Aid - Transferring (S)RECs." This pulled up "Transferring RECs & Posting to the Bulletin Board" which I read. I also read How do I sell RECs?. Then, on November 11, 2013, I posted two of my GRECs for sale, one for $150 and the other for $200. That same day, I reached out to the only buyer listed on the bulletin board for geothermal RECs in Maryland, Ronnie B. of Spectron Energy. I never heard back from him. I also contacted Kevin F., the Director of Operations of Flett Exchange. He got back to me quickly but so far, he has not found me a buyer. I am quite certain I am asking for way too much money but the truth of the matter is that I really have no idea how much these GRECs are worth. On November 28, 2013, I changed these prices to $150 and $100. After not hearing from anyone, I sent out an e-mail to a variety of sources, most of which were listed on the PJM-EIS bulletin board as just buying SRECs. I was hoping that they might also be interested in GRECs or at least be able to point me in the right direction. I have yet to hear from anyone that can help. It seems silly that the government allows me to generate and sell GRECs when there are no buyers. On February 27, 2014, I lowered my GREC prices to $100 and $75. I checked to see who else was selling GRECs. Out of 1,470 entries, I was the only one selling them. Also on February 27, 2014, I contacted a Customer Support Analyst at the PJM - EIS Environmental Information Services Inc. I asked about the expiration date of the GRECs. I was told The solar thermal certificates have a three reporting year "life-time". The three reporting years is based on the month and year that the certificate is created. On May 1, 2014, I lowered my GREC prices to $50 and $25. In 2014, my GREC generation is as follows: January: 1 (8.255) February: 0 (8.89) March: 1 (9.525) April: 1 (10.16) May: 0 (10.795) June: 1 (11.43) July: 1 (12.065) August: 0 (12.7) September: 1 (13.335) October: 0 (13.97) November: 1 (14.605) December: 1 (15.24) Mr. Robert W. informed me of various brokerages that can manage GRECs: I reached out to Steve Mapp on September 13, 2014 to inquire about his company and GREC management. It looks like GRECs sell for $14-15. This is considerably less than what solar renewable energy credits (SRECs) sell for. Also on September 13, 2014, I reached out to Kevin Lucas to confirm that I am being allocated the correct number of GRECs. I had a couple of people inform me that they thought I should be receiving more. Kevin got back to me promptly and let me know that Marta Tomic would be looking into this. Marta is the Clean Energy Program Manager for the Maryland Energy Administration. Marta got back to me on September 29 with a thoroughly written e-mail informing me that the number of GRECs I am being allowed to record annually is indeed correct. In 2015, my GREC generation is as follows: January: 0 (15.875) February: 1 (16.51) March: 1 (17.145) April: 0 (17.78) May: 1 (18.415) June: 1 (19.05) July: 0 (19.685) August: 1 (20.32) September: 0 (20.955) October: 1 (21.59) November: 1 (22.225) December: 0 (22.86) The PJM Environmental Information Services (EIS) Home website changed and it was rather confusing for me to make my GREC entries. Below, I included a screenshot of the webpage that illustrates how to get to the page to make this entry. 
On February 28, 2015, a small group of us organized through Robert W. sold our GRECs to Carbon Solutions Group. Each GREC sold for $15.25. I sold 14 of them so I got a check for $213.50. Selling the GRECs wasn't too difficult after things get pointed out from someone that has done it before. Here are my instructions: 
In 2016, my GREC generation is as follows: January: 1 (23.495) February: 1 (24.13) March: 0 (24.765) April: 1 (25.4) May: 1 (26.035) June: 0 (26.67) July: 1 (27.305) August: 0 (27.94) September: 1 (28.575) October: 1 (29.21) November: 0 (29.845) December: 1 (30.48) In 2017, my GREC generation is as follows: January: 1 (31.115) February: 0 (31.75) March: 1 (32.385) April: 1 (33.02) May: 0 (33.655) June: 1 (34.29) July: 0 (34.925) August: 1 (35.56) September: 1 (36.195) October: 0 (36.83) November: 1 (37.465) December: 1 (38.1) In 2018, my GREC generation is as follows: January: 0 (38.735) February: 1 (39.37) March: 1 (40.005) April: 0 (40.64) May: 1 (41.275) June: 0 (41.91) July: 1 (42.545) August: 1 (43.18) September: 0 (43.815) October: 1 (44.45) November: 1 (45.085) December: 0 (45.72) In 2019, my GREC generation is as follows: January: 1 (46.355) February: 0 (46.99) March: 1 (47.625) April: 1 (48.26) May: 0 (48.895) June: 1 (49.53) July: 1 (50.165) August: 0 (50.8) September: 1 (51.435) October: 1 (52.07) November: 0 (52.705) December: 1 (53.975) In 2020, my GREC generation is as follows: January: 1 (54.61) February: 1 (55.245) March: 0 (55.88) April: 1 (56.515) May: 1 (57.15) June: 0 (57.785) July: 1 (58.42) August: 1 (59.055) September: 0 (59.69) October: 1 (60.325) November: 0 (60.96) December: 1 (61.595) On January 30, 2021, I sold 23 GRECs to Carbon Solutions Group for $267.70. I worked with Kory Trapp (ktrapp at carbonsolutionsgroup.com). He said they could only take GRECs dating back to 2018. His company paid me via PayPal. In 2021, my GREC generation is as follows: January: 1 (62.23) February: 0 (62.865) March: 1 (63.5) April: 1 (64.135) May: 0 (64.77) June: 1 (65.405) July: 1 (66.04) August: 0 (66.675) September: 1 (67.31) October: 0 (67.945) November: 1 (68.58) December: 1 (69.215) In 2022, my GREC generation is as follows: January: 0 (69.85) February: 1 (70.485) March: 1 (71.12) April: 0 (71.755) May: 1 (72.39) June: 1 (73.025) July: 0 (73.66) August: 1 (74.295) September: 0 (74.93) October: 1 (75.565) November: 1 (76.2) December: 0 (76.835) Between mid-March and early May 2022, I was in contact with Wade S. of Clearpath Renewables. He set things up so that his company would managed my RECs, earning a commission. I started receiving payments on May 4, 2022. Wade determined that I should be receiving 22 GRECs per year. He submitted the paperwork to get this changed and as of June 10, 2022, my system was upgraded so that it would generate 22 RECs per year. Since signing on with Wade, I let him take care of the selling of my GRECs and he periodically sends me money which is deposited to my bank account. It is all very seamless. In October 2023, I was given $27.50 per GREC (that's after Clearpath Renewables took their share). Note that GREC values fluctuate. In 2023, I sold 16 GRECs, earning a total of $435.50. |
|
So was it worth it to have a geothermal heating and cooling system installed?
Costs
Payback
Energy savings
|
|
In Critique - Disadvantages, I mentioned that forced air heat doesn't feel as warm as baseboard heat. Norma was quick to point that out to me. She prefers the feel of baseboard heat while I prefer the monetary savings and less dependence on fossil fuels associated with a geothermal heat pump.
We eventually came to what we considered a good solution. We would purchase a fireplace insert. When we bought our house, it came with a fireplace which we never used. We had discussed the possibility of getting an insert and figured that now was the time. What kind of insert?
Choosing a pellet stove
Critique
Water in the chimney
Pellets
Payback
Critique
|
|
In 2021, Norma and I discussed home renovations. These changes would mean displacement of some of the baseboard heaters. It was a good time to consider updates to our HVAC system. Perhaps the biggest consideration was replacing our old boiler with a new one.
I estimated that during the 2011-2012 winter, our geothermal heating system produced 18,616,240 BTU. Based on December 2011 oil costs, it would have taken 187.15 gallons of oil, costing $705.56 to produce 18,616,240 BTU of heat. Boiler maintenance is not included. This means one gallon of oil produces about 99,472 BTU of heat with one gallon of heating oil costing $3.77. For my old rental townhouse, my tenants paid a fixed charge of about $15 per month, regardless of how much gas they used. If we pay the same, heat the house half the year, and don't use gas for anything else, then that means we would be paying 6x$15=$90 per year to use gas even though we aren't using it. I elaborate on this in Water Heating - On-demand (tankless). The geothermal heat pump provides one million BTUs for $8.60. According to the Howard County energy information sheet that Norma photographed in 2021, Our 2012-2013 winter heating cost to include electricity for the heat pump and oil for the oil boiler came to $146.60 (for geothermal heat pump) + $138.96 (for oil boiler at $3.77 per gallon) = $285.56. The oil boiler cost does not include maintenance. Note that the 2012-2013 winter was 24% colder than the 2011-2012 winter. In this case, we used 36.86 gallons of oil which produced 3,666,480 BTU of heat. The geothermal system provided just over 17 million BTU of heat. So oil provided about 21.5% of our heat, in terms of BTUs but accounted for ~49% of our heating cost. A total of 20,666,480 BTU of heat was used to get us through the winter of 2012-2013. So how much does 3,666,480 BTU cost? But we may not need to generate as many BTUs with an electric boiler. Gas and oiler boilers need to be vented to the outside. This means they need fresh air intake from the outside. During the winter, this equates to letting cold air in. But electric boilers don't need to be vented so the house will stay better insulated. I can't say numerically what the difference would be but there would be some difference in how many BTUs are needed between a vented and non-vented system. So why are we considering an electric boiler? I always say that if you are going to use gas, then use it for as much stuff as you can because you pay the delivery charge regardless if you use a lot or none at all. Norma used to be a fan of gas for cooking until she started reading about a new technology for electric cooking called induction heating. After that, gas wasn't as appealing to her. Gas is still cheaper in many ways but it is a fossil fuel and we would like to reduce our dependence on fossil fuels. So electric boilers are back on the table. Electric boiler heat may be more expensive but if it is your secondary heating source and you don't expect to use it much, then it might be worthwhile. In 2013, we had two ducts run to the basement to provide geothermal heat pump air to spaces which had none previously. This means the percent and number of BTUs needed to heat the house that come from a source other than the heat pump should be significantly less. This further supports the argument for getting an electric boiler. |
|
Having a highly efficient heating system is just one part of the big picture.
When Norma and I bought our house in December 2009, we looked at the orientation of the garage roof and the fact that there were no trees around it. We both knew it would be a good place to mount solar panels. In our first three years of ownership, I added attic insulation and rain barrels/boxes. I also paid to have photovoltaic solar panels installed. Now we have geothermal heating and cooling. Later I invested in solar water heating. Why bother? The up-front cost for all this is pretty significant. With all the tax incentives, energy savings, and increased property value, I feel it is worth it though one might argue that if I was really interested in making money, I could have just put that money into the stock market. True. But there is much more to this than just making or saving money. What I am doing is a proof-of-concept for how a 1952, small house can be retrofitted with energy saving devices that pay for themselves. All too often, I see expensive new homes featured in magazines that are built with the latest "green" technology. Rarely do I see the final cost associated with construction. Such homes are not for the average middle-income family. But our house is. And unlike many places that just talk about "green" and "environmentally friendly" alternatives, I actually tell you how much I've spent and saved. Homes are expensive. So why pay expensive monthly fees for heating, electricity, water, internet, cable T.V., phone service, and homeowner association (HOA) fees? Why not look for ways you can reduce your living expenses rather than buy the latest and greatest of everything? Then you can take that money you save and use it to invest in more ways to further reduce your expenses. There are still plenty of ways we can reduce our monthly spending. I'm always looking for more. Ideally, I'd like to have a net-zero home. I don't think we will ever get there but I'd like to get close. A zero-energy building, also known as a zero net energy (ZNE) building, net-zero energy building (NZEB), or net zero building, is a building with zero net energy consumption and zero carbon emissions annually. - from Wikipedia - Zero-energy building So what is my big picture? |


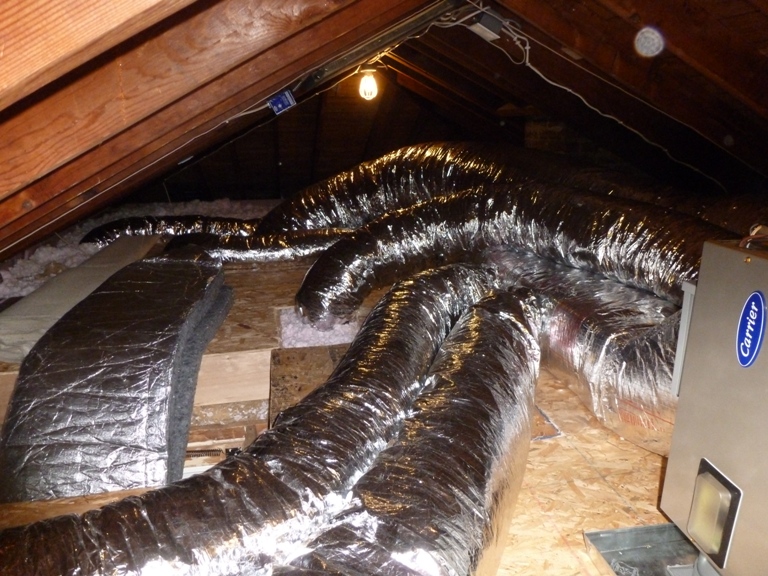

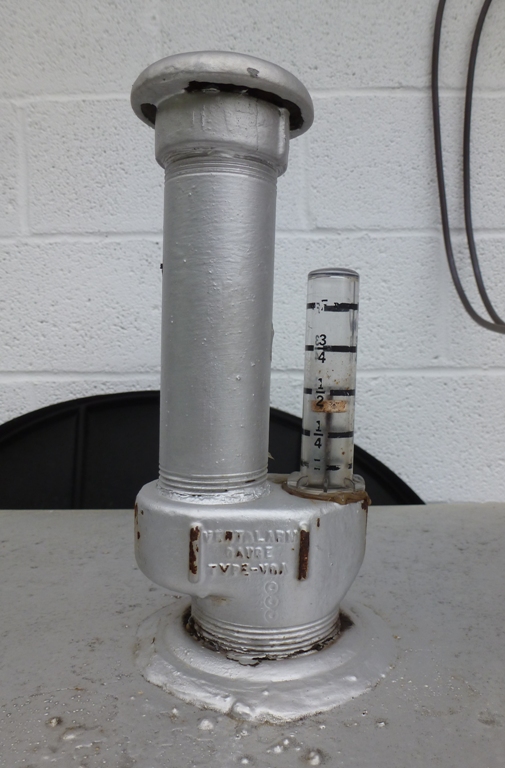
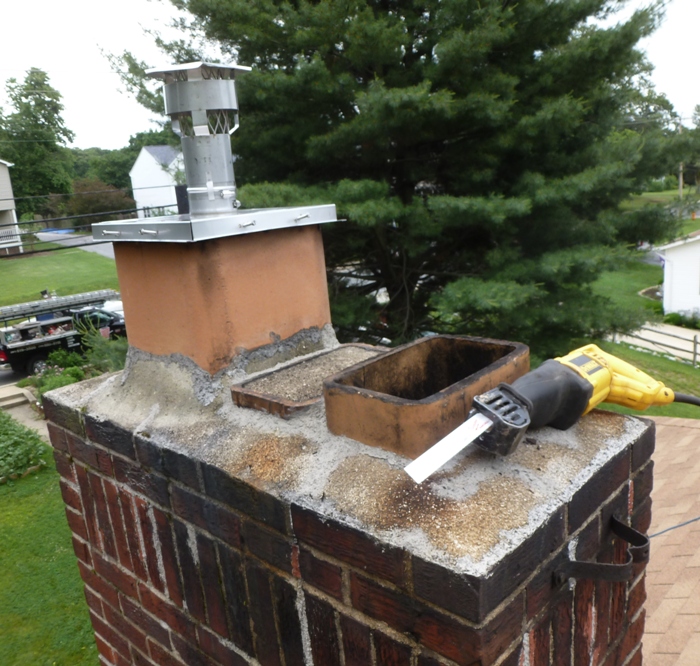
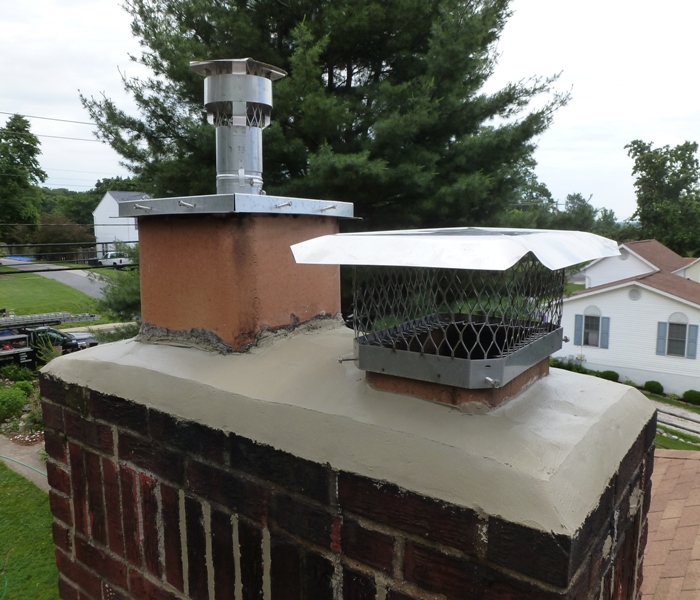
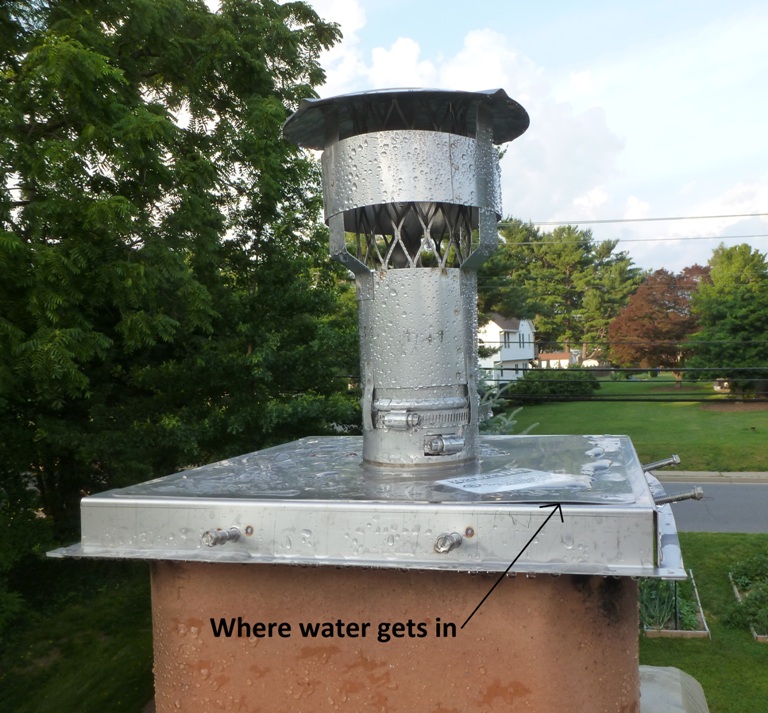

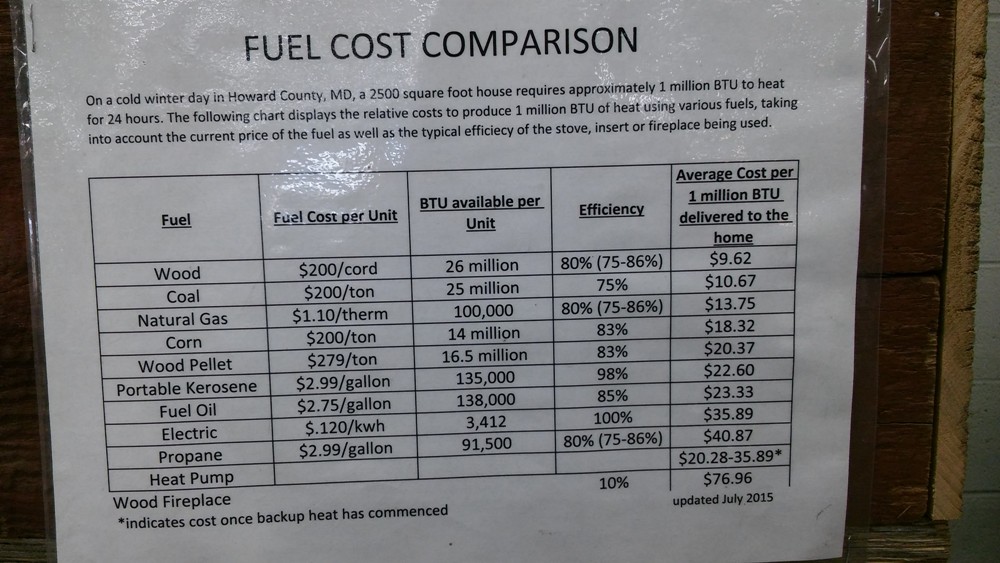